CorvetteForum - Chevrolet Corvette Forum Discussion
  • LOG IN
  • REGISTER
  • Forums
    • New Member
      • Intros
    • In Memoriam
      • In loving memory of lost CorvetteForum Brothers and Sisters
    • C8 Corvette
      • C8 Stingray/General Discussion
      • C8 Z06 Discussion
      • C8 Grand Sport Discussion
      • C8 ZR1 Discussion
      • C8 ERay/GSX/ZR1X
      • C8 Tech/Performance
      • C8 Forced Induction/Nitrous
      • C8 Corvettes for Sale
      • C8 Parts for Sale/Wanted
      • C8 Dealer Inventory
      • C8 Vendor for Sale
    • C7 Corvette, 2014 - 2019
      • C7 General Discussion
      • C7 Z06 Discussion
      • C7 ZR1 Discussion
      • C7 Tech/Performance
      • C7 Forced Induction/Nitrous
      • C7 Dealer Inventory
      • C7 Corvettes for Sale
      • C7 Parts for Sale/Wanted
      • C7 Vendor for Sale
    • C6 Corvette, 2005 - 2013
      • C6 Corvette General Discussion
      • C6 Corvette ZR1 & Z06
      • C6 Tech/Performance
      • C6 Scan & Tune
      • C6 Forced Induction/Nitrous
      • C6 Dealer Inventory
      • C6 Corvettes for Sale
      • C6 Parts for Sale/Wanted
      • C6 Vendor for Sale
    • C5 Corvettes, 1997 - 2004
      • C5 General
      • C5 Tech
      • C5 Scan & Tune
      • C5 Forced Induction/Nitrous
      • Performance Results
      • C5 Corvettes for Sale
      • C5 Parts for Sale/Wanted
      • C5 Vendor for Sale
    • C4 Corvettes, 1984 - 1996
      • C4 General Discussion
      • C4 Tech/Performance
      • C4 ZR-1 Discussion
      • C4s for Sale/Wanted
      • C4 Parts for Sale/Wanted
      • C4 Vendor for Sale
    • C3 Corvettes, 1968 - 1982
      • C3 General
      • C3 Tech/Performance
      • C3s for Sale/Wanted
      • C3 Parts for Sale/Wanted
      • C3 Vendor for Sale
    • C1 & C2 Corvettes, 1953 - 1967
      • C1 & C2 Corvettes
      • C1 & C2 Corvettes for Sale/Wanted
      • C1 & C2 Parts
      • C1 & C2 Vendor for Sale
    • General Corvette Topics
      • Autocrossing & Roadracing
      • Drag Racing
      • Wheels & Tires
      • Car Care Discussion
      • Audio/Electronics
      • Engine Mods
      • Factory Correct Resto
      • Paint/Body
      • Auto Extras & Memorabilia
    • Upcoming Events and Regional Discussion
      • National Events
      • NMCA C4/C5/C6 Shootout
      • Northeast
      • Southeast
      • Great Lakes
      • Northern California
      • Southern California
      • Pacific Northwest
      • Southwest
      • Mountain - Prairie
      • Canadian Events
      • Other Country Events
    • Off Topic
      • Photography
      • F-Body General Discussion
      • Other Cars
    • Professional News, Articles, and Tips
      • Ask Tadge
      • Ken's Newsletters
      • CorvetteForum Newsletter Archive
    • Help & Feedback
      • Help Forum
      • Forum Guidelines and Rules
      • Transactions Feedback
      • Testing
  • News
  • Marketplace
    • Vendor Directory
    • Become a Vendor
    • CorvetteForum Store
  • Tools
    • Car Payment Calculator
    • Tire Rim Calculator
    • Vin Decoder
    • Recalls
    • Technical Service Bulletins (TSBs)
    • Members List
    • Live Feed
  • New Posts
  • How-Tos
  • Gallery
  • View Dark Mode
    • Please register or login to enable Dark Mode.
  • Log In
  • Register
CorvetteForum - Chevrolet Corvette Forum Discussion
    • Threads
      • Advanced
Dark Mode

Please register or login to enable Dark Mode.

Log In

Forgot your Password?

By logging into your account, you agree to our Terms of Use and Privacy Policy, and to the use of cookies as described therein.
or
 
  • Recent
  • Commented
  • Albums
  • My Pictures

My Post Pictures

R66
December 12, 2015
 792
 0
Sort:
Most Recent
  • Default
  • Most Recent
What color highlights would you use in the valleys between the ribs.
0 2019/10/26 06:29:50 R66
Carb set on the stack.
0 2019/10/13 04:10:03 R66
One large aluminum shield on the bottom, then a gasket, then a aluminum spacer same as the gasket then another aluminum then the gasket.
0 2019/10/13 04:09:57 R66
Multimeter Collection less a couple I gave away.
0 2019/09/17 07:06:07 R66
Learning about these meters
0 2019/09/17 07:00:13 R66
Junk aluminum channel
0 2019/08/20 18:05:18 R66
Painted the channel black to minimize the visability.
0 2019/08/20 18:05:13 R66
Fire extinguisher hung on partition
0 2019/08/20 18:04:57 R66
Square hole in the housing behind the bezel at the locked and unlocked positions.
0 2019/07/31 18:25:30 R66
Metal pall retaining the lock cylinder (at the end of the toothpick)
0 2019/07/31 18:25:23 R66
With the new bushings, spacers, and exhaust hangers, I am hoping to have gained the clearance I need for RED NECK CRUISES thru the country. I may remove the spare and buy a can of Fix-a-Flat to remove the weight on the spring. 

Now back to the rear suspension alignment. 

Thanks for the input.

Ron
With the new bushings, spacers, and exhaust hangers, I am hoping to have gained the clearance I need for RED NECK CRUISES thru the country. I may remove the spare and buy a can of Fix-a-Flat to remove the weight on the spring. Now back to the rear suspension alignment. Thanks for the input. Ron
0 2019/06/24 04:13:29 R66
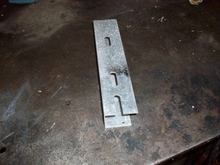
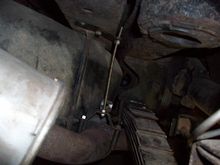
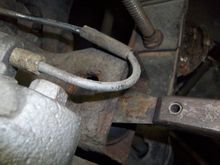
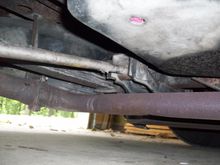
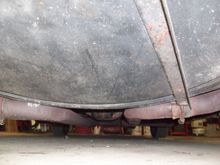
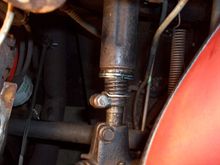
I then turned my thoughts to the exhaust system. The driver’s side pipe had once again sagged down as a few had noted - thanks. Taking lessons lessons from Jim, I added BUBBA hangers at the elbow behind the rear spring. I didn’t want to drill or modify the frame or anything, so used HOARDED JUNK I had laying around to attach the hanger to the frame. I pulled the pipes to within 1/2” of the spring. If this works, I will probably buy the aftermarket hangers to make it look more PRO.
0 2019/06/24 04:13:10 R66
I ended up using a putty knife to keep the bolt head below the top inside of the trailing arm while I assembled things. Just a note for anyone thinking of adding spacers to the top of the bolt.
0 2019/06/24 04:12:54 R66
So, I got the new Willcox bushings in after a bit of a struggle. I added 1/4” washers top and bottom to give it a little lift and give a better fit on the 1/2” bolt. The washer on top required the new bushing to be compressed a bit to fit inside the trailing arm and allow the bolt to pivot to align with the hole in the spring.
0 2019/06/24 04:12:23 R66
Homemade bracket to hold it to the hood latch. No positive vs negative discussions please.
0 2019/06/15 08:48:42 R66
About 1 in. under the spring at the mount.
0 2019/06/14 19:12:14 R66
Don't know why the driver's side is slightly lower than the passenger's side.
0 2019/06/14 19:10:22 R66
Two large (1-1/4" dia.) washers against the bearing outer race.
0 2019/06/07 11:59:39 R66
After placing the new BUBBA grommet in place, I glued the second ring on the bottom.

Although rather ugly yellow, they are much more durable and last longer than the cheap aftermarket grommets. A white pipe of the correct O.D. would be better, but yellow functions until I find the right stuff.
After placing the new BUBBA grommet in place, I glued the second ring on the bottom. Although rather ugly yellow, they are much more durable and last longer than the cheap aftermarket grommets. A white pipe of the correct O.D. would be better, but yellow functions until I find the right stuff.
0 2019/05/31 20:22:34 R66
Bevel the inside of the pipe to aid guiding the pin in
0 2019/05/31 20:22:27 R66
Fitup of rings on the nipple
0 2019/05/31 20:22:14 R66
 took a piece of 1/2 in. sch. 40 CPVC pipe and cut 2 pieces (nipples) 3/4” long. Then I cut 4 each 1/8” long rings from a 1/2” coupling. I used a miter saw, but your tool may be better.

I glued one of the rings on the end of the short nipples and then beveled the inside to the pipe to aid guiding the pin thru the grommet.
took a piece of 1/2 in. sch. 40 CPVC pipe and cut 2 pieces (nipples) 3/4” long. Then I cut 4 each 1/8” long rings from a 1/2” coupling. I used a miter saw, but your tool may be better. I glued one of the rings on the end of the short nipples and then beveled the inside to the pipe to aid guiding the pin thru the grommet.
0 2019/05/31 20:22:00 R66
~3/8" gap between shifter shaft and reverse lockout sleeve exposing sharp edge on sleeve.
0 2019/05/08 05:31:41 R66
0 2019/05/08 05:31:36 R66
72 FWD. 383 Auto. Owner complained about 6 MPG.
0 2019/04/29 04:10:39 R66
30 something Chevy P/U. Almost flawless
0 2019/04/29 04:10:32 R66
60 El Camino needs work, but it is coming along.
0 2019/04/29 04:10:26 R66
Third brake light (chevy emblem) looked right at home.
0 2019/04/29 04:10:13 R66
55 resto mod - 355 auto nicely done
0 2019/04/29 04:09:55 R66
72 (I think) C10 4WD nice 383 400 TH
0 2019/04/27 18:59:05 R66
30 something restored Chevy Pickup - didn't guess the year - nicely done - near perfect
0 2019/04/27 18:58:48 R66
55 Resto Mod profile 350 Auto
0 2019/04/27 18:58:32 R66
60 El Camino - 283 PG
0 2019/04/27 18:58:15 R66
55 Resto Mod done well.
0 2019/04/27 18:57:58 R66
55 Chevy emblem - Don't recall if it was just trunk lid or hood also.
0 2019/04/14 08:03:56 R66
66 fender emblems - 1/2 bowtie in 1/2 of 55 outlined design
0 2019/04/14 08:03:40 R66
66 nose emblem - 1/2 bowtie & family crest?
0 2019/04/14 08:03:18 R66
Bad picture, but the contact is a piece of brass bent almost 180 degrees and needs to be spread out to assure a good connection.
0 2019/03/28 03:59:01 R66
See the tab on the lug? You may have to bend it back out slightly to get it to engage firmly when reinstalling the contact(lug).
0 2019/03/28 03:57:20 R66
Pull the wire and lug out from the back while holding the tool down in the connector.
0 2019/03/28 03:55:32 R66
First
Page
18 of 20
Last
Go To
Page
  • 1
  • ...
  • 14
  • 15
  • 16
  • 17
  • 18
  • 19
  • 20
18 of 20
Go To GO
Go to page of 20 pages
  • 1
  • ...
  • 14
  • 15
  • 16
  • 17
  • 18
  • 19
  • 20

Top
CorvetteForum - Chevrolet Corvette Forum Discussion
  • Contact Us
  • FAQ
  • Archive
  • Advertising
  • Cookie Policy
  • Privacy Statement
  • Terms of Service
  • About Us
  • Your Privacy Choices
  • Manage Preferences

© 2026 MH Sub I, LLC dba Internet Brands

Follow Us        


When you click on links to various merchants on this site and make a purchase, this can result in this site earning a commission. Affiliate programs and affiliations include, but are not limited to, the eBay Partner Network.