


Alignment help (pic's)

Thread Starter
Instructor

Joined: May 2013
Posts: 158
Likes: 1
From: Ct
1st let me say I bought the car in 84. Restored it it 93. Nut and bolt. Complete born with car that had 60K on it. 8,000 miles since restoration. 2 yrs ago it started wandering and last season it seemed worse. I decided to try and adjust it to get in 2 more rides before winter sets in.. Big mistake.. Car was all over the road, actually scary to drive at speed. Come to find out the tires were severely worn on the inside. Over winter I purchased new tires. Had alignment done yesterday. Still wonders and gets worse the faster I go though much better. I've searched the forum and read many threads. Still are unsure what the specs should be. Her e is a picture of the print out and the one from the AM. The align. shop said the AM specs weren't clear enough so they went to internet. What spec should I bring back to the shop?
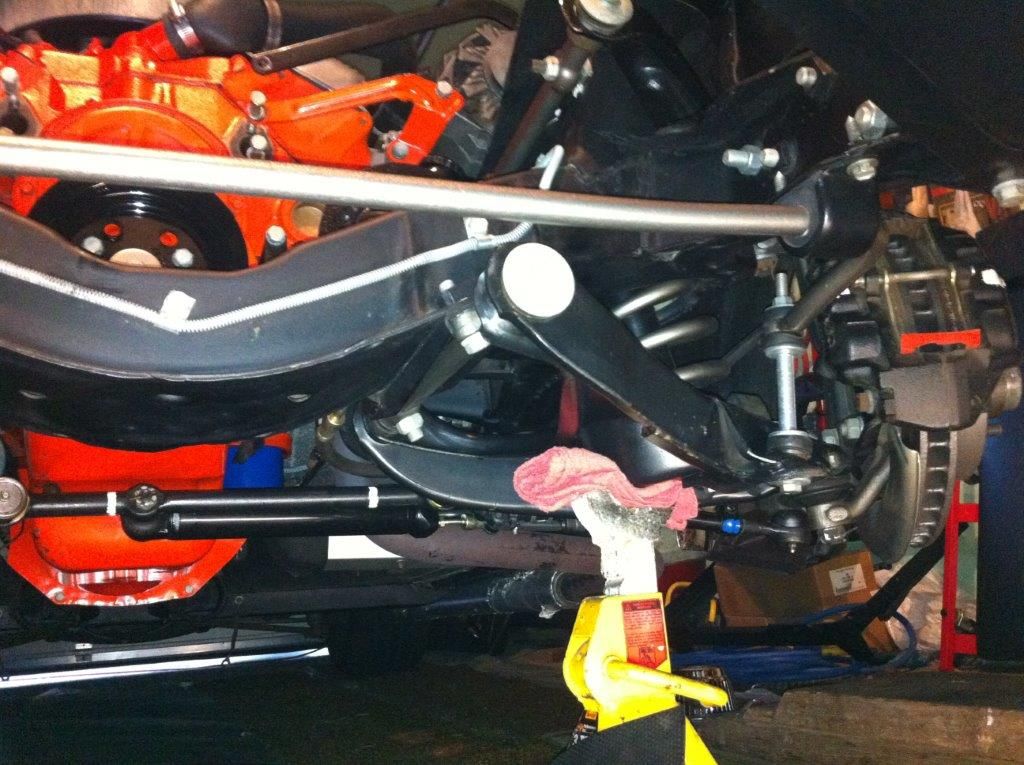
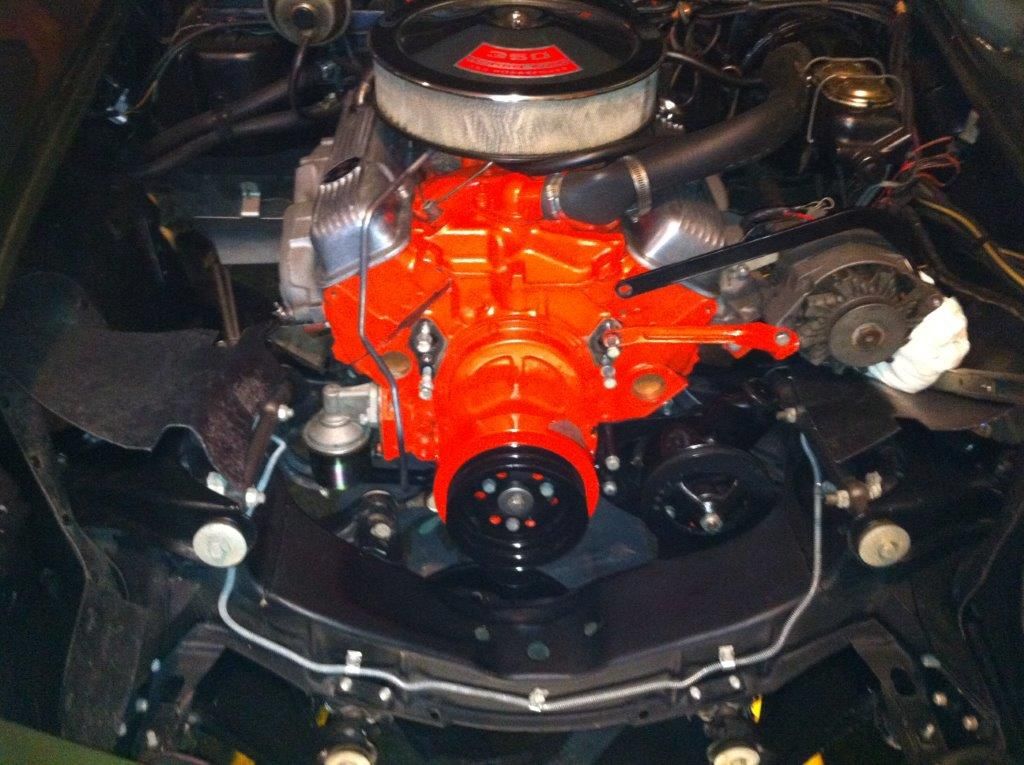
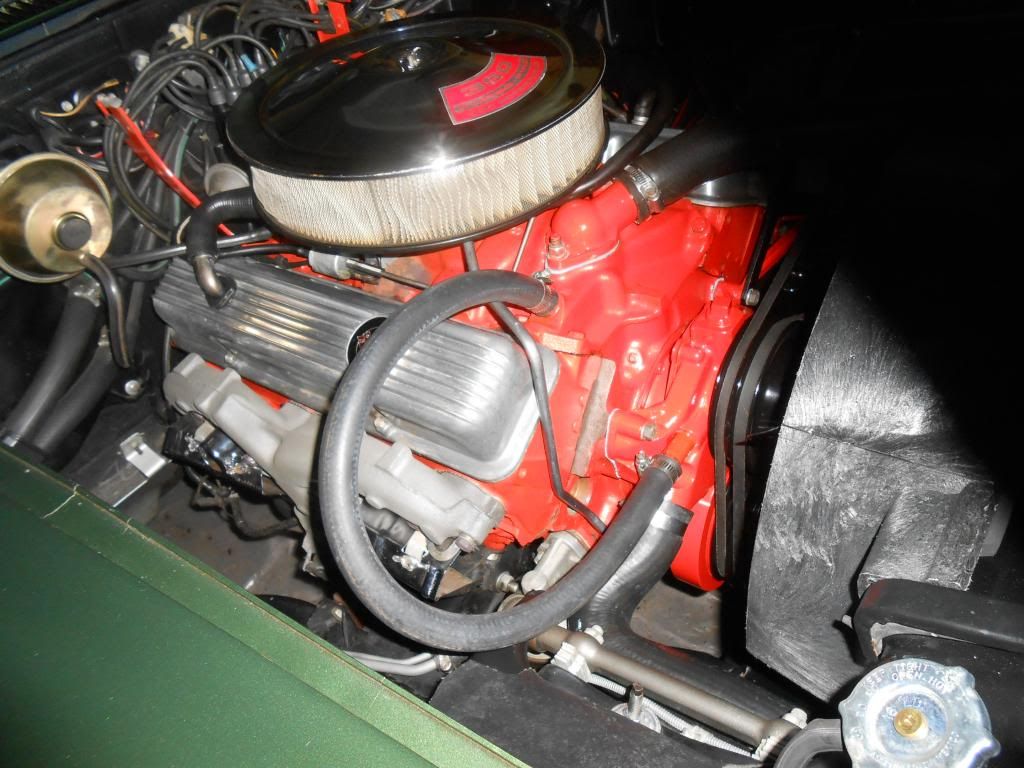
I've also included a few pic's of the chassis when I repaired the rad and water pump last September.
Thanks for the help.
[IMG]
http://i1272.photobucket.com/albums/y382/crowleyl46/unnamed1_zpsa6314924.jpg[/IMG]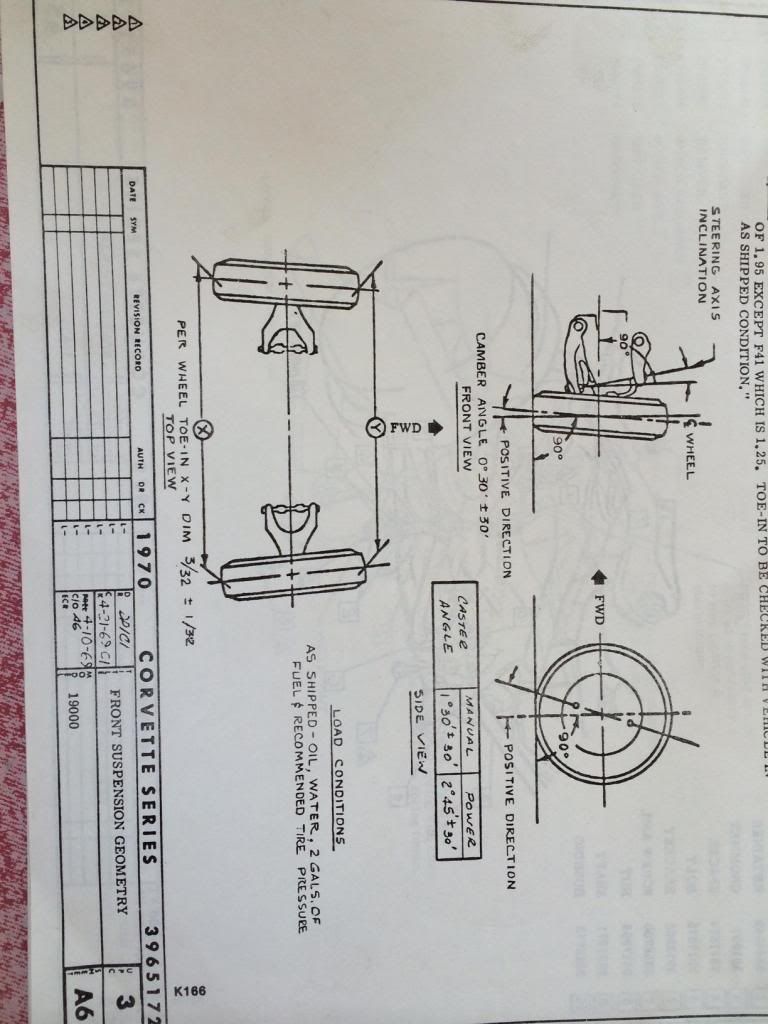

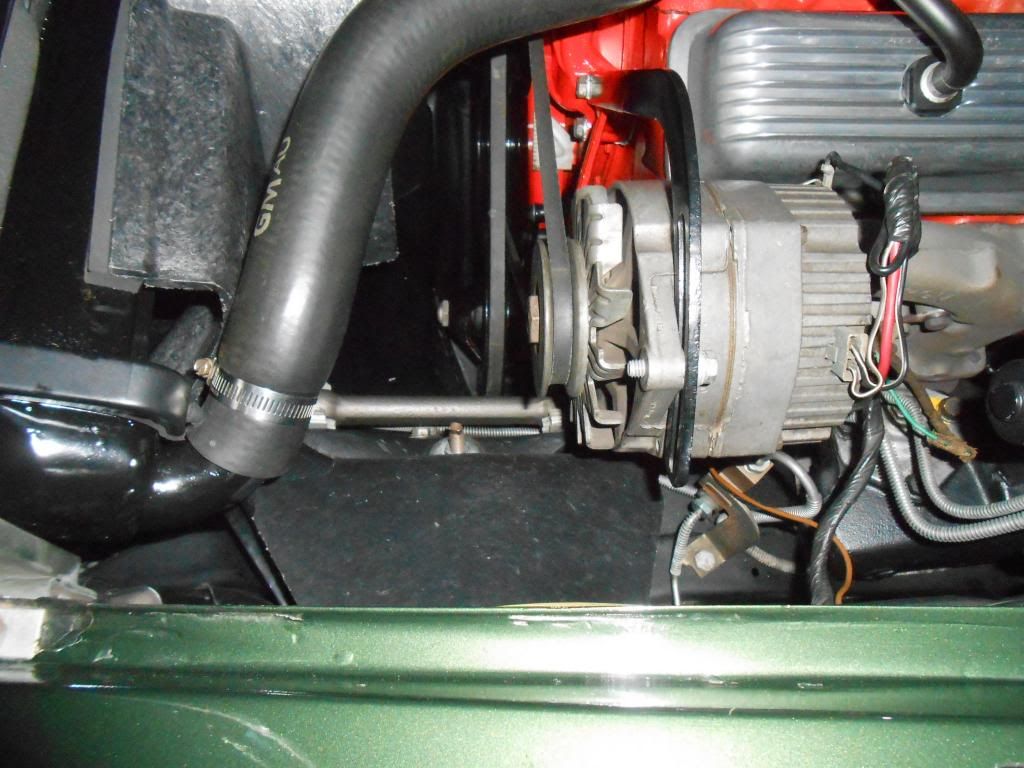
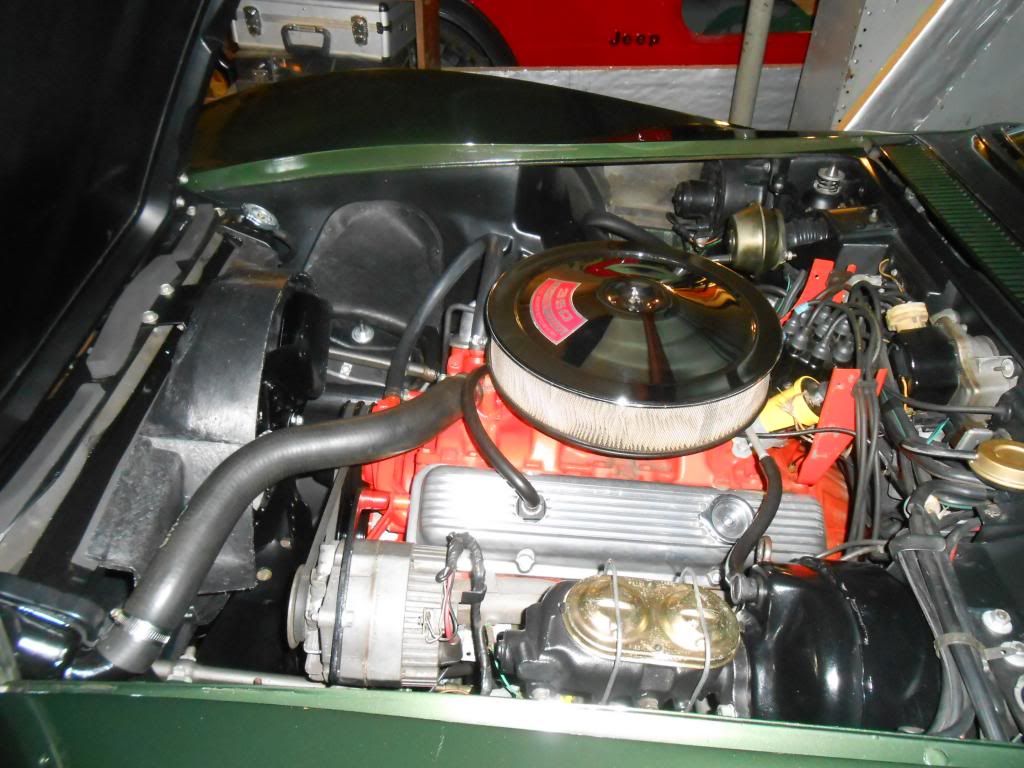
I've also included a few pic's of the chassis when I repaired the rad and water pump last September.
Thanks for the help.
[IMG]
http://i1272.photobucket.com/albums/y382/crowleyl46/unnamed1_zpsa6314924.jpg[/IMG]


Race Director


Joined: Sep 1999
Posts: 11,361
Likes: 383
From: Plano TX
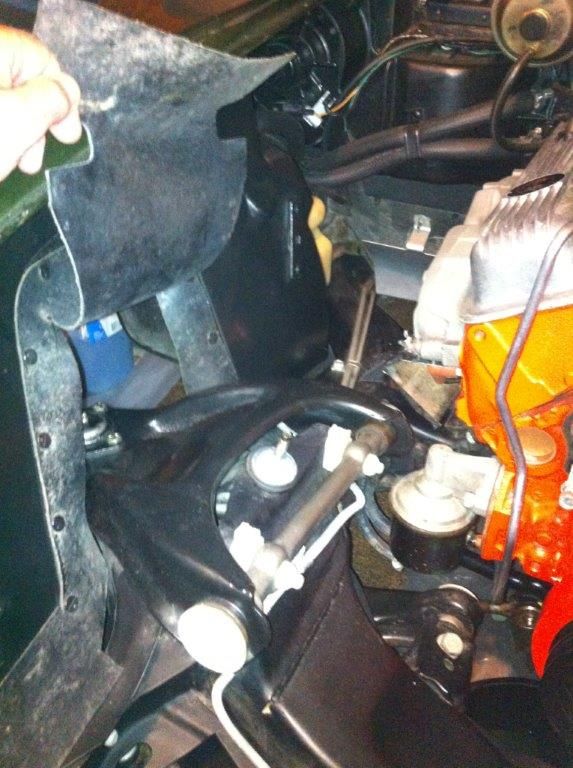
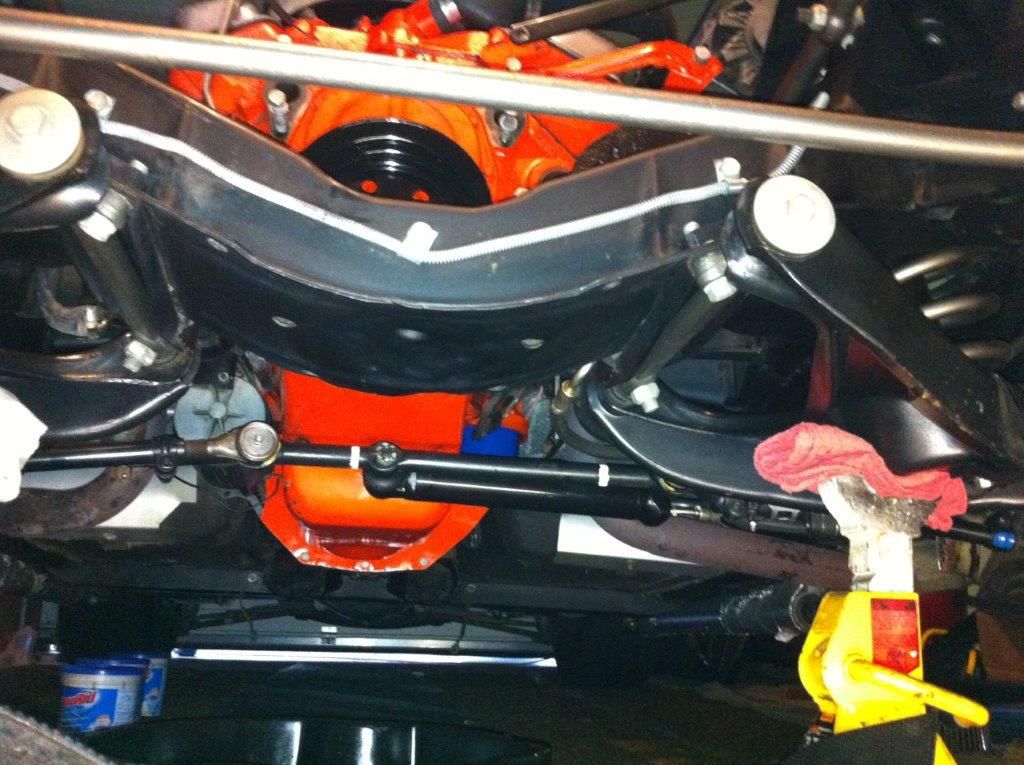
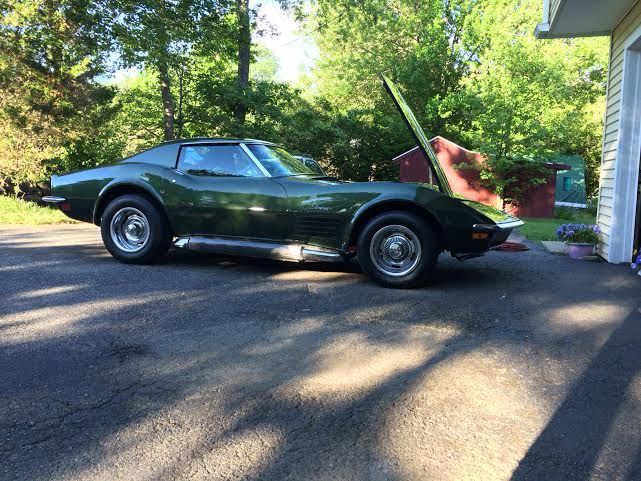
In your last picture the car sits very high. Has this been corrected? It needs to sit at the correct height to drive well.
As for alignment, factory specs were for bias ply tires. I take it you put radials on it? I've found the following settings to work well:
Front
Camber: -0.5 dgr
Caster: +2.5 dgr (or more if it will take it)
Toe: 1/8" in
Rear:
Camber: -0.75 dgr
Toe: 1/8" in
Did the alignment shop check for bad bushings, ball joints etc? You don't have many miles on it, but 20+ years can rot out bushings.
Pro


Joined: May 2008
Posts: 582
Likes: 9
I am close to finishing my 1979 Corvettes restoration and have been researching what I am going to do with my alignment. I have had my car for 16 years and seem to always have issues with the alignments and the shops not knowing what to do with it or will not use other than stock alignment angles. My plan is to just do the alignment myself. I plan to use a camber/caster gage and string the car to set toe and to make sure the rear is aligned to the front. But to answer your question look at Vette Brakes and Products or Van Steel and they have different alignment specs for different situations. From VBP there daily street is Front toe 1/32 Camber 0 Caster 2 3/4 rear toe 1/8 Camber 0.
On the C3 vettes rear toe in is very important because if the toe in is to little than the wheel will toe out when you corner or hit bumps causing a rear steer situation that will make the car scary to drive.
Your car looks really good and you did a really good job with the attention to detail.
On the C3 vettes rear toe in is very important because if the toe in is to little than the wheel will toe out when you corner or hit bumps causing a rear steer situation that will make the car scary to drive.
Your car looks really good and you did a really good job with the attention to detail.
Team Owner


Joined: Sep 2006
Posts: 31,273
Likes: 4,366
From: Westminster Maryland
Hi Pete,
I agree that the car looks very nice!
I also agree that the car appears to be sitting quite high both front and rear.
Have you checked the ride height dimensions�.UPC 0, Sheet A-12 ?
I believe the car needs to be at the factory ride height for the factory alignment specs to be used.
Were the springs front/rear replaced when the car was restored?
Regards,
Alan
Thread Starter
Instructor
Joined: May 2013
Posts: 158
Likes: 1
From: Ct
In your last picture the car sits very high. Has this been corrected? It needs to sit at the correct height to drive well.
As for alignment, factory specs were for bias ply tires. I take it you put radials on it? I've found the following settings to work well:
Front
Camber: -0.5 dgr
Caster: +2.5 dgr (or more if it will take it)
Toe: 1/8" in
Rear:
Camber: -0.75 dgr
Toe: 1/8" in
Did the alignment shop check for bad bushings, ball joints etc? You don't have many miles on it, but 20+ years can rot out bushings.
As for alignment, factory specs were for bias ply tires. I take it you put radials on it? I've found the following settings to work well:
Front
Camber: -0.5 dgr
Caster: +2.5 dgr (or more if it will take it)
Toe: 1/8" in
Rear:
Camber: -0.75 dgr
Toe: 1/8" in
Did the alignment shop check for bad bushings, ball joints etc? You don't have many miles on it, but 20+ years can rot out bushings.


Thread Starter
Instructor
Joined: May 2013
Posts: 158
Likes: 1
From: Ct
Hi Pete,
I agree that the car looks very nice!
I also agree that the car appears to be sitting quite high both front and rear.
Have you checked the ride height dimensions�.UPC 0, Sheet A-12 ?
I believe the car needs to be at the factory ride height for the factory alignment specs to be used.
Were the springs front/rear replaced when the car was restored?
Regards,
Alan
I agree that the car looks very nice!
I also agree that the car appears to be sitting quite high both front and rear.
Have you checked the ride height dimensions�.UPC 0, Sheet A-12 ?
I believe the car needs to be at the factory ride height for the factory alignment specs to be used.
Were the springs front/rear replaced when the car was restored?
Regards,
Alan
Thread Starter
Instructor
Joined: May 2013
Posts: 158
Likes: 1
From: Ct
I am close to finishing my 1979 Corvettes restoration and have been researching what I am going to do with my alignment. I have had my car for 16 years and seem to always have issues with the alignments and the shops not knowing what to do with it or will not use other than stock alignment angles. My plan is to just do the alignment myself. I plan to use a camber/caster gage and string the car to set toe and to make sure the rear is aligned to the front. But to answer your question look at Vette Brakes and Products or Van Steel and they have different alignment specs for different situations. From VBP there daily street is Front toe 1/32 Camber 0 Caster 2 3/4 rear toe 1/8 Camber 0.
On the C3 vettes rear toe in is very important because if the toe in is to little than the wheel will toe out when you corner or hit bumps causing a rear steer situation that will make the car scary to drive.
Your car looks really good and you did a really good job with the attention to detail.
On the C3 vettes rear toe in is very important because if the toe in is to little than the wheel will toe out when you corner or hit bumps causing a rear steer situation that will make the car scary to drive.
Your car looks really good and you did a really good job with the attention to detail.
. Thanks for the attention to detail comment.
Race Director
Joined: Sep 1999
Posts: 11,361
Likes: 383
From: Plano TX
There were many different springs. At the factory they selected the ones that matched the options on the car. It is possible the dealer sold you a generic one-size-fits-all.
I'm surprised the original rear spring sits so high. You can get 2" longer bolts that will give you more adjustment. The half shafts should be about parallel to the ground. Yours are angled quite a bit.
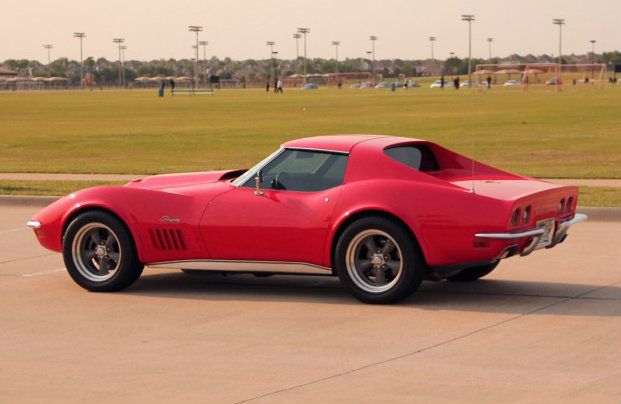
Here's a shot of mine that sits right at factory height.
I'm surprised the original rear spring sits so high. You can get 2" longer bolts that will give you more adjustment. The half shafts should be about parallel to the ground. Yours are angled quite a bit.
Here's a shot of mine that sits right at factory height.
Corvette Stories
The Best of Corvette for Corvette Enthusiasts

Top 10 Most Expensive Corvettes Ever Sold on Bring A Trailer
Brett Foote
10 Things Every Corvette Owner Needs (2026 Edition)
Michael S. Palmer
8 Most "Only Corvette Owners Understand" Quirks and Problems
Pouria Savadkouei
10 Reasons the C6 Z06 is Still A Performance Benchmark After 20 Years
Joe Kucinski
How Much Horsepower Every Corvette Engine "LOST" in 1972
Joe Kucinski
Top 10 DOs and DON'Ts for Protecting Your Convertible Top!
Michael S. Palmer
Top 10 Most Explosive Corvettes Ever Made: Power-to-Weight Ratio Ranked!
Joe Kucinski
150 hp to 1,250 hp: Every Corvette Generation Compared by the Specs That Matter
Joe Kucinski
8 Coolest Corvette Pace Cars (and Replicas) of All Time
Verdad GallardoTeam Owner
Joined: Sep 2006
Posts: 31,273
Likes: 4,366
From: Westminster Maryland
Hi Pete,
The AIM page allows you to measure from the ground to the center of the wheel well front and back… the dimensions are based on a tire height of 27". You can adjust the dimension for your tire's heights.
The page also allows you to measure the suspension itself which disregards the tires' dimensions to see where you are.
Regards,
Alan
It does look high. Remember, longer bolts treat the symptom, not the cause.
Last edited by Alan 71; Jun 8, 2014 at 07:04 PM.
Race Director
Joined: Sep 1999
Posts: 11,361
Likes: 383
From: Plano TX
Looking at what they set it to: You need more toe-in front and rear. That's your wandering right there. 0.20 dgr is good. Can even go 0.30 dgr in the rear as it likes to toe out on bump. You should consider going to negative camber in the front, it will handle better. Your front camber is not making it drive badly, though. Finally you want more caster to make it more stable at speed. Caster increases steering effort, improves return-to-center. They should be able to get 2.5 dgrs.

Race Director

Joined: Apr 2009
Posts: 19,294
Likes: 2,754
From: Charlotte NC
Some people often forget that the power steering control valve can be out of adjustment...and can actually cause the car to turn due to it not being balanced correctly....even though the alignment numbers are perfect.
Just a thought. I always check the control valve before an alignment. A simple easy check/adjustment.
DUB
Just a thought. I always check the control valve before an alignment. A simple easy check/adjustment.
DUB
Thread Starter
Instructor
Joined: May 2013
Posts: 158
Likes: 1
From: Ct
There were many different springs. At the factory they selected the ones that matched the options on the car. It is possible the dealer sold you a generic one-size-fits-all.
I'm surprised the original rear spring sits so high. You can get 2" longer bolts that will give you more adjustment. The half shafts should be about parallel to the ground. Yours are angled quite a bit.
Here's a shot of mine that sits right at factory height.
I'm surprised the original rear spring sits so high. You can get 2" longer bolts that will give you more adjustment. The half shafts should be about parallel to the ground. Yours are angled quite a bit.
Here's a shot of mine that sits right at factory height.
Thread Starter
Instructor
Joined: May 2013
Posts: 158
Likes: 1
From: Ct
Some people often forget that the power steering control valve can be out of adjustment...and can actually cause the car to turn due to it not being balanced correctly....even though the alignment numbers are perfect.
Just a thought. I always check the control valve before an alignment. A simple easy check/adjustment.
DUB
Just a thought. I always check the control valve before an alignment. A simple easy check/adjustment.
DUB
Thread Starter
Instructor
Joined: May 2013
Posts: 158
Likes: 1
From: Ct
Hi Pete,
The AIM page allows you to measure from the ground to the center of the wheel well front and back� the dimensions are based on a tire height of 27". You can adjust the dimension for your tire's heights.
The page also allows you to measure the suspension itself which disregards the tires' dimensions to see where you are.
Regards,
Alan
It does look high. Remember, longer bolts treat the symptom, not the cause.
Thread Starter
Instructor
Joined: May 2013
Posts: 158
Likes: 1
From: Ct
Looking at what they set it to: You need more toe-in front and rear. That's your wandering right there. 0.20 dgr is good. Can even go 0.30 dgr in the rear as it likes to toe out on bump. You should consider going to negative camber in the front, it will handle better. Your front camber is not making it drive badly, though. Finally you want more caster to make it more stable at speed. Caster increases steering effort, improves return-to-center. They should be able to get 2.5 dgrs.
how much? 2.5 deg caster (now set at 1.3 and 1.8)
How do I set the car lower to the ground?
I see your suggestion.. I'm a slow typist!!
Last edited by PeteL46; Jun 8, 2014 at 07:21 PM.
Thread Starter
Instructor
Joined: May 2013
Posts: 158
Likes: 1
From: Ct

Race Director
Joined: Sep 1999
Posts: 11,361
Likes: 383
From: Plano TX
For the front, first make sure the springs have properly gone into the grooves in the lower a-arms. Service manual shows what it should look like.
If they have, you have two options: Either replace the springs and hope the next set is better, or cut your existing springs.
Rear (like mentioned earlier): use the 2" longer bolts. I still have no explanation why your car sits so high in the rear with a factory spring.
Your bushing looks fine, but sometimes you can't tell just by looking at them. See if you can find a shop that has a "suspension wiggler" (don't know the technical term). You drive onto it and it rapidly moves a couple inches side-to-side. While it's doing that, the tech walks under the car and watches the suspension. A weak bushing, ball joint etc is immediately obvious.
Last edited by zwede; Jun 8, 2014 at 07:36 PM.
Thread Starter
Instructor
Joined: May 2013
Posts: 158
Likes: 1
From: Ct
For the front, first make sure the springs have properly gone into the grooves in the lower a-arms. Service manual shows what it should look like.
If they have, you have two options: Either replace the springs and hope the next set is better, or cut your existing springs.
Rear (like mentioned earlier): use the 2" longer bolts. I still have no explanation why your car sits so high in the rear with a factory spring.
Your bushing looks fine, but sometimes you can't tell just by looking at them. See if you can find a shop that has a "suspension wiggler" (don't know the technical term). You drive onto it and it rapidly moves a couple inches side-to-side. While it's doing that, the tech walks under the car and watches the suspension. A weak bushing, ball joint etc is immediately obvious.
If they have, you have two options: Either replace the springs and hope the next set is better, or cut your existing springs.
Rear (like mentioned earlier): use the 2" longer bolts. I still have no explanation why your car sits so high in the rear with a factory spring.
Your bushing looks fine, but sometimes you can't tell just by looking at them. See if you can find a shop that has a "suspension wiggler" (don't know the technical term). You drive onto it and it rapidly moves a couple inches side-to-side. While it's doing that, the tech walks under the car and watches the suspension. A weak bushing, ball joint etc is immediately obvious.
Last edited by PeteL46; Jun 8, 2014 at 10:19 PM.
2026 Loser of the Year


Joined: Sep 2013
Posts: 36,597
Likes: 7,046
From: New Or-leens Loo-z-anna
For eight years!?!?!?!?!?!?!?!?!?
That's great!
I was clean for 20 years....got stupIed...now reclaiming "lost ground"!
Those look very good....My A-arm bushings were cracked/squished out.
8 years!
