




Wire short somewhere ????

Thread Starter
Racer

Joined: Feb 2017
Posts: 407
Likes: 12
From: Maywood NJ



Team Owner


Joined: Sep 2006
Posts: 31,214
Likes: 4,302
From: Westminster Maryland
Hi Mike,
I found it…..
I just encountered the same problem, just 2 weeks before national judging. After getting over the panic, I set to work and found a creative way to repair.
As stated in a previous post, I removed the rear wheel and the access panel in the wheel well. I removed the wires from the switch and pulled them out through the second hole in the body (at access opening). I took a bezel nut (the large dia, thin nut that holds your radio stems into the guage cluster) and reworked the threads with a 3/8" X 24 tap. I then took a 4" long, 3/8" X 24 bolt and after wiping grease on the threads, I inserted it in through the hole in the door jamb. Before pushing the bolt in through the hole, I ran a second nut all the way up the threads for later use. I pushed the bolt through the second hole and after carefully applying JB Weld to the outer face of the bezel nut, I started the bezel nut onto the end of the grease-covered bolt. I pulled the bolt back out, causing the JB Weld to contact the back side of the fiberglass jamb, where the threaded mounting bracket had been. I ran the jam nut down to the now tape-covered jam (tape was applied to protect the painted jamb surface). This, of course, clamped the bezel nut in place while the epoxy set up. During the cure time, I occasionally turned the greased bolt to ensure that the bolt didnt end up glued to the bezel nut.
Make sense so far?
After I was certain that the epoxy had fully cured, I removed the bolt and saw that the bezel nut was securely (abeit differently than originally designed) to the back side of the door jamb. From the outside, the threads in the bezel nut look just like the bracket that had once been there. I re-assembled the wiring to the switch and with blue loctite, re-threaded the switch into adjustment. All worked perfectly and the fix was done.
Whew!! Another catastrophe averted. Got it all done and the fix left no scars. Judging went well. The switch looks exact and works perfectly!
BTW, I decided to use a bezel nut because it has more surface area for JB Weld application.
Maybe this will work for you too?
Regards,
Alan
I found it…..
I just encountered the same problem, just 2 weeks before national judging. After getting over the panic, I set to work and found a creative way to repair.
As stated in a previous post, I removed the rear wheel and the access panel in the wheel well. I removed the wires from the switch and pulled them out through the second hole in the body (at access opening). I took a bezel nut (the large dia, thin nut that holds your radio stems into the guage cluster) and reworked the threads with a 3/8" X 24 tap. I then took a 4" long, 3/8" X 24 bolt and after wiping grease on the threads, I inserted it in through the hole in the door jamb. Before pushing the bolt in through the hole, I ran a second nut all the way up the threads for later use. I pushed the bolt through the second hole and after carefully applying JB Weld to the outer face of the bezel nut, I started the bezel nut onto the end of the grease-covered bolt. I pulled the bolt back out, causing the JB Weld to contact the back side of the fiberglass jamb, where the threaded mounting bracket had been. I ran the jam nut down to the now tape-covered jam (tape was applied to protect the painted jamb surface). This, of course, clamped the bezel nut in place while the epoxy set up. During the cure time, I occasionally turned the greased bolt to ensure that the bolt didnt end up glued to the bezel nut.
Make sense so far?
After I was certain that the epoxy had fully cured, I removed the bolt and saw that the bezel nut was securely (abeit differently than originally designed) to the back side of the door jamb. From the outside, the threads in the bezel nut look just like the bracket that had once been there. I re-assembled the wiring to the switch and with blue loctite, re-threaded the switch into adjustment. All worked perfectly and the fix was done.
Whew!! Another catastrophe averted. Got it all done and the fix left no scars. Judging went well. The switch looks exact and works perfectly!
BTW, I decided to use a bezel nut because it has more surface area for JB Weld application.
Maybe this will work for you too?
Regards,
Alan
Thread Starter
Racer
Joined: Feb 2017
Posts: 407
Likes: 12
From: Maywood NJ
Hi Mike,
I found it…..
I just encountered the same problem, just 2 weeks before national judging. After getting over the panic, I set to work and found a creative way to repair.
As stated in a previous post, I removed the rear wheel and the access panel in the wheel well. I removed the wires from the switch and pulled them out through the second hole in the body (at access opening). I took a bezel nut (the large dia, thin nut that holds your radio stems into the guage cluster) and reworked the threads with a 3/8" X 24 tap. I then took a 4" long, 3/8" X 24 bolt and after wiping grease on the threads, I inserted it in through the hole in the door jamb. Before pushing the bolt in through the hole, I ran a second nut all the way up the threads for later use. I pushed the bolt through the second hole and after carefully applying JB Weld to the outer face of the bezel nut, I started the bezel nut onto the end of the grease-covered bolt. I pulled the bolt back out, causing the JB Weld to contact the back side of the fiberglass jamb, where the threaded mounting bracket had been. I ran the jam nut down to the now tape-covered jam (tape was applied to protect the painted jamb surface). This, of course, clamped the bezel nut in place while the epoxy set up. During the cure time, I occasionally turned the greased bolt to ensure that the bolt didnt end up glued to the bezel nut.
Make sense so far?
After I was certain that the epoxy had fully cured, I removed the bolt and saw that the bezel nut was securely (abeit differently than originally designed) to the back side of the door jamb. From the outside, the threads in the bezel nut look just like the bracket that had once been there. I re-assembled the wiring to the switch and with blue loctite, re-threaded the switch into adjustment. All worked perfectly and the fix was done.
Whew!! Another catastrophe averted. Got it all done and the fix left no scars. Judging went well. The switch looks exact and works perfectly!
BTW, I decided to use a bezel nut because it has more surface area for JB Weld application.
Maybe this will work for you too?
Regards,
Alan
I found it…..
I just encountered the same problem, just 2 weeks before national judging. After getting over the panic, I set to work and found a creative way to repair.
As stated in a previous post, I removed the rear wheel and the access panel in the wheel well. I removed the wires from the switch and pulled them out through the second hole in the body (at access opening). I took a bezel nut (the large dia, thin nut that holds your radio stems into the guage cluster) and reworked the threads with a 3/8" X 24 tap. I then took a 4" long, 3/8" X 24 bolt and after wiping grease on the threads, I inserted it in through the hole in the door jamb. Before pushing the bolt in through the hole, I ran a second nut all the way up the threads for later use. I pushed the bolt through the second hole and after carefully applying JB Weld to the outer face of the bezel nut, I started the bezel nut onto the end of the grease-covered bolt. I pulled the bolt back out, causing the JB Weld to contact the back side of the fiberglass jamb, where the threaded mounting bracket had been. I ran the jam nut down to the now tape-covered jam (tape was applied to protect the painted jamb surface). This, of course, clamped the bezel nut in place while the epoxy set up. During the cure time, I occasionally turned the greased bolt to ensure that the bolt didnt end up glued to the bezel nut.
Make sense so far?
After I was certain that the epoxy had fully cured, I removed the bolt and saw that the bezel nut was securely (abeit differently than originally designed) to the back side of the door jamb. From the outside, the threads in the bezel nut look just like the bracket that had once been there. I re-assembled the wiring to the switch and with blue loctite, re-threaded the switch into adjustment. All worked perfectly and the fix was done.
Whew!! Another catastrophe averted. Got it all done and the fix left no scars. Judging went well. The switch looks exact and works perfectly!
BTW, I decided to use a bezel nut because it has more surface area for JB Weld application.
Maybe this will work for you too?
Regards,
Alan


Team Owner
Joined: Sep 2006
Posts: 31,214
Likes: 4,302
From: Westminster Maryland
Hi Mike,
Here's a picture of Don's from 2011 on the Judging Floor in Novi Michigan.
It really IS is this nice looking.
Hopefully he'll be along and add some more!
Regards,
Alan
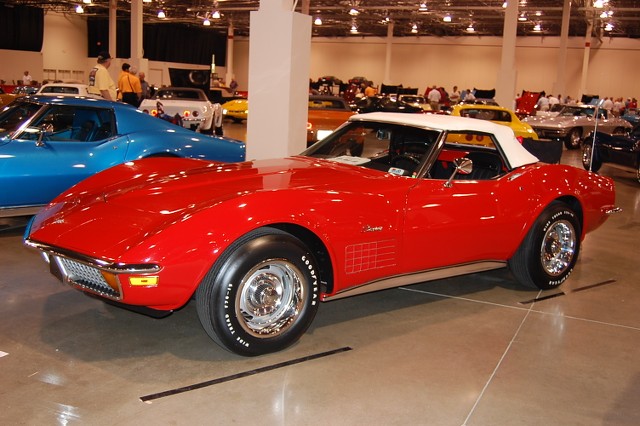
Here's a picture of Don's from 2011 on the Judging Floor in Novi Michigan.
It really IS is this nice looking.
Hopefully he'll be along and add some more!
Regards,
Alan
Last edited by Alan 71; Apr 30, 2017 at 07:21 PM.
Le Mans Master


Joined: May 2003
Posts: 8,875
Likes: 3,555
From: Fernandina Beach FL
2023 Restomod of the Year finalist
2020 C3 of the Year Winner - Modified
Hi RR..My friend just left . We were out side trying to pinpoint the short/ drain from battery. Then he checked the neg battery term with it disconnected from the battery. Still had power on neg batt. Disconnected the ground from the alternator , same as above , still had power on neg batt. Checked the wiper over ride , wiper door , and head lamps over ride. They all work as they should. Also there is an orange wire hanging under dash that he does not know where it goes. Cant trace it. Also lighter does not work. He is totally stumped and does not know what else to do or check. Also when he checks the neg battery term his power tester lights up bright and he says its a good power loss in system and thats why the battery is draining so fast. TOTALLY STUMPED .
Disconnecting the ground from the alternator will do/tell nothing- unless the alt's case is not touching any metal...
You have only a few things that are directly connected to the battery and could be a constant draw-
-Alternator- at which you would disconnect the +terminal AND the plug-
-Pull the fuses for the "CLK LTR" -"TAIL"-"STOP"-all on the lower left side- these circuits ALL use orange wire- which means they can albeit fused - start a fire or at least let out a bunch of smoke...you need to check that loose orange wire and see if its hot...AT the least- wrap some electrical tape around it. Not to mentuion your cigarette lighter is power by an orange wire...
-Horn relay- at which you would disconnect the 3 pin connector- wires are pink/black-black-green (key/horn button/horn)- that will keep the coil wire from pulling current...
Last are the ignition switch and the headlight switch- which are directly connected to the battery-
These are the things you NEED to TEST with a AMMETER!!!
Last edited by Richard454; Apr 30, 2017 at 09:08 PM.
Burning Brakes


Joined: Jan 2009
Posts: 766
Likes: 97
From: Lake Norman, NC
Mike and I spoke tonight. I explained my fix from 2011 in detail.
Since my repair project, one of the Corvette vendors has come out with a repair bracket that works well if rivets are to be replaced. Some cobbling my need to be done to fit the bracket thru the inner access hole if inserting from behind. If original rivets are in place, the bracket will need to be glued to install and the bracket will either cut down some more or the rivet holes in the bracket will need to be enlarged to fit over the rivets.
Good luck Mike. Call me again if questions, etc
Regards,
Don
Since my repair project, one of the Corvette vendors has come out with a repair bracket that works well if rivets are to be replaced. Some cobbling my need to be done to fit the bracket thru the inner access hole if inserting from behind. If original rivets are in place, the bracket will need to be glued to install and the bracket will either cut down some more or the rivet holes in the bracket will need to be enlarged to fit over the rivets.
Good luck Mike. Call me again if questions, etc
Regards,
Don
Corvette Stories
The Best of Corvette for Corvette Enthusiasts

Top 10 Most Explosive Corvettes Ever Made: Power-to-Weight Ratio Ranked!
Joe Kucinski
150 hp to 1,250 hp: Every Corvette Generation Compared by the Specs That Matter
Joe Kucinski
8 Coolest Corvette Pace Cars (and Replicas) of All Time
Verdad Gallardo
Top 10 Corvette Engines RANKED by Peak Torque (70+ Years of Muscle!)
Joe Kucinski
Corvette ZR1X Will Be Pacing the Indy 500, And Could Probably Race, Too!
Verdad Gallardo
Top 10 Corvettes Coming to Mecum Indy 2026!
Brett Foote
Top 10 C9 Corvette MUST-HAVES to Fix These C8 Generation Flaws!
Michael S. Palmer
10 Revolutionary 'Corvette Firsts' Most People Don't Know
Joe Kucinski
5 Reasons to Upgrade to an LS6-Powered Corvette; 5 Reasons to Stay LT2
Michael S. Palmer
Thread Starter
Racer
Joined: Feb 2017
Posts: 407
Likes: 12
From: Maywood NJ
Mike and I spoke tonight. I explained my fix from 2011 in detail.
Since my repair project, one of the Corvette vendors has come out with a repair bracket that works well if rivets are to be replaced. Some cobbling my need to be done to fit the bracket thru the inner access hole if inserting from behind. If original rivets are in place, the bracket will need to be glued to install and the bracket will either cut down some more or the rivet holes in the bracket will need to be enlarged to fit over the rivets.
Good luck Mike. Call me again if questions, etc
Regards,
Don
Since my repair project, one of the Corvette vendors has come out with a repair bracket that works well if rivets are to be replaced. Some cobbling my need to be done to fit the bracket thru the inner access hole if inserting from behind. If original rivets are in place, the bracket will need to be glued to install and the bracket will either cut down some more or the rivet holes in the bracket will need to be enlarged to fit over the rivets.
Good luck Mike. Call me again if questions, etc
Regards,
Don

Thread Starter
Racer
Joined: Feb 2017
Posts: 407
Likes: 12
From: Maywood NJ
Thread Starter
Racer
Joined: Feb 2017
Posts: 407
Likes: 12
From: Maywood NJ
A friend of mine was trying to figure this battery drain and he observed the following. 1. With the key out of the ignition and everything is turned off in car. 2 .. Horn relay clicks when u touch the when u touch the negative battery cable to the post. Is this the current draw that could be draining the battery when the battery is connected?
Le Mans Master
Joined: May 2003
Posts: 8,875
Likes: 3,555
From: Fernandina Beach FL
2023 Restomod of the Year finalist
2020 C3 of the Year Winner - Modified
A friend of mine was trying to figure this battery drain and he observed the following. 1. With the key out of the ignition and everything is turned off in car. 2 .. Horn relay clicks when u touch the when u touch the negative battery cable to the post. Is this the current draw that could be draining the battery when the battery is connected?
Read post #18
https://www.corvetteforum.com/forums...post1594593295
And post #67
-Horn relay- at which you would disconnect the 3 pin connector- wires are pink/black-black-green (key/horn button/horn)- that will keep the coil wire from pulling current...
Thread Starter
Racer
Joined: Feb 2017
Posts: 407
Likes: 12
From: Maywood NJ
Yes...
Read post #18
https://www.corvetteforum.com/forums...post1594593295
And post #67
-Horn relay- at which you would disconnect the 3 pin connector- wires are pink/black-black-green (key/horn button/horn)- that will keep the coil wire from pulling current...
Read post #18
https://www.corvetteforum.com/forums...post1594593295
And post #67
-Horn relay- at which you would disconnect the 3 pin connector- wires are pink/black-black-green (key/horn button/horn)- that will keep the coil wire from pulling current...
Last edited by MikesRed68; May 24, 2017 at 02:50 AM.


Thread Starter
Racer
Joined: Feb 2017
Posts: 407
Likes: 12
From: Maywood NJ