When you click on links to various merchants on this site and make a purchase, this can result in this site earning a commission. Affiliate programs and affiliations include, but are not limited to, the eBay Partner Network.
I was able to get the reverse piston in this evening. Although I don't have a picture i can describe how I got it in. Used a piece of paint gun cup liner which is a fairly heavy plastic sheet, cut to about 3" wide and set it into the drum , acting as a sleeve to get the outer lip seal to compress and let the piston slide into the bore. Took several minutes to work it in. Then I finished it up with the new steels and frictions.
The kit I bought came with 9 frictions and steels for the 3-4 clutch pack, which is 3 more than stock and supposedly a 30% increase in holding power. I really like this kit, has way more seals and bushings than my model of transmission will use and was 25 bucks cheaper than the TCI kit that didn't have enough parts, and this is a full Alto kit with the good 3-4 clutch pack. Def worth the money. If anyone wants a link to the kit let me know.
Should have the low reverse clutch piston Saturday so I hope to finish this up before next week.
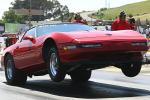
I drove my car for the first time this year last week. Was fun drive, way faster than my 2010 CTD pick-up. My kid even took the car out for some pics by the lake. I think he left some rubber left on my tires.
Last edited by Mike Holmen; May 20, 2020 at 10:28 PM.
I drove my car for the first time this year last week. Was fun drive, way faster than my 2010 CTD pick-up. My kid even took the car out for some pics by the lake. I think he left some rubber left on my tires.
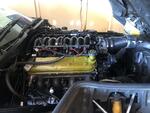
Well the last of the bits for my tranny rebuild came in this morning so I should be able to finish it up today. Which means if I get my *** in gear and clean up the engine bay I should be able to drop the combo in next weekend! Super excited about that!
Shift kit and 2-3 shift valve with extra dinosaurs and cashews Sonnax 3-4 check ball upgrade Tail housing adapter with speed sensor plug. Adapter came with a bolt on reluctor ring and a new sensor As she sits now. Got both sonnax servos ready to go and grinded the pin to achieve about .080" travel.
I liked that dino shift improver kit. My dad took my car out for a rip the other day and left my key on, so the battery is completely dead. I think he just wants it to stay at his place. Thanks for the update buddy.
Trans oil pan cleaned up and painted with high temp black flake pearl, same as the valve covers. Not that you'll be able to see it Valve body installed, need to clean and paint the bellhousing
I have a goal: get the engine and trans in the car this weekend. I'm taking tomorrow off work to try and get the engine bay cleaned up and painted if need be. I had started the cleaning process last week but it started raining so I got little done short of some crud scraping. There is a large amount of grease coating the cross member and I also have the dreaded "morning sickness" issue in the rack. I may try some flushing technique I saw another member post on here. But the goal is to have the drivetrain installed by EOD Sunday.
Drive shaft with new u joints. Very unimpressed with the 8mm bolts at the diff yoke. I'm used to much bigger 7/16" bolts on my older f bodies Fuel filter/regulator installed
I didnt get a whole lot done yesterday except new u joints and fuel filter install. Who knew it would take 8 hours to do those fairly simple things. Except for jacking the car up 3 feet it wasnt too bad. Now its 90 degrees and humid
Engine bay is as clean as its gonna get! Engine degreaser and various types of scrapers and brushes get the job done. I never intended to do a frame off restoration of this car, and since most of the frame cleaned up fairly well, it will have to do. Gonna get started first thing in the morning
Looking good buddy, curious if your going to have to get the drive shaft cut? I ran my fuel line on the other side of the AC evap box, I found that the fuel line was pretty close to some very hot headers. You planning on wrapping your headers? I wrapped mine.
Took a little wiggling but it went together with no issues. I didnt need to cut the driveshaft as I had test fit everything before and it all worked out. Somehow I misplaced the engine mount bolts, I'm sure they'll turn up eventually. Glad that is over with!
Took a little wiggling but it went together with no issues. I didnt need to cut the driveshaft as I had test fit everything before and it all worked out. Somehow I misplaced the engine mount bolts, I'm sure they'll turn up eventually. Glad that is over with!
Took a little wiggling but it went together with no issues. I didnt need to cut the driveshaft as I had test fit everything before and it all worked out. Somehow I misplaced the engine mount bolts, I'm sure they'll turn up eventually. Glad that is over with!
Nice progress!
Did you have to get the driveshaft in place before the c-beam went in?
Nice progress!
Did you have to get the driveshaft in place before the c-beam went in?
From what I've read in other posts you have to install them together so I started the driveshaft first then shoved it into the c beam and shoved it back to align with the c beam holes I slotted prior to starting. About a heavy 1/8" just to make sure there was some adjustment, which I ended up needing. I have a transmission jack which made that a lot easier.






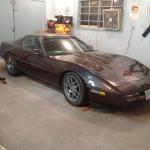


 My dad took my car out for a rip the other day and left my key on, so the battery is completely dead. I think he just wants it to stay at his place. Thanks for the update buddy.