


NEW Interior LED Mod Thread
Drifting


Joined: Jun 2008
Posts: 1,317
Likes: 9
From: McCall Idaho


Hello, so I want to replace the burned out bulbs in my C5 with leds. I read the initial part of this thread were they refer you to the oznium leds. However, it appears in the comments that these leds do not work well for C5s at all. Is there a current best place to get leds to replace the factory interior lights with? Thanks guys!
https://www.superbrightleds.com/
https://www.oznium.com/


Pro

Joined: Mar 2005
Posts: 672
Likes: 0
From: Seabrook TX
Any Tim apprentices still lurking on here?
I have a Bose HU that was converted to LED years ago by another user. I haven't been using it, but thought I'd plug it in again and check it out. A few bulbs were out, so I went to replace them. I have done HVAC units before and my soldering skills are decent. I didn't notice any shorts or issues before or after I plugged it into the car (I killed an HVAC controller years ago and remember that well). I did check for continuity, but don't remember the exact results as this was months ago. I started looking at it again last week and still had a few bulbs out. I tested them all for continuity, checked solder contacts and ever since, I can't get any illumination at all in the unit when it's plugged into the car. Direct arcing a battery to the bulbs on the board gets some to come on. I have a full list of what bulbs are continuous to others if that's helpful
Does anyone know if there is any troubleshooting to do to see why none of the bulbs are getting power in the car? Is it your understanding that the bulbs are all in series or are there separate circuits for certain bulbs?
Instructor


Joined: Dec 2014
Posts: 241
Likes: 17
From: Poway CA
I have searched extensively in this thread for any info on installing a switch in the center console that would power an LED when the console is opened. I'm sure it's possible and I likely just missed the post - the interior LED mod thread is daunting, to say the least. If anyone can post a link or has a write up on how to do this I would appreciate the direction. Thanks !
!
!
Drifting


Joined: Aug 2014
Posts: 1,402
Likes: 394
From: Virginia
St. Jude Donor '18
I have searched extensively in this thread for any info on installing a switch in the center console that would power an LED when the console is opened. I'm sure it's possible and I likely just missed the post - the interior LED mod thread is daunting, to say the least. If anyone can post a link or has a write up on how to do this I would appreciate the direction. Thanks!
!Instructor
Joined: Dec 2014
Posts: 241
Likes: 17
From: Poway CA
Burning Brakes


Joined: Mar 2007
Posts: 1,203
Likes: 21
From: centennial colorado
When I had my C5 I drilled a hole by the latch and mounted a pin switch. Powered an led strip off the traction control wiring just in front of the console lid. Interrupted the negative wire with the pin switch. Worked for years.
Le Mans Master


Joined: Dec 2013
Posts: 6,337
Likes: 5,115
From: Charles Town WV
2024 Corvette of the Year Finalist - Modified
2023 C6 of the Year Winner - Modified
2022 C6 of the Year Finalist - Modified
So i scrolled back a ways and still cant find quite what im looking for. Whats the current method for doing the hvac? i had originally done mine with the leds and resistors but if im reading correctly theres a better method now? can anyone point me in the right direction?
Melting Slicks


Joined: Jul 2004
Posts: 3,294
Likes: 482
From: Brea CA
So i scrolled back a ways and still cant find quite what im looking for. Whats the current method for doing the hvac? i had originally done mine with the leds and resistors but if im reading correctly theres a better method now? can anyone point me in the right direction?
Gary
Corvette Stories
The Best of Corvette for Corvette Enthusiasts

Top 10 Most Expensive Corvettes Ever Sold on Bring A Trailer
Brett Foote
10 Things Every Corvette Owner Needs (2026 Edition)
Michael S. Palmer
8 Most "Only Corvette Owners Understand" Quirks and Problems
Pouria Savadkouei
10 Reasons the C6 Z06 is Still A Performance Benchmark After 20 Years
Joe Kucinski
How Much Horsepower Every Corvette Engine "LOST" in 1972
Joe Kucinski
Top 10 DOs and DON'Ts for Protecting Your Convertible Top!
Michael S. Palmer
Top 10 Most Explosive Corvettes Ever Made: Power-to-Weight Ratio Ranked!
Joe Kucinski
150 hp to 1,250 hp: Every Corvette Generation Compared by the Specs That Matter
Joe Kucinski
8 Coolest Corvette Pace Cars (and Replicas) of All Time
Verdad GallardoHeel & Toe
Joined: Jan 2015
Posts: 15
Likes: 9
Gonna copy my instrument cluster thread content over here.
Currently, my high beam indicator and MIL bulbs are burned out, so lacking any sort of online guidance, I figured I'd tear into it myself.
I'll assume if you've decided to do this yourself, you already know how to get your gauge cluster out. If not, there *are* a million threads on that.
http://www.vetteessentials.com/instr...zel_howto.html
Instrument cluster removal is about a 30 minute job. No big deal.
On to the important stuff. Order a pizza.
Place your gauge cluster on your kitchen table
Attachment 48359077
The first thing you'll have to do is remove those HIGH VOLTAGE channels. They're covering the wiring that goes to the UV bulbs. They're held in place by plastic clips that you just have to lightly bend back.
Attachment 48359078
Disconnect all those wiring connectors. One on each side of the UV inverter, one on each side for HUD/DIC, and the lower green connector that supplies power and whatnot to the inverter.
Attachment 48359079
There are four brass colored screws holding the inverter/coverplate onto the gauge pod. Remove those. Don't bother removing the four screws holding the inverter's metal cover plate. It's not necessary. There are also several more of those clip tabs that you'll have to gently pry and then you can remove the whole plate.
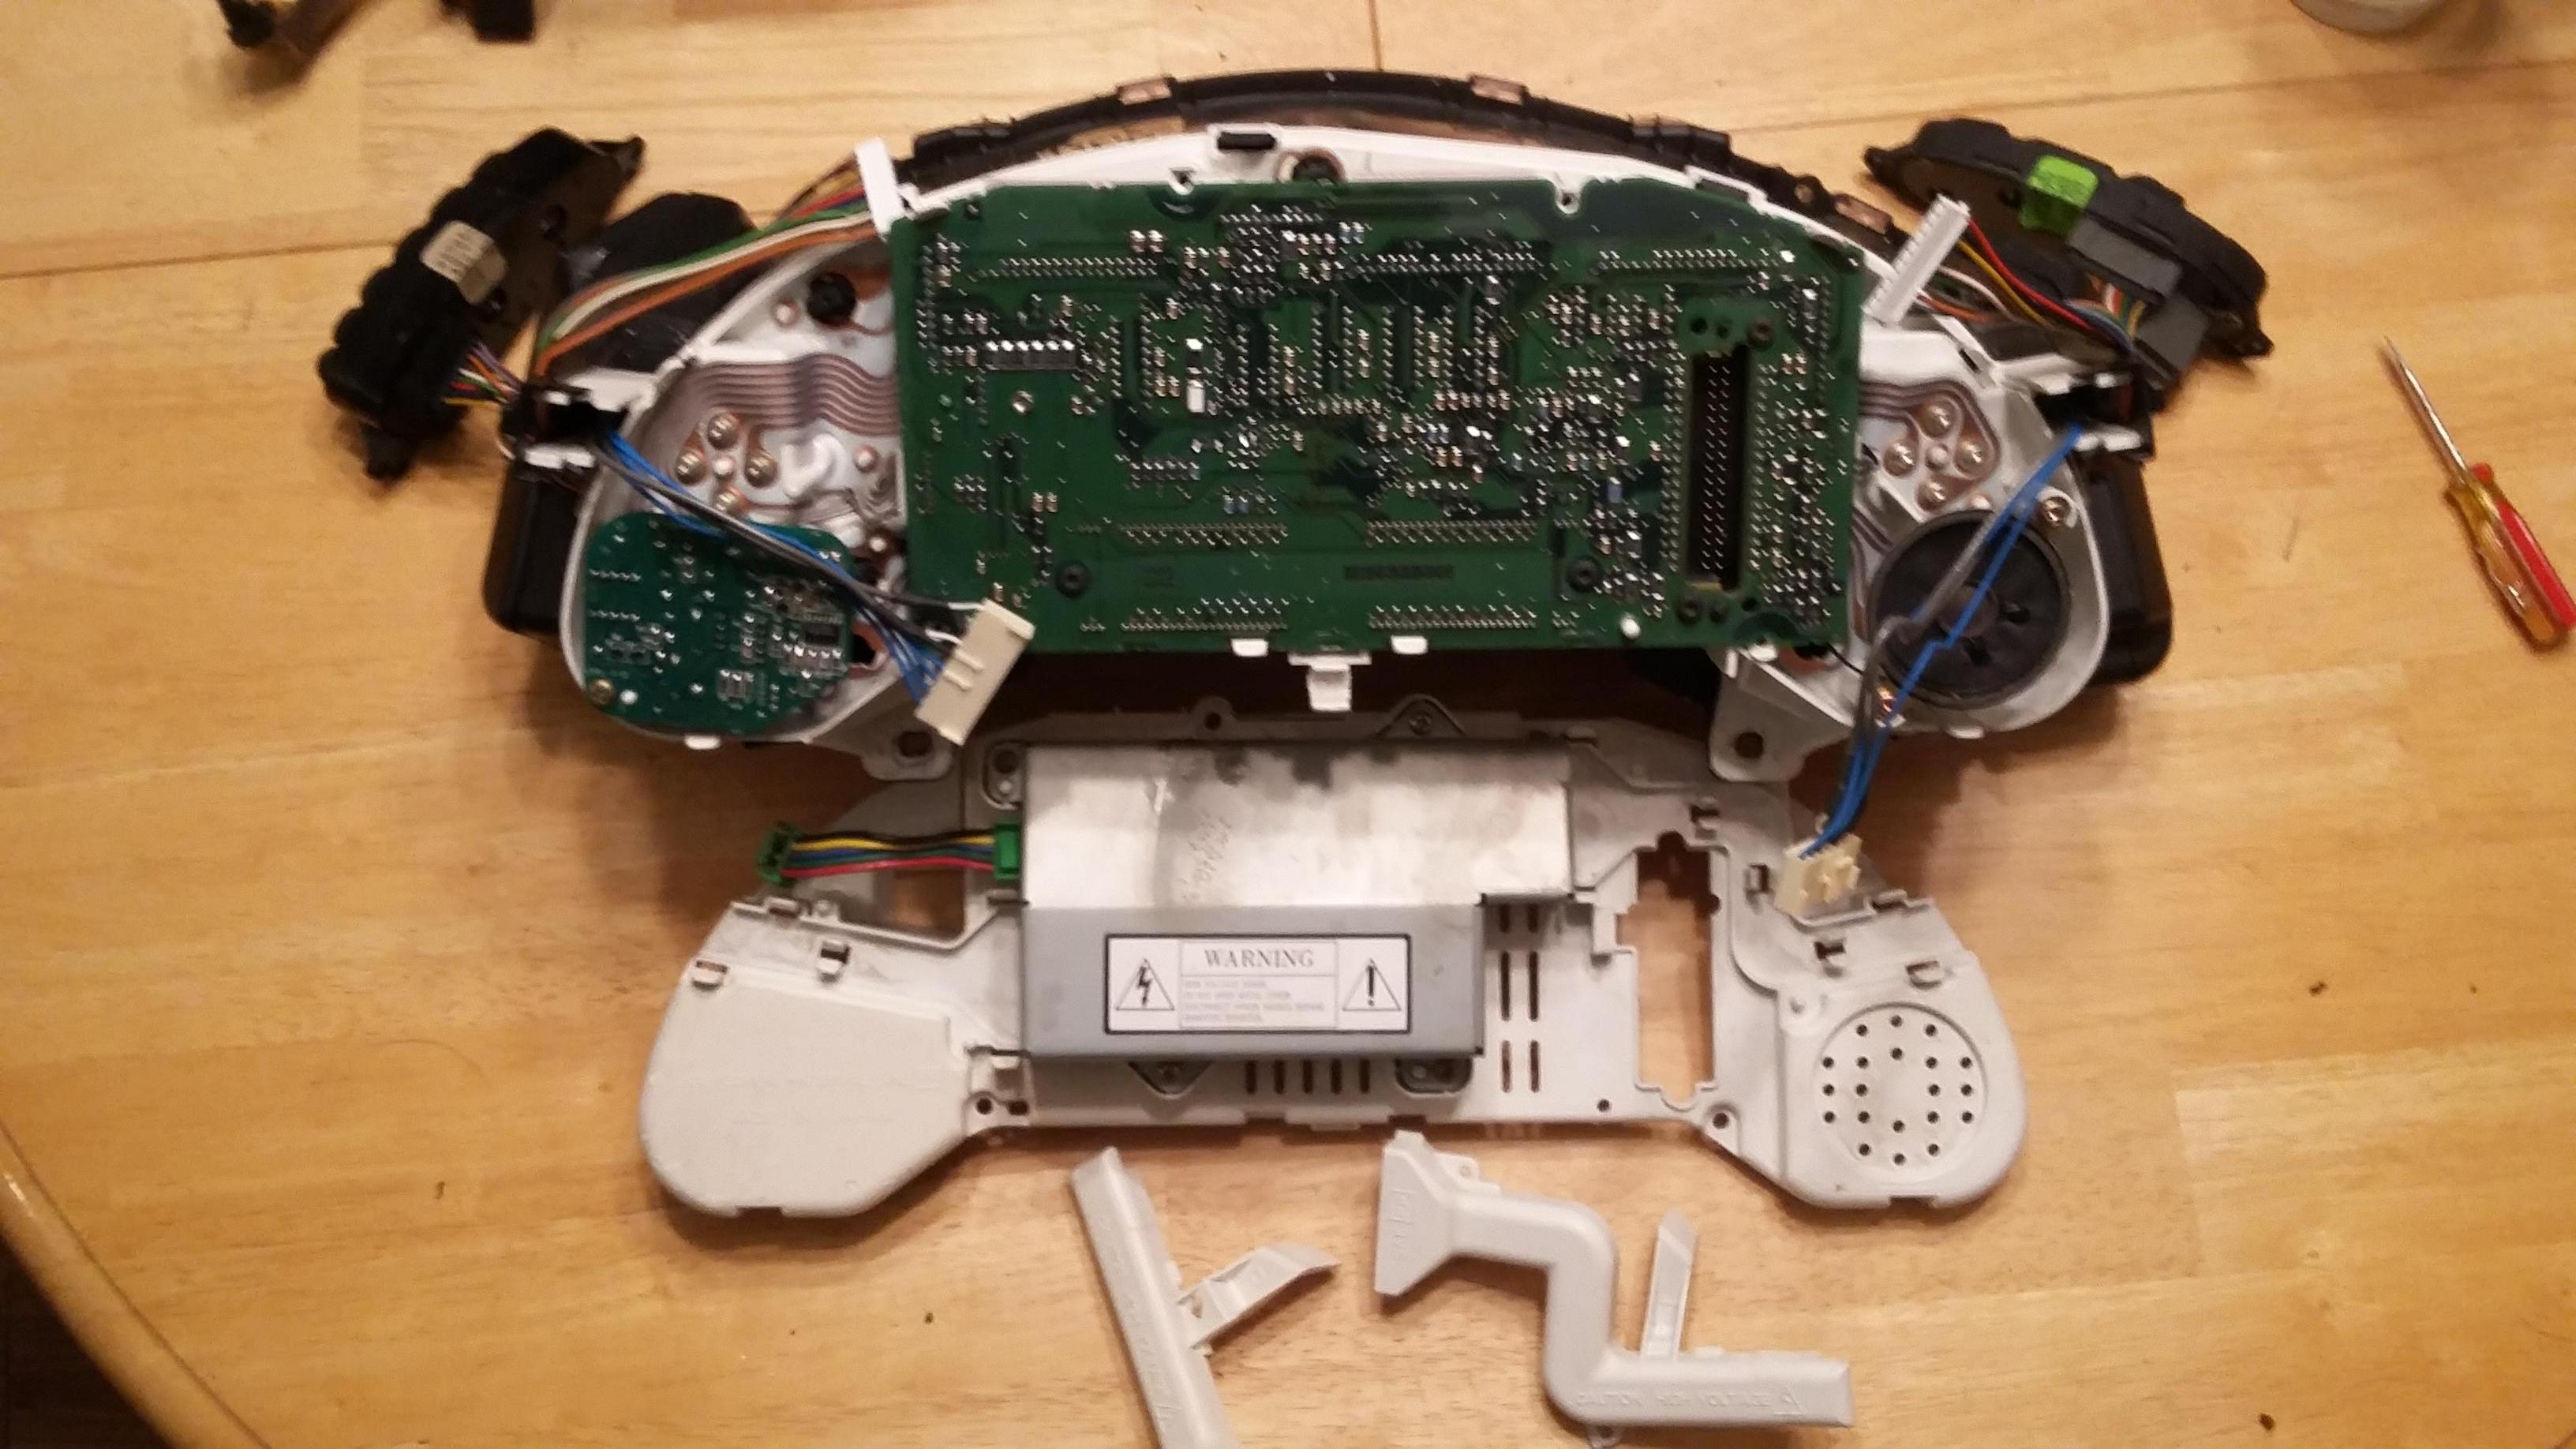
Next, the circuit board has to go. BEFORE YOU TRY TO LIFT IT: There are two small wiring connectors on each side. One has two wires, the other has 8. Disconnect those from the board.
Here's the speaker connector. Disconnect it.
Attachment 48359081
Here's the other one. Disconnect it too.
Attachment 48359082
Once you've done that, the board flips up and over and will hold itself in place pretty well.
Attachment 48359083
Each of these black bases are your indicator and warning bulbs. There are 14 in total. Might as well do 'em all.
Attachment 48359084
Once you've gotten to this point, that pizza you ordered should be getting pretty close!
Currently, my high beam indicator and MIL bulbs are burned out, so lacking any sort of online guidance, I figured I'd tear into it myself.
I'll assume if you've decided to do this yourself, you already know how to get your gauge cluster out. If not, there *are* a million threads on that.
http://www.vetteessentials.com/instr...zel_howto.html
Instrument cluster removal is about a 30 minute job. No big deal.
On to the important stuff. Order a pizza.
Place your gauge cluster on your kitchen table
Attachment 48359077
The first thing you'll have to do is remove those HIGH VOLTAGE channels. They're covering the wiring that goes to the UV bulbs. They're held in place by plastic clips that you just have to lightly bend back.
Attachment 48359078
Disconnect all those wiring connectors. One on each side of the UV inverter, one on each side for HUD/DIC, and the lower green connector that supplies power and whatnot to the inverter.
Attachment 48359079
There are four brass colored screws holding the inverter/coverplate onto the gauge pod. Remove those. Don't bother removing the four screws holding the inverter's metal cover plate. It's not necessary. There are also several more of those clip tabs that you'll have to gently pry and then you can remove the whole plate.
Next, the circuit board has to go. BEFORE YOU TRY TO LIFT IT: There are two small wiring connectors on each side. One has two wires, the other has 8. Disconnect those from the board.
Here's the speaker connector. Disconnect it.
Attachment 48359081
Here's the other one. Disconnect it too.
Attachment 48359082
Once you've done that, the board flips up and over and will hold itself in place pretty well.
Attachment 48359083
Each of these black bases are your indicator and warning bulbs. There are 14 in total. Might as well do 'em all.
Attachment 48359084
Once you've gotten to this point, that pizza you ordered should be getting pretty close!
Heel & Toe
Joined: Jan 2015
Posts: 15
Likes: 9
We've got TSD 74 and NHO 74B. TSD 74 is easy enough to find out about online, it's a T5 socket bulb, but NHO 74B doesn't seem to come up. Far as I can tell, they look to be interchangeable. I switched the two different bulbs around in one base and tried it on a 12V source and both bulbs lit up, so yeah, you can probably replace them all with one type of bulb.
Time for the important information! Here's the polarity for the gauge cluster warning lights if you want to go with LED. White marks are LED +
Attachment 48359075
Attachment 48359076
The only one I can't verify with absolute certainty is the 1-4 shift light (marked "14" on the back of the cluster) because I've disabled it through the PCM. The brake warning light + is on the same circuit path, though, so it should be correct.
Melting Slicks
Joined: Jul 2004
Posts: 3,294
Likes: 482
From: Brea CA
Good information on the cluster.
One bit of advice, do not leave the cluster face down. The fluid used to dampen the movement of the gauges can leak out through the shafts. If enough is lost this can affect the movement of the gauges. The fluid flows more as it gets hot.
Gary
One bit of advice, do not leave the cluster face down. The fluid used to dampen the movement of the gauges can leak out through the shafts. If enough is lost this can affect the movement of the gauges. The fluid flows more as it gets hot.
Gary

Heel & Toe
Joined: Jan 2015
Posts: 15
Likes: 9

I ordered the super white lights which is a different color than the warm incandescent bulbs they replaced. This color of light reacts differently with the filters for each of the indicators and projects a different color than before.
The red lights are almost fushcia now. The yellow lights are now a fluorescent, almost neon yellow. The greens have gone a little more toward teal. The blues, however, for high beam and MPH/KMH indicators are beautiful.
The increased light intensity has caused some spillover into the 1-4 shift and MIL indicators. They're not lit, they're just receiving a slight glow from the nearby MPH indicator.
My suggestion: Either stick with incandescent or get warm white LED's to avoid the weird discoloration of your indicators. I may or may not be considering swapping for warm white, but I'm also lazy and don't feel like pulling the cluster back out just for some bulbs.
As for the speaker, that's your ignition/door chime.

Banned Scam/Spammer
Joined: Sep 2016
Posts: 4,004
Likes: 3,929
From: Philadelphia PA (Birthplace of the USA, UNESCO World Heritage City)
I searched this thread for "vanity" but no results.
From another thread, it appears that the "74 wedge base bulbs" are used for the vanity mirrors, and that ideally there should also be LEDs on the side since the bulb faces sideways. Just thought this would be helpful to someone.
From another thread, it appears that the "74 wedge base bulbs" are used for the vanity mirrors, and that ideally there should also be LEDs on the side since the bulb faces sideways. Just thought this would be helpful to someone.
Last edited by ArmchairArchitect; Jun 21, 2017 at 03:54 PM.
Team Owner

Joined: Jul 2016
Posts: 25,303
Likes: 1,683
From: The Steel City, Colorful Colorado
Winner 2020 C7 of the Year - Modified
You originally asked for the number for the sun visor/vanity bulb (then you edited your post before I could find and post the bulb number). 2721 is the oem bulb, you already figured out the LED. I was just trying to help you in case you were needing the oem #.
Your original unedited question is below -
ArmchairArchitect has just replied to a thread you have subscribed to entitled - NEW Interior LED Mod Thread - in the C5 General forum of CorvetteForum - Chevrolet Corvette Forum Discussion.
This thread is located at:
https://www.corvetteforum.com/forums...9&goto=newpost
Here is the message that has just been posted:
***************
Anyone know the bulb #s or type/size for the vanity mirror lights?
***************
Last edited by FX VETTE; Jun 22, 2017 at 12:45 PM.
Le Mans Master
Joined: Dec 2013
Posts: 6,337
Likes: 5,115
From: Charles Town WV
2024 Corvette of the Year Finalist - Modified
2023 C6 of the Year Winner - Modified
2022 C6 of the Year Finalist - Modified
so heres a question... has anyone ever figured out a replacement or a brighter source for the uv tubes? would be cool to have them throw off a little more uv light to brighten things up.
Team Owner
Joined: Jul 2016
Posts: 25,303
Likes: 1,683
From: The Steel City, Colorful Colorado
Winner 2020 C7 of the Year - Modified
