


Leak Checks

Thread Starter
Tech Contributor


Joined: Dec 1999
Posts: 32,910
Likes: 2,402
From: Anthony TX
CI 6,7,8,9,11 Vet
St. Jude Donor '08
Dave
Your best bet is to remove the access plate in the passengers side wheel well area. You need to jack the car up on that side and remove the wheel:
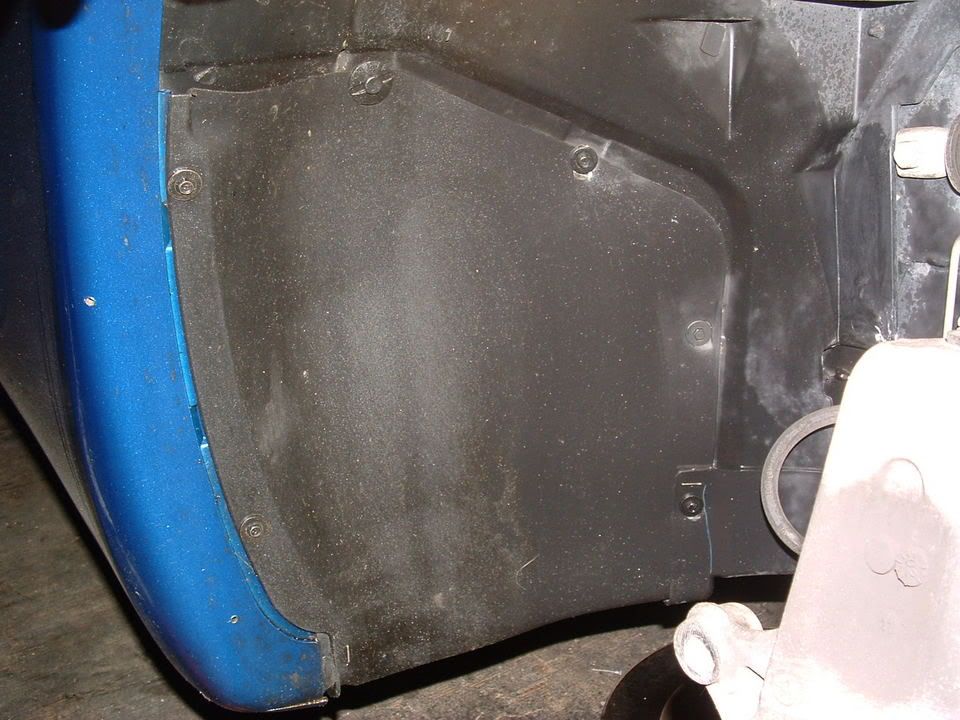
With that panel removed, you can access the tube and help feed it down to the area wher it belongs. Once you have the panel off, it should not be difficult to get it back in place.
Norm
I recommend removing the carpet and trim from the rear hatch area. Then have someone run water over the rear of the car while you look for water. You should also have thm spray the wheel well areas and the fuel door area. You should be able to pin point the leak easily once you have all the cover up stuff out! While the carpet is out, you might consider installing some Frost King insulation! It really helps knock down the road noise.
Bill C
Your best bet is to remove the access plate in the passengers side wheel well area. You need to jack the car up on that side and remove the wheel:
With that panel removed, you can access the tube and help feed it down to the area wher it belongs. Once you have the panel off, it should not be difficult to get it back in place.
Norm
I recommend removing the carpet and trim from the rear hatch area. Then have someone run water over the rear of the car while you look for water. You should also have thm spray the wheel well areas and the fuel door area. You should be able to pin point the leak easily once you have all the cover up stuff out! While the carpet is out, you might consider installing some Frost King insulation! It really helps knock down the road noise.
Bill C

Instructor

Joined: Aug 2004
Posts: 127
Likes: 0
From: Bethalto Illinois
Norm
I recommend removing the carpet and trim from the rear hatch area. Then have someone run water over the rear of the car while you look for water. You should also have thm spray the wheel well areas and the fuel door area. You should be able to pin point the leak easily once you have all the cover up stuff out! While the carpet is out, you might consider installing some Frost King insulation! It really helps knock down the road noise.
Bill C
Thanks Bill, I'll try it this weekend.
Norm
Racer

Joined: Apr 2005
Posts: 348
Likes: 2
From: Miami Fl
well is been raining like hell down here in fl and the car is soaked inside,and here i was thinking that a hardtop car would not leak,piece of crap,anyways it leaks from the weatherstrip near the back and the headliner is soaked,i removed the c pillars,all carpet and passenger seat,it leaks near the bottom of the rear window(z06 style) and i can't pin point that one leak,also near the pillar by the foot area/front door,i thought it was the glass but i don't think now,if i can't fix it i think is going to be up for sale soon,i'm getting a bit fed up.
Thread Starter
Tech Contributor
Joined: Dec 1999
Posts: 32,910
Likes: 2,402
From: Anthony TX
CI 6,7,8,9,11 Vet
St. Jude Donor '08
Originally Posted by turboed
well is been raining like hell down here in fl and the car is soaked inside,and here i was thinking that a hardtop car would not leak,piece of crap,anyways it leaks from the weatherstrip near the back and the headliner is soaked,i removed the c pillars,all carpet and passenger seat,it leaks near the bottom of the rear window(z06 style) and i can't pin point that one leak,also near the pillar by the foot area/front door,i thought it was the glass but i don't think now,if i can't fix it i think is going to be up for sale soon,i'm getting a bit fed up.
If you can take a digital picture of the leak points, I can help you get them fixed!! It's NOT rocket science, so the job is do able. Remove the passengers carpet and show me exactly where you see the water stream!!
'
Bill C
Racer
Joined: Apr 2005
Posts: 348
Likes: 2
From: Miami Fl
cool,thanks,the carpet is out on both sides cause it was really wet and i'm going to see if the leak at the rear of both side windows is the same water leak rolling down to the bottom rear window making it seem like another leak,also i might have to seal up the door hinges like you state at the start of the thread and go from there,and like norm i'm getting water in the rear pass storage area also,i'll keep you updated and thanks again for helping.
Last edited by turboed; May 16, 2006 at 11:23 PM.
Thread Starter
Tech Contributor
Joined: Dec 1999
Posts: 32,910
Likes: 2,402
From: Anthony TX
CI 6,7,8,9,11 Vet
St. Jude Donor '08
Hell,, I would just go to an automotive paint store that sells automotive/marine body sealer and get some BLACK sealer!! Use air to blow the area dry , rough it up with some 380 grit and force that sealer into the gaps!!! Use a small putty knife or plastic spatula and force that sealer into the cracks,holes or seam what ever it is where the water is coming in at. Its either that, or pay a body shop to remove the top, reseal and re-set the top! Hope your WALLET IS REALLY FAT for that one!!!! . Give the sealer a try. What have you got to loose??
Please let me know how you make out. Hell,,, if you lived close, I wold do it for you!!
Bill
Bill
. Give the sealer a try. What have you got to loose??Please let me know how you make out. Hell,,, if you lived close, I wold do it for you!!
Bill
Bill
Corvette Stories
The Best of Corvette for Corvette Enthusiasts

Every 2027 Corvette Engine Explained
Joe Kucinski
Designer Imagines A Corvette That Looks More Like a Corvette Than the Corvette
Verdad Gallardo
10 Ugly Corvettes That We Still Kinda Love
Joe Kucinski
Top 10 Most Expensive Corvettes Ever Sold on Bring A Trailer
Brett Foote
10 Things Every Corvette Owner Needs (2026 Edition)
Michael S. Palmer
8 Most "Only Corvette Owners Understand" Quirks and Problems
Pouria Savadkouei
10 Reasons the C6 Z06 is Still A Performance Benchmark After 20 Years
Joe Kucinski
How Much Horsepower Every Corvette Engine "LOST" in 1972
Joe Kucinski
Top 10 DOs and DON'Ts for Protecting Your Convertible Top!
Michael S. PalmerRacer
Joined: Apr 2005
Posts: 348
Likes: 2
From: Miami Fl
you read my mind,trust me i'm going to try everything to seal that up and what you said is what i had in mind but i'm always open to suggestions,i was hoping somebody else had this problem before but i guess i'm the first,the only positive thing is that i added a whole new set of leak areas to the leak check thread.
Thread Starter
Tech Contributor
Joined: Dec 1999
Posts: 32,910
Likes: 2,402
From: Anthony TX
CI 6,7,8,9,11 Vet
St. Jude Donor '08
Yep! Went to Walmart and picked up two tubes of Permatex BLACK Silicone RTV> Also got some blue painters tape and applied the tape all the way around a hinge area where you don't want the silicone. Just cut the tip on the pointy applicators that it puts a nice even bead in the area and fill up the voids and gaps. When you have the silicone in the area, just use your finger to smooth out the bead. Once the silicone skims over (about 60 min) remove the tape. I find the silicone better than the putty.
Bill
Bill


Cruising
Joined: Apr 2006
Posts: 14
Likes: 2
From: New London CT
Bill C. your first posting was right on target, thank you again. Turns out we are nearly neighbors. I live/work in Lebanon/New London, CT
I offer some additional Tips for those with the first problem and wet carpets.
1) When Diagnosing the problem with the “black lagoon” drain hose (first post) you may need to use A LOT of water. I removed my seat and carpet and hosed my car down and the drain appeared to be working fine. I was still suspicious, so I removed the battery and popped the hose out of the reservoir. Water came pouring down from the reservoir. Bingo.
2) After removing the drain hose I used my garden hose through the utter to blow the garbage out. 2 second operation.
3) Anyone who is reluctant to remove the seat and carpets should think again. They come out and go back in so EASY. However I have three comments. See 4, 5 & 6.
4) The small air duct that comes into the passenger side from the center console has a FRAGILE bezel interface. Instead of disassembling it and then removing the carpet, leave it in place, tilt the carpet out and unplug the hose carefully from the whole bezel assembly by gently rocking the soft rubber tube. The bezel should stay in place when you remove the carpet. I tried to remove the bezel face and broke one retaining flange. Super glue to the rescue.
5) Once you have your carpet and seat out and drying thoroughly, move your car to different pitches. This will allow any water trapped in small spaces to flow to the rear of the floor pan. I just mopped it up as I drove with a dry towel. I was amazed at how much water was hiding. Then again, I had a huge leak.
6) When you reinstall the carpet don’t bother tucking the front edge under the lip of the computer bay / relay box. In fact it is better if you leave it on the outside as the access panel lays against it nicely.
This photo sums it up.
http://www.geocities.com/photo_veg/C...orfor_leak.JPG
Photo Legend
A: This is the flange that I broke off
B: These two hard plastic protrusions engage the soft plastic relief’s in C
C: The soft plastic relief’s that engage with B. Note that they should NOT be pulled thru as I have shown here.
D: These are the pockets that engage A.
Last edited by Acer288; Aug 9, 2006 at 03:49 PM.


Cruising
Joined: Mar 2002
Posts: 13
Likes: 0
From: Dearborn Michigan
I had the A/C tube leak not once, not twice, but three times. The dealer fixed it three times, once each year, the last time a month ago. I started to notice a diffedrence in my Bose radio since last year. They have checked it and say it's fine, but we know how dealers are. The problem is with the Bass control. I turn it all the way up and it doesn't sound very Bassy. I have tons of Treble though. Could there be a fuse blown for the Bass Amplifier? The water drained down there three times and the floor was soaked three times. Or is their a Bose Amplifier box dowm there that could be affected? I hope someone (Maybe a Chevy Technician) can answer this or help or point me in the right direction. Thanks all.


 Hopefully not for future reference!