


Leak Checks

Pro

Joined: Jul 2008
Posts: 631
Likes: 0
From: Rockville MD
Did they forget to seal my car when it left the factory? 


I tried to seal it with RTV silicone but I think I need something that holds form better, like a putty of some sort.

This is where the water is leaking out of:

There some kind of foam in there. I put an extra layer of RTV silicone into the holes where the foam is, you can see the holes here:

I think it was leaking from there due to the unsealed hinge area up above... We'll see after it dries...
I tried to seal it with RTV silicone but I think I need something that holds form better, like a putty of some sort.
This is where the water is leaking out of:
There some kind of foam in there. I put an extra layer of RTV silicone into the holes where the foam is, you can see the holes here:
I think it was leaking from there due to the unsealed hinge area up above... We'll see after it dries...
Pro
Joined: Jul 2008
Posts: 631
Likes: 0
From: Rockville MD
Ok one more leak to go. Any ideas?
These are the drips that I can obviously see with the door closed:

I think it originates at the circle with the question mark
I'm not sure if somebody tried to repair this already. Here's a close up shot of what is located in that area:

These are the drips that I can obviously see with the door closed:
I think it originates at the circle with the question mark
I'm not sure if somebody tried to repair this already. Here's a close up shot of what is located in that area:

Le Mans Master


Joined: Oct 1999
Posts: 6,366
Likes: 34
You going to have to get real creative with how to apply water to one area, and wait for the leak.
I spent the last 2 nights when I get home on the dark trying to get water in one spot to find my rear leak. I have not been able to get it to happen. Drying it out inbetween tests is annoying as well. I think I may try to find a hill and get the bottle of water to go backwards under the trunk/rear window area.
My passenger side A pillar is leaking about 4 inches from the roof line as well. I am thinking it may be the trim around the windshield. that will be my next water test after I nail the exact trunk issue.

Thread Starter
Tech Contributor


Joined: Dec 1999
Posts: 32,910
Likes: 2,402
From: Anthony TX
CI 6,7,8,9,11 Vet
St. Jude Donor '08
You going to have to get real creative with how to apply water to one area, and wait for the leak.
I spent the last 2 nights when I get home on the dark trying to get water in one spot to find my rear leak. I have not been able to get it to happen. Drying it out inbetween tests is annoying as well. I think I may try to find a hill and get the bottle of water to go backwards under the trunk/rear window area.
My passenger side A pillar is leaking about 4 inches from the roof line as well. I am thinking it may be the trim around the windshield. that will be my next water test after I nail the exact trunk issue.
I spent the last 2 nights when I get home on the dark trying to get water in one spot to find my rear leak. I have not been able to get it to happen. Drying it out inbetween tests is annoying as well. I think I may try to find a hill and get the bottle of water to go backwards under the trunk/rear window area.
My passenger side A pillar is leaking about 4 inches from the roof line as well. I am thinking it may be the trim around the windshield. that will be my next water test after I nail the exact trunk issue.
Bill
Like most ZO6 cars,, you have the common roof rail/windshield header/junction leak. The area where all three combine, leaks and rund down the A pillar and leaks down to the sill plate cover area. Some are real bad.
The only real cure is to remove the door seal, the roof gutter and apply the correct seal in the area. Its quite an involved repair and if your NOT careful, you can break the roof gutter/trim.
They DO NOT make that part any more!

Last edited by Bill Curlee; Sep 14, 2011 at 06:23 PM.
Le Mans Master
Joined: Oct 1999
Posts: 6,366
Likes: 34

Intermediate

Joined: Mar 2010
Posts: 25
Likes: 0
From: Elgin Illinois
I just had those replaced at the dealer today...the originals were cracked near the top of the window, and I bought the car on the condition he would replace them on both sides...I don't know where they got them but they are available
Pro
Joined: Jul 2008
Posts: 631
Likes: 0
From: Rockville MD
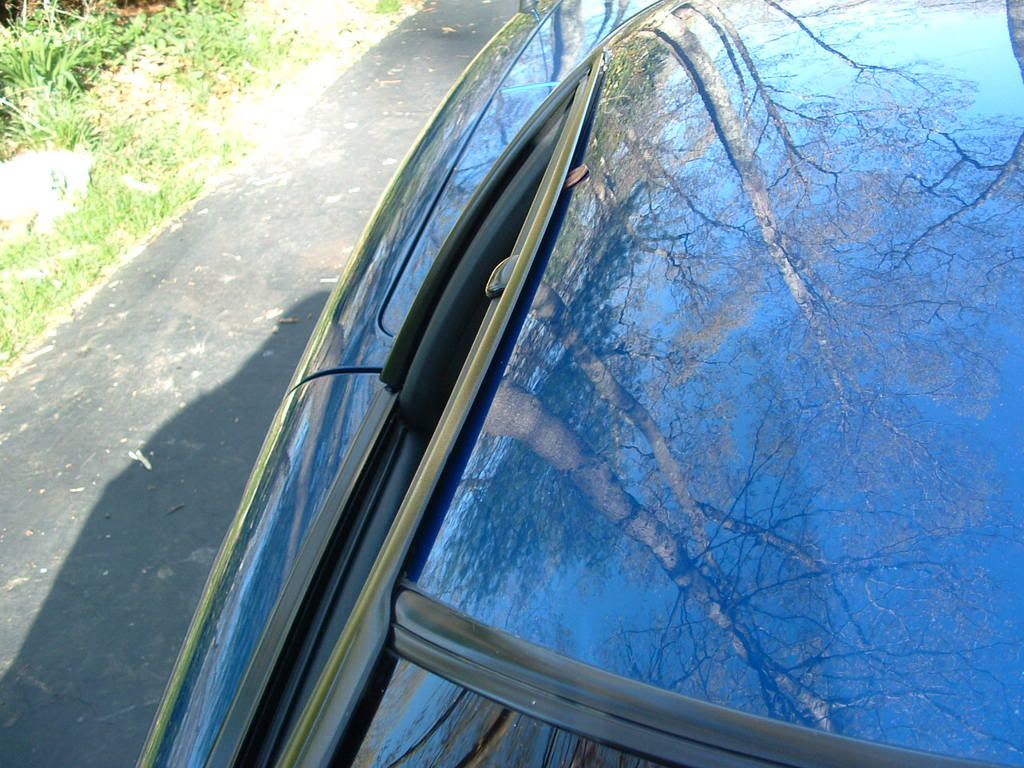
Went crazy with the RTV silicone today... I think I've got all of the leaks sealed up.
I took off the triangle and sealed up everything inside of it, including the screws. Then I sealed off the entire channel that's above the weatherstripping and runs all the way down to the triangle.
Closer shot:

As you can see I sealed off the entire triangle piece too.

Closer:

I also sealed off the windshield by using a credit card to lift the flap high enough and then I stuck the nozzle in there and pumped in plenty of silicone. I marked the area that I sealed with a red line.

I took off the triangle and sealed up everything inside of it, including the screws. Then I sealed off the entire channel that's above the weatherstripping and runs all the way down to the triangle.
Closer shot:
As you can see I sealed off the entire triangle piece too.
Closer:
I also sealed off the windshield by using a credit card to lift the flap high enough and then I stuck the nozzle in there and pumped in plenty of silicone. I marked the area that I sealed with a red line.
Last edited by pewter99; Feb 17, 2012 at 04:10 PM.
Corvette Stories
The Best of Corvette for Corvette Enthusiasts

Top 10 Most Expensive Corvettes Ever Sold on Bring A Trailer
Brett Foote
10 Things Every Corvette Owner Needs (2026 Edition)
Michael S. Palmer
8 Most "Only Corvette Owners Understand" Quirks and Problems
Pouria Savadkouei
10 Reasons the C6 Z06 is Still A Performance Benchmark After 20 Years
Joe Kucinski
How Much Horsepower Every Corvette Engine "LOST" in 1972
Joe Kucinski
Top 10 DOs and DON'Ts for Protecting Your Convertible Top!
Michael S. Palmer
Top 10 Most Explosive Corvettes Ever Made: Power-to-Weight Ratio Ranked!
Joe Kucinski
150 hp to 1,250 hp: Every Corvette Generation Compared by the Specs That Matter
Joe Kucinski
8 Coolest Corvette Pace Cars (and Replicas) of All Time
Verdad Gallardo
Pro
Joined: Jul 2008
Posts: 631
Likes: 0
From: Rockville MD


Le Mans Master
Joined: Oct 1999
Posts: 6,366
Likes: 34
It is attached, or I should say, the same piece as the plastic trim that runs up the windshield and top of the side window.
If you remove the weather stripping from the track, you will see screws all over inside. remove them all. this will free the track. once the track is out you will see more screws (Or the posibility mine is broken made me think they are behind it). remove them. there is also one in the door jam area. remove it. Then you can free the trim/triangle.
On my car it was a combo of screws and torx heads... I can tell someone has been in there and did some bubba work
I just spent the whole weekend on this bs. I sealed it 2x like 2slicks1vette and it still leaked like I did nothing. I also had glue issues from an astehtics point of view but we wont get into that.
There is double sided tape foam holding most of this together on all parts. there is even angled foam. Mine had dirt on it and was falling apart. I siliconed the whole thing all back together. I will reget this one day, but it had to be done. I want to complete my sound system and I cant have water running all over it. I still have to go back and fill all the seems with glue. I was waiting on pass 1 to dry as I had some other crap I put in there a week ago, and it was still wet like it was just out of the tube.
I tore the whole thing apart sunday and cleaned it all. I used a wire wheel on a drill to clean out all the crap me and other people put in the metal track, had to paint it again where I removed the paint/glue. razor blade and wd-40 the glue off the body/glass, sanded the inside of the roof/door face where the trim mounts. waxed it where I had glue on the body. cleaned that off. acetone everywhere I wanted glue to stick. then rebuild.
I also had to climb in the trunk and put silicone all over the trunk seals inside the car. After sealing the bar I had water dripping out of, it started comming in at other place. I also went around the whole back of the trunk where it meets the body from outside with the trunk open.
If I could reach the torx in the quarter panel channel, I probably would of had the whole car taken apart by now. roof included.
I should of took pictures, but I was in a really bad mood, and I had to race the sun.
If you remove the weather stripping from the track, you will see screws all over inside. remove them all. this will free the track. once the track is out you will see more screws (Or the posibility mine is broken made me think they are behind it). remove them. there is also one in the door jam area. remove it. Then you can free the trim/triangle.
On my car it was a combo of screws and torx heads... I can tell someone has been in there and did some bubba work
I just spent the whole weekend on this bs. I sealed it 2x like 2slicks1vette and it still leaked like I did nothing. I also had glue issues from an astehtics point of view but we wont get into that.
There is double sided tape foam holding most of this together on all parts. there is even angled foam. Mine had dirt on it and was falling apart. I siliconed the whole thing all back together. I will reget this one day, but it had to be done. I want to complete my sound system and I cant have water running all over it. I still have to go back and fill all the seems with glue. I was waiting on pass 1 to dry as I had some other crap I put in there a week ago, and it was still wet like it was just out of the tube.
I tore the whole thing apart sunday and cleaned it all. I used a wire wheel on a drill to clean out all the crap me and other people put in the metal track, had to paint it again where I removed the paint/glue. razor blade and wd-40 the glue off the body/glass, sanded the inside of the roof/door face where the trim mounts. waxed it where I had glue on the body. cleaned that off. acetone everywhere I wanted glue to stick. then rebuild.
I also had to climb in the trunk and put silicone all over the trunk seals inside the car.
After sealing the bar I had water dripping out of, it started comming in at other place. I also went around the whole back of the trunk where it meets the body from outside with the trunk open.If I could reach the torx in the quarter panel channel, I probably would of had the whole car taken apart by now. roof included.
I should of took pictures, but I was in a really bad mood, and I had to race the sun.
Last edited by bill mcdonald; Sep 19, 2011 at 02:04 PM. Reason: adding some more clearity
Le Mans Master
Joined: Oct 1999
Posts: 6,366
Likes: 34
Mine looked exactly like this, but I had far more glue crap built up on the roof/door area that it made the surface uneven.
I had dirt in the same spot. Nothing between the glass and frame. I even had that funky metal grinding on the A pillar at the top there.
I put glue in places it didn't need it.
Anyhow, take note the triangle is not there, and the trim is with it.


I had dirt in the same spot. Nothing between the glass and frame. I even had that funky metal grinding on the A pillar at the top there.
I put glue in places it didn't need it.
Anyhow, take note the triangle is not there, and the trim is with it.
Melting Slicks


Joined: Apr 2008
Posts: 3,131
Likes: 12
From: Houston Tx
Well after a good 2 or so years of no leaking after I fixed it. I am leaking again. First leak started after I took the car to the body shop. When it rains for a long period of times I get a good amount of water in the rear driver side small compartment in the trunk area (Z06 btw). I had the rear passenger side fender replaced. Do you think they screwed something up causing it to leak back there? Kinda pissed too as I now have my window rolling half way down and making grinding sounds. Never did it before I took to body shop.
Other leak takes the same amount of time but it only has 1 or 2 drops of water on the passenger side door panel right below the A pillar. I will come in and see just a drop or so of water chilling in that spot. Not sure why its leaking again after I fixed both sides a few years back. Kinda upset about that too. This is one of my least worries. The main one is why am I getting a nice size puddle of water in the back driver side compartment. Passenger side one is completely dry as well.
Other leak takes the same amount of time but it only has 1 or 2 drops of water on the passenger side door panel right below the A pillar. I will come in and see just a drop or so of water chilling in that spot. Not sure why its leaking again after I fixed both sides a few years back. Kinda upset about that too. This is one of my least worries. The main one is why am I getting a nice size puddle of water in the back driver side compartment. Passenger side one is completely dry as well.
Le Mans Master
Joined: Oct 1999
Posts: 6,366
Likes: 34
My z06 was filling the drivers side trunk pocket with water. to the top.
I found the leak running around the whole seam of the roof/quarter panel/trunk, across the back window. There are 2 plastic posts under the trunk hidge mounts that go to the wheel well. water was running down the back of it as well.
I found a fat piece of sealent at the rear window drivers side. water would rip off this because it was bowing down.
Both these paths lead all water right into the drivers side trunk recessed pocket thing.
here is a picture from a post earlier on. I did what was done here and ran a ton of silicone around those seals.

I have not tested it yet as my car still smells like a tube of silicone, and I have to make a nice looking seal around the trim of the windows.
I found the leak running around the whole seam of the roof/quarter panel/trunk, across the back window. There are 2 plastic posts under the trunk hidge mounts that go to the wheel well. water was running down the back of it as well.
I found a fat piece of sealent at the rear window drivers side. water would rip off this because it was bowing down.
Both these paths lead all water right into the drivers side trunk recessed pocket thing.
here is a picture from a post earlier on. I did what was done here and ran a ton of silicone around those seals.
I have not tested it yet as my car still smells like a tube of silicone, and I have to make a nice looking seal around the trim of the windows.
Last edited by bill mcdonald; Sep 20, 2011 at 02:12 PM.
Pro

Joined: Nov 2003
Posts: 513
Likes: 0
From: Hotlanta GA
My 00 FRC needs these corrections as well. Are you guys just going to town with huge caulk guns of this stuff, or what?
Also - just out of curiosity - wouldn't doing the convertible conversion negate the roof/a-pillar issue?
Also - just out of curiosity - wouldn't doing the convertible conversion negate the roof/a-pillar issue?
Le Mans Master
Joined: Oct 1999
Posts: 6,366
Likes: 34
I am going to do the final look of the seals around the windows with permatex sealent. since I had issues with the other caulk types looking bad, or setting up super fast on me in 85 degrees.
I filled the door hinges gaps, all the weather strip seal pieces/triangle. some floor seam issues that just looked odd to me. around the whole inside trunk seam. Outside trunk seal area. Corners where the roof meets the windows.
when I was laying in the trunk, I could see the frame halo had a gap between it and the roof looking forward. I filled that gap as well since I could see light at the bottom.
My headliner is seperating. I have been going to work on it. Cardboard by the side windows is just falling off. Up by the windshield the liner is peeling away which I did not notice till I pulled it. Found some water stains on it by the corner of the side windows. the fun never ends.

Just be warned, when you glue this much, it stinks. I did my last glue job sunday and it still smells real strong. I air it out often, but still.
Pro
Joined: Nov 2003
Posts: 513
Likes: 0
From: Hotlanta GA
But as bad as the sealant smell is - it's still gotta be better than mildewed carpet, right?

Le Mans Master
Joined: Oct 1999
Posts: 6,366
Likes: 34
It smells as best as I can think of like vinegar. It can clear your sinus cavity and make your eyes water. I dont know if I would call it better.
If I was locked in the garage with this smell, I would pass out.
If I was locked in the garage with this smell, I would pass out.
Thread Starter
Tech Contributor
Joined: Dec 1999
Posts: 32,910
Likes: 2,402
From: Anthony TX
CI 6,7,8,9,11 Vet
St. Jude Donor '08
The smell you are experiencing is ACETIC ACID and thats the by product of the chemical process that happens when the RTV is exposed to atmospheric humidity. As the RTV cures the smell will stop.
Just keep the windows open and let it out of the car. Once its fully cured, the smell will go away.
The term RTV stands for "Room Temperature Vulcanization"