


Leak Checks

Pro

Joined: Jul 2008
Posts: 631
Likes: 0
From: Rockville MD
Hunting more leaks down!
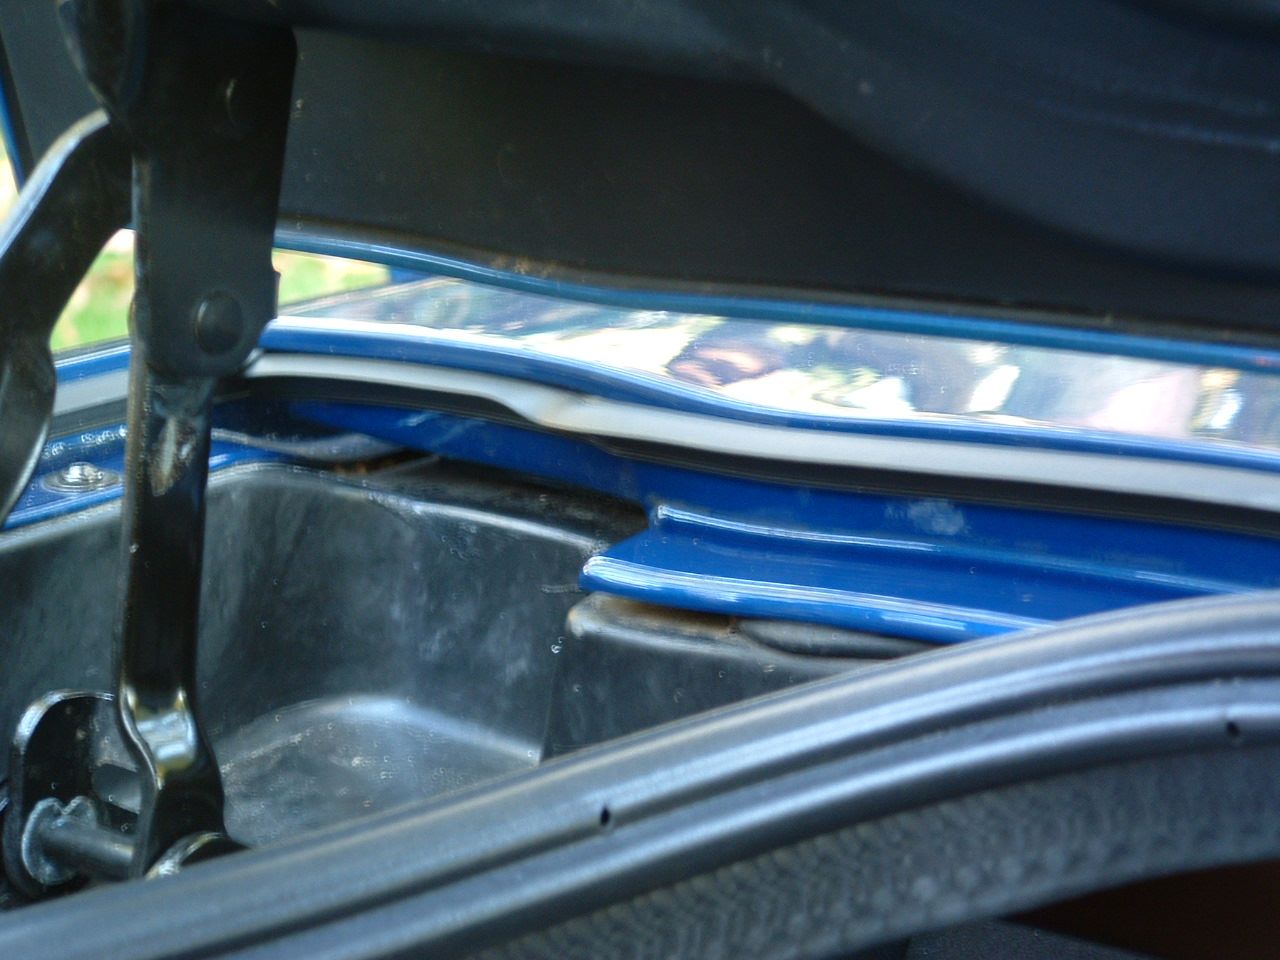
Here's where the leak was happening:

I tackled this leak by first sealing here:

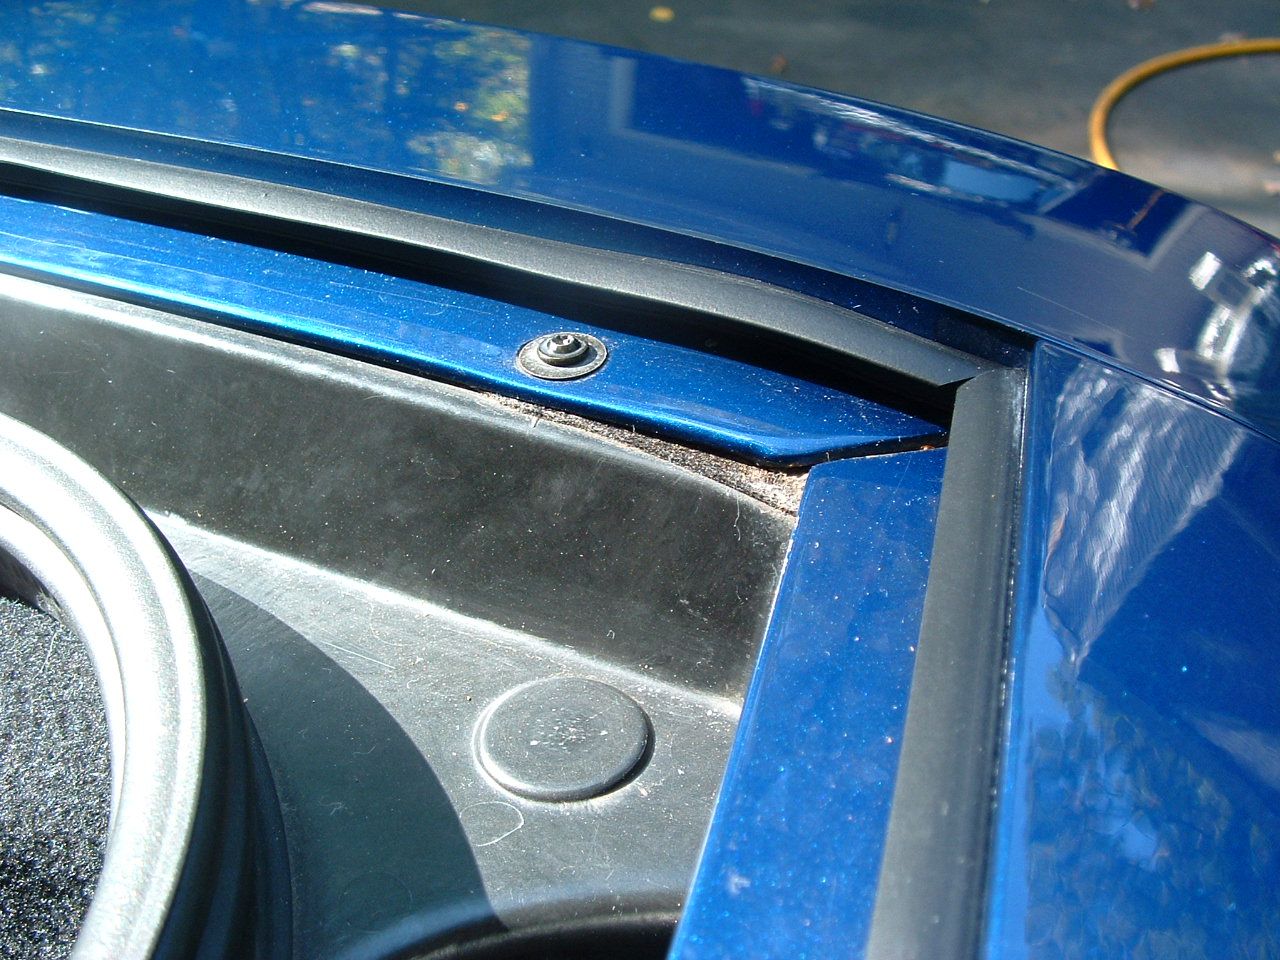
Then I sealed up the area where a screw holds the weatherstripping. I also added a bead of silicone to the circled areas to make the roof/targa top interface seal tighter.

Closer:

By the way, I picked up this stuff at Home Depot to seal up the door hinges (not pictured in this post). It's about $1.50 and is plenty to do both doors.


Here's where the leak was happening:
I tackled this leak by first sealing here:
Then I sealed up the area where a screw holds the weatherstripping. I also added a bead of silicone to the circled areas to make the roof/targa top interface seal tighter.
Closer:
By the way, I picked up this stuff at Home Depot to seal up the door hinges (not pictured in this post). It's about $1.50 and is plenty to do both doors.

Last edited by 2slicks1vette; Sep 23, 2011 at 06:04 PM.
Burning Brakes


Joined: May 2011
Posts: 1,009
Likes: 0
From: Southeastern Michigan
I've been searching on my leaky windows and keep running into dead end old links. (below)
http://www.theredlion.us/window_blowout_clip.htm
http://www.theredlion.us/TipIn.htm
I read the sticky in the general section but the links are no longer good and I tried to search CorvetteActionCenter.com with no luck
General sticky info: " Water Intrusion
Water leaks have several ways of getting in the car, and none of them AFAIK are very difficult to fix. Proper adjustments and maintenance will prevent most leaks.
Bill Curlee�s thread abouting locating & cleaning the udders, and sealing the door hinges.
Here�s a few TSB�s from the CorvetteActionCenter.com:
1997-1998: Service Bulletin: Waterleak Above Door Glass (Reseal Blowout Clip)
1997-2002: Service Bulletin: General Waterleak Guide
1997: Service Bulletin: Water Drips into Rear Compartment After Hatch/Glass Has Been Opened "
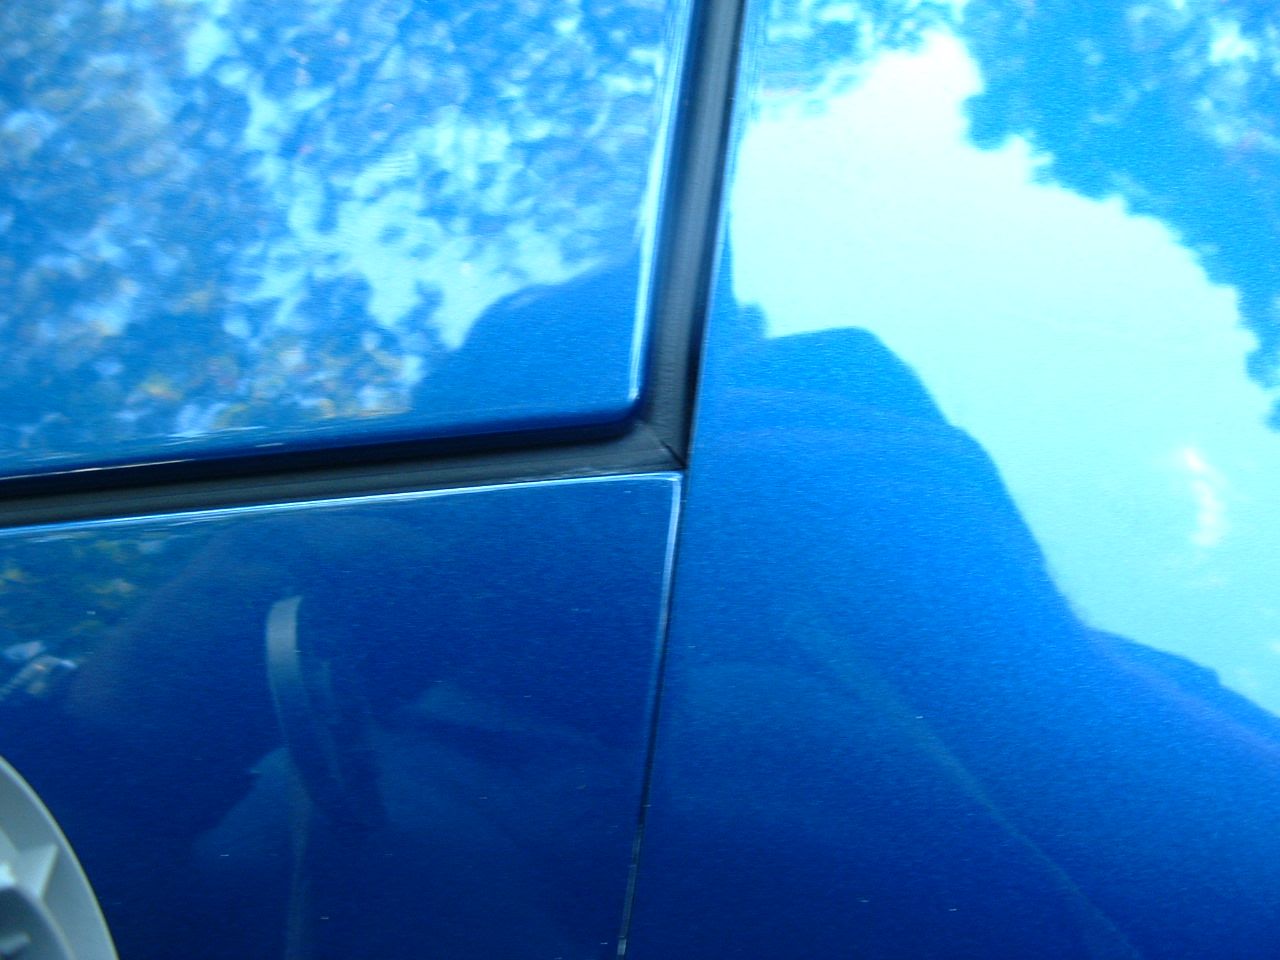
Now I'm looking at this thread but still not seeing what I need. I have gaps in the window trim on both driver and passenger side. There is a gap right where the two seals meet it comes in towards the targa top and there is no seal touching the top of the window when its rolled up.
http://www.theredlion.us/window_blowout_clip.htm
http://www.theredlion.us/TipIn.htm
I read the sticky in the general section but the links are no longer good and I tried to search CorvetteActionCenter.com with no luck
General sticky info: " Water Intrusion
Water leaks have several ways of getting in the car, and none of them AFAIK are very difficult to fix. Proper adjustments and maintenance will prevent most leaks.
Bill Curlee�s thread abouting locating & cleaning the udders, and sealing the door hinges.
Here�s a few TSB�s from the CorvetteActionCenter.com:
1997-1998: Service Bulletin: Waterleak Above Door Glass (Reseal Blowout Clip)
1997-2002: Service Bulletin: General Waterleak Guide
1997: Service Bulletin: Water Drips into Rear Compartment After Hatch/Glass Has Been Opened "
Now I'm looking at this thread but still not seeing what I need. I have gaps in the window trim on both driver and passenger side. There is a gap right where the two seals meet it comes in towards the targa top and there is no seal touching the top of the window when its rolled up.

Le Mans Master


Joined: Oct 1999
Posts: 6,366
Likes: 34
Well I am so glad you brought up the blow out clips. I went to see where mine were friday night... They were on my work bench.  I forgot to put them in.
Spent saturday with a razor blade removing the silicone I put in the window tracks and put the blow out clips back on. siliconed it back up. Siliconed around the plastic window seals (roof and windshield) since it has been a week for the last bit of silicone to dry out.
Having the head liner out, I saw where a potential leak could be happening where the sun visor mounts. Above that area is the corner of the window seal (where the top windshield seal meets the side window). I pumped that area full of silicone on both sides up inside the top of the windshield steel frame.
I also pulled the weather stripping back from inside the car and ran a bead of silicone under it, where it is hidden. I put the bead where the weather stripping meets the track.
Sunday morning I water tested my car and fixed all the front leaks. Even the one where it drips through the window down the door and over the speaker grill.
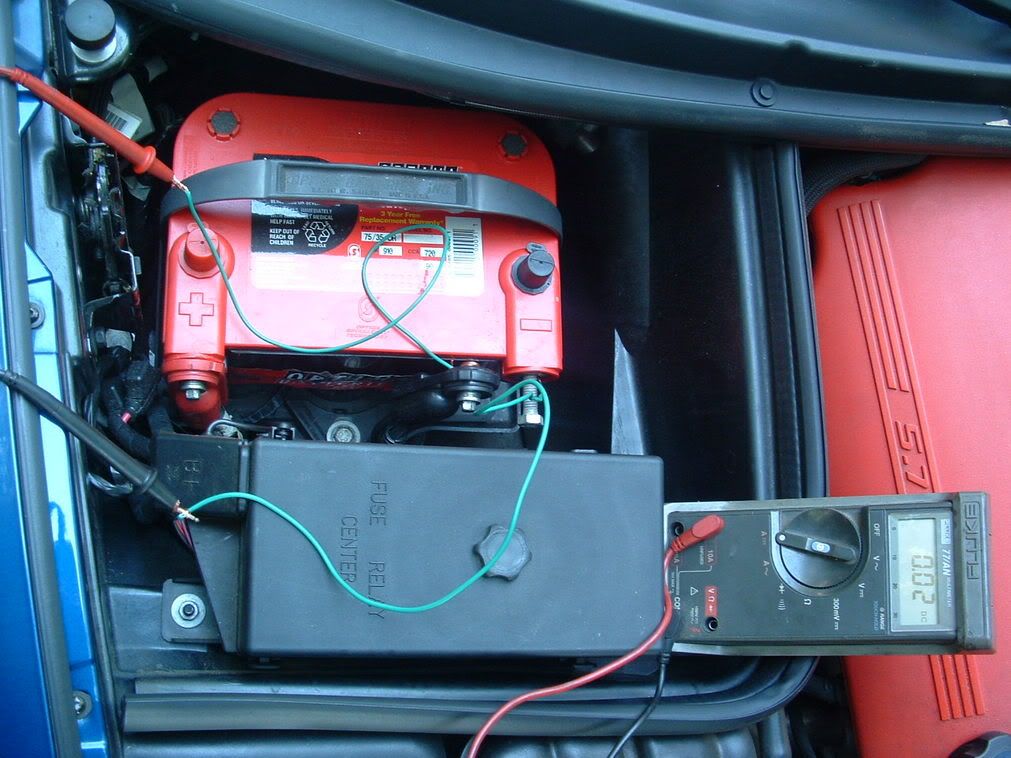
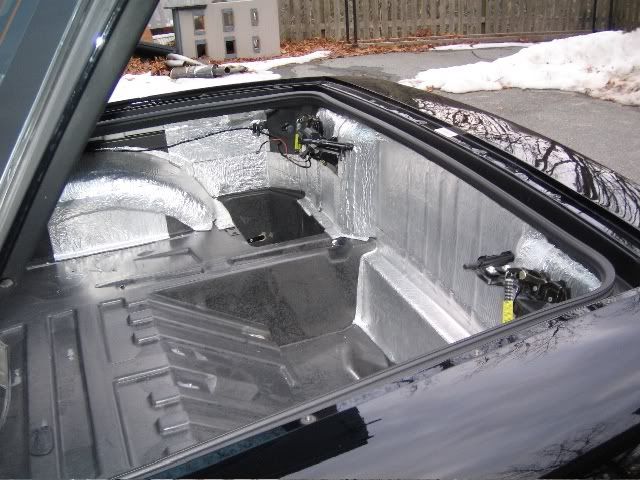
The rear was still dripping a drop every 30 seconds. I hooked up the air compressor where the leak was dripping and shot air inside. I could hear the air come out around the trunk seal. At this location below.
I already had siliconed that area with a caulk gun. I must of done a crap job since the big gun with the trunk in the way made it hard. It was a small hole/gap.
I got a little tube of silicone gasket maker and used that. I filled the whole channel again full by hand and then pushed in the trunk weather seal. I will give it a day or 2 and test again. Also re-glued the area it was dripping from in the trunk, under the rear window.
Almost got this sucker beat.
I forgot to put them in. Spent saturday with a razor blade removing the silicone I put in the window tracks and put the blow out clips back on. siliconed it back up. Siliconed around the plastic window seals (roof and windshield) since it has been a week for the last bit of silicone to dry out.
Having the head liner out, I saw where a potential leak could be happening where the sun visor mounts. Above that area is the corner of the window seal (where the top windshield seal meets the side window). I pumped that area full of silicone on both sides up inside the top of the windshield steel frame.
I also pulled the weather stripping back from inside the car and ran a bead of silicone under it, where it is hidden. I put the bead where the weather stripping meets the track.
Sunday morning I water tested my car and fixed all the front leaks. Even the one where it drips through the window down the door and over the speaker grill.
The rear was still dripping a drop every 30 seconds. I hooked up the air compressor where the leak was dripping and shot air inside. I could hear the air come out around the trunk seal. At this location below.
I already had siliconed that area with a caulk gun. I must of done a crap job since the big gun with the trunk in the way made it hard. It was a small hole/gap.
I got a little tube of silicone gasket maker and used that. I filled the whole channel again full by hand and then pushed in the trunk weather seal. I will give it a day or 2 and test again. Also re-glued the area it was dripping from in the trunk, under the rear window.
Almost got this sucker beat.

Thread Starter
Tech Contributor


Joined: Dec 1999
Posts: 32,910
Likes: 2,402
From: Anthony TX
CI 6,7,8,9,11 Vet
St. Jude Donor '08
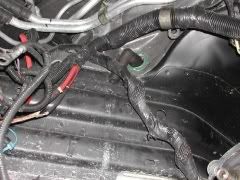
If you have problems with dirt and water in the trunk drainage area,, you can add the C6 hood seal to the C5 trunk lid area. I did this and it does a great job keeping stuff out and seals the area:

BC
BC
Burning Brakes

Joined: Feb 2006
Posts: 1,085
Likes: 3
From: Ottawa Ontario, Canada
^Bill, that C6 hood seal around the trunk opening is a great idea! I hate how dirty it gets around the trunk opening and it's a PITA to clean... I bet that hood seal keeps most of the crap out of there!
Is this seal the same as the seal that runs along the side of the C5 hood also?
Is this seal the same as the seal that runs along the side of the C5 hood also?
Thread Starter
Tech Contributor
Joined: Dec 1999
Posts: 32,910
Likes: 2,402
From: Anthony TX
CI 6,7,8,9,11 Vet
St. Jude Donor '08
^Bill, that C6 hood seal around the trunk opening is a great idea! I hate how dirty it gets around the trunk opening and it's a PITA to clean... I bet that hood seal keeps most of the crap out of there!
Is this seal the same as the seal that runs along the side of the C5 hood also?
Is this seal the same as the seal that runs along the side of the C5 hood also?
Well,, its the same TYPE seal but,, I think the C6 seal works a bit better
In this picture is shot of the C5 hood seal:
BC
Safety Car


Joined: Dec 2010
Posts: 3,938
Likes: 498
From: Fords, NJ
Corvette Stories
The Best of Corvette for Corvette Enthusiasts

Every 2027 Corvette Engine Explained
Joe Kucinski
Designer Imagines A Corvette That Looks More Like a Corvette Than the Corvette
Verdad Gallardo
10 Ugly Corvettes That We Still Kinda Love
Joe Kucinski
Top 10 Most Expensive Corvettes Ever Sold on Bring A Trailer
Brett Foote
10 Things Every Corvette Owner Needs (2026 Edition)
Michael S. Palmer
8 Most "Only Corvette Owners Understand" Quirks and Problems
Pouria Savadkouei
10 Reasons the C6 Z06 is Still A Performance Benchmark After 20 Years
Joe Kucinski
How Much Horsepower Every Corvette Engine "LOST" in 1972
Joe Kucinski
Top 10 DOs and DON'Ts for Protecting Your Convertible Top!
Michael S. Palmer
Burning Brakes
Joined: May 2011
Posts: 1,009
Likes: 0
From: Southeastern Michigan
Burning Brakes
Joined: Feb 2006
Posts: 1,085
Likes: 3
From: Ottawa Ontario, Canada
I posted this in another thread, and decided to put it here as well in case it's useful to someone.
--------------------------------------------------------------------------------
Well, I cleaned out all of my "udder" drains last night. The whole process only took about an hour, and this included removing the wipers and cowl to give everything a good look.
The three drains under the wiper motor on the driver's side were pretty much clean. There were a couple of leaves inside the rearmost drain, simply squeezing the drain ground them up (they were dry) and the bits fell out. There's lots of room to get your hand in under there and check all three drains. Also, since there's lots of room under the drains all of the stuff in them seems to come out easily… my car has lived outside (exept in the winter) for seven years since I bought it in 2004 and I've never cleaned these drains.
The pass side drain was another story. There was about an inch of wet "gunk" in the bottom of it. I found it odd that the gunk was still wet as we hadn't had any rain for almost a week (beautiful dry weather right through the long weekend ). I got the impression when reinstalling the drain that the end of it was resting on something, but this is not possible to confirm from up top as you can't see down there…
I bet the drain's end is either crowded and can't open properly, or it's sitting close enough to whatever is under it that the gunk that comes out is piling up around the end of the drain and keeping it from clearing itself as designed. If I get real ambitious this weekend (and the predicted rainy weather doesn't interfere) I'll pull the access panel from the pass side wheel well and see what's going on in there.
Another thing I noticed was the cowl design. It would appear it was originally designed to ferry most or all of the water coming off the windshield over to the three large drains on the driver's side, but the hole in the cowl for the pass side wiper arm will let most of the water from the pass side windshield go right down into the wiper well where it will be forced to drain from the single drain on the pass side. If there was a ridge around that hole it would keep a significant portion of that water flowing over to the three drains on the driver's side, and probably reduce the volume of water required to drain from the pass side. That pass side drain is right in front of the HVAC opening, which is right above the blower motor in the passenger's foot well… it's the one and only path for water to escape the wiper well without flooding the interior!
--------------------------------------------------------------------------------
Well, I cleaned out all of my "udder" drains last night. The whole process only took about an hour, and this included removing the wipers and cowl to give everything a good look.
The three drains under the wiper motor on the driver's side were pretty much clean. There were a couple of leaves inside the rearmost drain, simply squeezing the drain ground them up (they were dry) and the bits fell out. There's lots of room to get your hand in under there and check all three drains. Also, since there's lots of room under the drains all of the stuff in them seems to come out easily… my car has lived outside (exept in the winter) for seven years since I bought it in 2004 and I've never cleaned these drains.
The pass side drain was another story. There was about an inch of wet "gunk" in the bottom of it. I found it odd that the gunk was still wet as we hadn't had any rain for almost a week (beautiful dry weather right through the long weekend
). I got the impression when reinstalling the drain that the end of it was resting on something, but this is not possible to confirm from up top as you can't see down there…I bet the drain's end is either crowded and can't open properly, or it's sitting close enough to whatever is under it that the gunk that comes out is piling up around the end of the drain and keeping it from clearing itself as designed. If I get real ambitious this weekend (and the predicted rainy weather doesn't interfere) I'll pull the access panel from the pass side wheel well and see what's going on in there.
Another thing I noticed was the cowl design. It would appear it was originally designed to ferry most or all of the water coming off the windshield over to the three large drains on the driver's side, but the hole in the cowl for the pass side wiper arm will let most of the water from the pass side windshield go right down into the wiper well where it will be forced to drain from the single drain on the pass side. If there was a ridge around that hole it would keep a significant portion of that water flowing over to the three drains on the driver's side, and probably reduce the volume of water required to drain from the pass side. That pass side drain is right in front of the HVAC opening, which is right above the blower motor in the passenger's foot well… it's the one and only path for water to escape the wiper well without flooding the interior!
Pro
Joined: Nov 2010
Posts: 514
Likes: 21
Alright getting a tad frustrated here. 2002 z06, with a trunk leak, in the center pan. Not one other spot in the back is wet except for the middle pan. The drains all work perfectly and are not clogged. Took the carpet out and had someone hold a hose over the trunk/rear window/roof for about 15 minutes. Not a single drop. But sure enough every time it rains I have water in the trunk. Any ideas?
Le Mans Master
Joined: Oct 1999
Posts: 6,366
Likes: 34
Alright getting a tad frustrated here. 2002 z06, with a trunk leak, in the center pan. Not one other spot in the back is wet except for the middle pan. The drains all work perfectly and are not clogged. Took the carpet out and had someone hold a hose over the trunk/rear window/roof for about 15 minutes. Not a single drop. But sure enough every time it rains I have water in the trunk. Any ideas?
I also siliconed the trunk seal together at the gap so it is one piece. Then I lightly siliconed to to the trunk ridge it sits on. I did this when I first found out I had a leak.
I also found it would leak depending on the angle it was at. in my driveway it would leak pretty bad. All I had to do was run the water down the roof and it would run down to the seam between the trunk and the quarter panel into my rear drivers side storage bin.
Le Mans Master
Joined: Oct 1999
Posts: 6,366
Likes: 34
I dont know what to report on them, they are just those little metal tabs sticking out of the weather stripping. They are about 2" long.
I would like to add the fact that I glued the hell out of window seals it has helped a ton. I actually did not get my passenger side door shut one night and it rained. Not a single drop in the car. I got in it in the morning and the door ajar warning was on. I was shocked. Usually with the door shut I would have a puddle on the passenger side floor board. Not a single drop.
I would like to add the fact that I glued the hell out of window seals it has helped a ton. I actually did not get my passenger side door shut one night and it rained. Not a single drop in the car. I got in it in the morning and the door ajar warning was on. I was shocked. Usually with the door shut I would have a puddle on the passenger side floor board. Not a single drop.

Team Owner


Joined: Jan 2007
Posts: 29,065
Likes: 1,839
From: cookeville tennessee
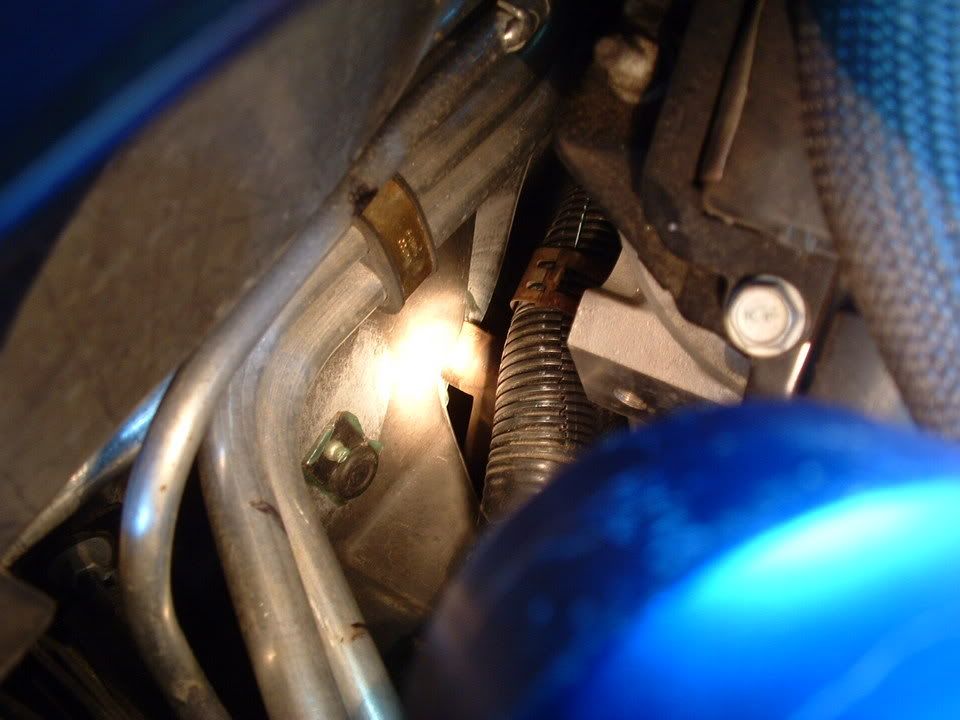
Last but not least is the air box drain. When you use the AC or Defrost, condensation collects in the HVAC air box. If it cant drain out, it will leak in the pass foot well!!
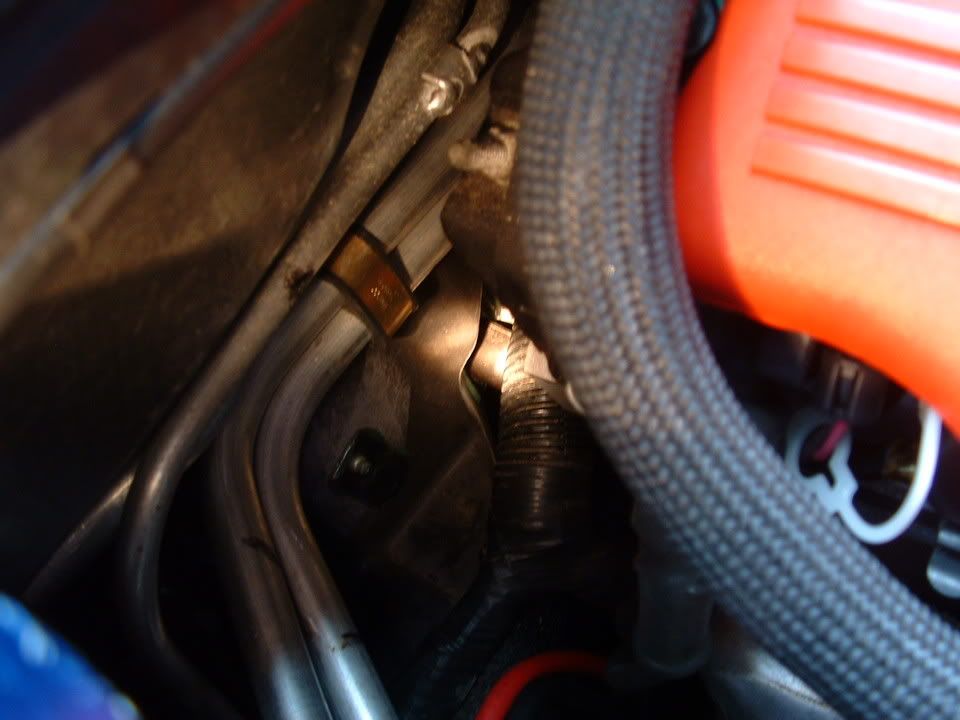
Here is the drain tube. It lives on the passengers firewall just aft of the cylinder head: Flash light beam highlihts the area where the drain tube is:
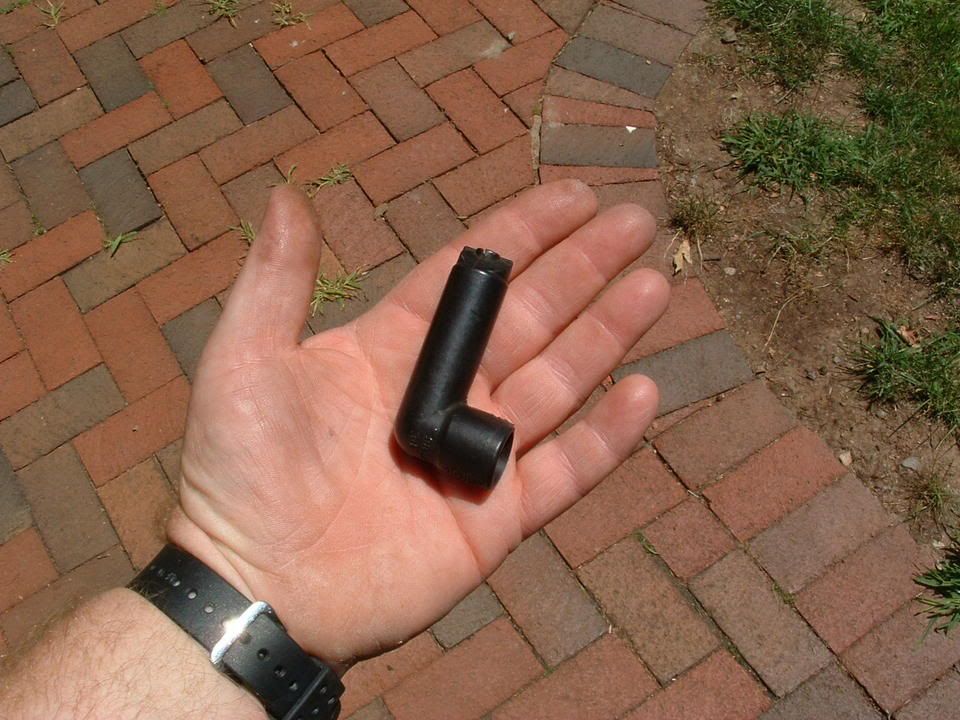
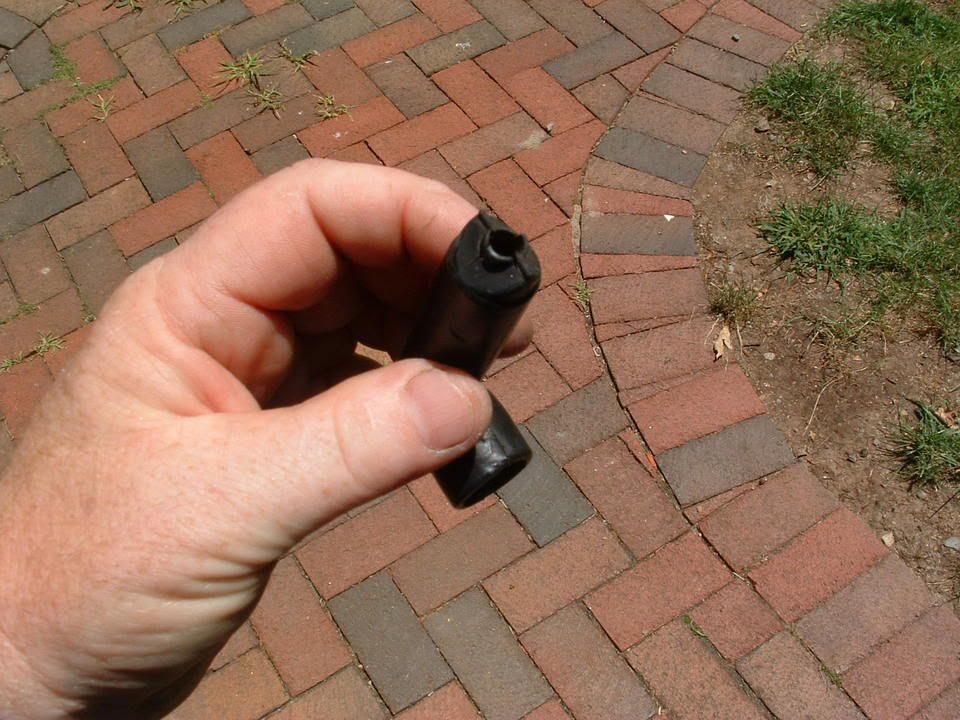
The crimped end needs to be cut off.
Here is wher it lives!


Almost forgot about this. There are fender well access panels in both front fender wells. You can access the large and small drains in each access.
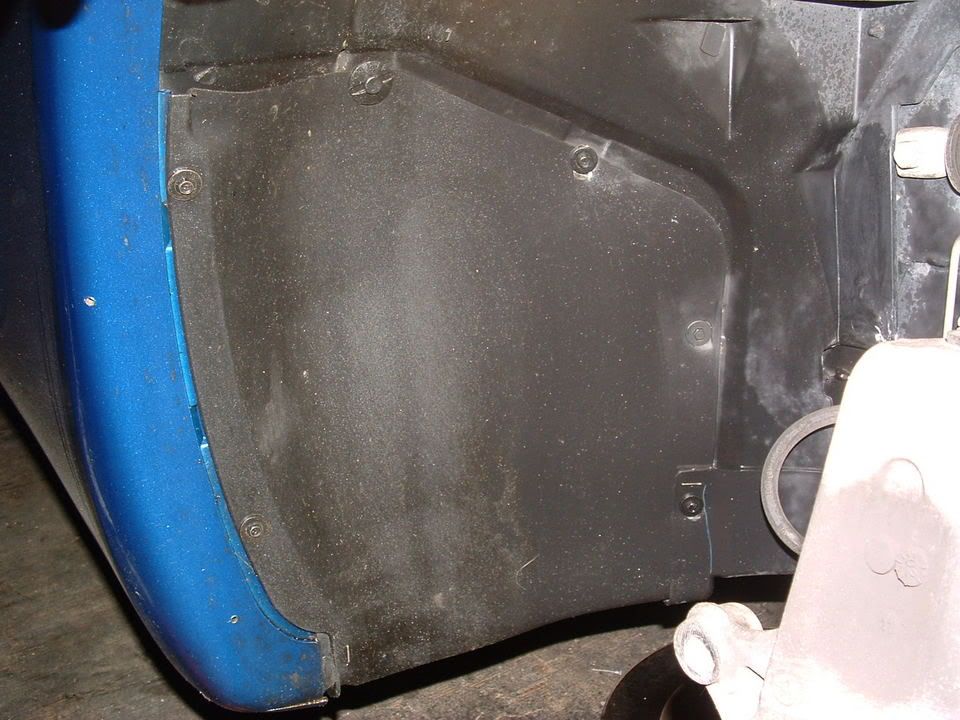
Dont forget to check and see if the side window seals and or top leaks!!
BC
Here is the drain tube. It lives on the passengers firewall just aft of the cylinder head: Flash light beam highlihts the area where the drain tube is:
The crimped end needs to be cut off.
Here is wher it lives!
Almost forgot about this. There are fender well access panels in both front fender wells. You can access the large and small drains in each access.
Dont forget to check and see if the side window seals and or top leaks!!
BC


Instructor

Joined: Nov 2007
Posts: 138
Likes: 0
From: Richwood NJ
Well, I've managed to fix the two A-pillar leaks on my 2000 FRC. I also fixed the "hinge" area leaks. A trip to the touchfree car wash confirmed the fix. What the car wash also confirmed is that something in the trunk area is leaking like crazy! In pinpointing the leak, it seems to be related to "Condition 7" in the Waterleak GuideHere's the picture from there:
In reading, it looks like this can be fixed by forcing some 3M strip-calk into the channel, but I'm a little unclear on what exactly that diagram is showing me. Has anyone else tackled this? Thanks!
In reading, it looks like this can be fixed by forcing some 3M strip-calk into the channel, but I'm a little unclear on what exactly that diagram is showing me. Has anyone else tackled this? Thanks!

Melting Slicks

Joined: Jul 2013
Posts: 2,012
Likes: 23
From: Anaheim CA
One small note on the driver's side udders: it took me forever to find the third one in the back. And it is really easy to knock loose (what I assume is) the washer-fluid-level sensor and send a pint or so of washer fluid down into the same cavity where the cruft from the udders just landed.
It's trivially simple to vacuum out the cruft when it's dry. When it's saturated with washer fluid...not so much.
It's trivially simple to vacuum out the cruft when it's dry. When it's saturated with washer fluid...not so much.

Intermediate
Joined: Aug 2006
Posts: 46
Likes: 0
From: Ringwood, England
Bill Curlee,
Excellent information and pictures! Thank you.
Here is a link to a C5 general waterleak guide TSB: http://corvetteactioncenter.com/kb/q....php?qstId=208
Thanks again.
Excellent information and pictures! Thank you.
Here is a link to a C5 general waterleak guide TSB: http://corvetteactioncenter.com/kb/q....php?qstId=208
Thanks again.
Any ideas?
Le Mans Master
Joined: Oct 1999
Posts: 6,366
Likes: 34
Joe, is the water your pouring over the rear window making it's way down into the gap between the quarter panel and the roof panel?
That is where mine was coming in. I had a hell of a time sealing that gap, only after I pretty much put RTV over everything in the rear area. I still seemed to drip out those tab holes no matter what I did, untill I filled the seam between the roof and quarter panel with RTV.
I did not just caulk the gap up. I got it in there and used a coat hanger I think to get it down in a thin layer so the car could be taken apart later if need be.