


Thermostat Question
Tech Contributor

Joined: May 2008
Posts: 3,100
Likes: 17
From: Somers, CT and Clermont, FL
St. Jude Donor '09-'10-'11-'12-'13-'14-'15-'16

Since the OP lives in FL, a 160 degree stat might be a better choice for his climate. Here's one at Autozone:
http://www.autozone.com/autozone/par...923_1640_93208
Thread Starter
Instructor

Joined: Aug 2009
Posts: 242
Likes: 0
From: Orlando Florida
Since the OP lives in FL, a 160 degree stat might be a better choice for his climate. Here's one at Autozone:
http://www.autozone.com/autozone/par...923_1640_93208
And..
Is it worth it spending $60 for a Hypertech brand?

Le Mans Master


Joined: May 2007
Posts: 5,393
Likes: 17
From: Belleville Mich.
Melting Slicks

Joined: Jun 2012
Posts: 3,163
Likes: 6
From: Oceanside California
Oh God, here we go again!!! 
My opinion is that a cooler thermo matched with a lower fan switch setting can allow lower temps. Not just a thermo that opens sooner. I wouldnt just shove one in and call it good. Do it along with other mods and get a tune and have them set the fan lower.
My opinion is that a cooler thermo matched with a lower fan switch setting can allow lower temps. Not just a thermo that opens sooner. I wouldnt just shove one in and call it good. Do it along with other mods and get a tune and have them set the fan lower.
Corvette Stories
The Best of Corvette for Corvette Enthusiasts

Top 10 Most Expensive Corvettes Ever Sold on Bring A Trailer
Brett Foote
10 Things Every Corvette Owner Needs (2026 Edition)
Michael S. Palmer
8 Most "Only Corvette Owners Understand" Quirks and Problems
Pouria Savadkouei
10 Reasons the C6 Z06 is Still A Performance Benchmark After 20 Years
Joe Kucinski
How Much Horsepower Every Corvette Engine "LOST" in 1972
Joe Kucinski
Top 10 DOs and DON'Ts for Protecting Your Convertible Top!
Michael S. Palmer
Top 10 Most Explosive Corvettes Ever Made: Power-to-Weight Ratio Ranked!
Joe Kucinski
150 hp to 1,250 hp: Every Corvette Generation Compared by the Specs That Matter
Joe Kucinski
8 Coolest Corvette Pace Cars (and Replicas) of All Time
Verdad GallardoPro


Joined: Apr 2006
Posts: 647
Likes: 22
From: Norwalk CT and Boynton Beach FL
Thread Starter
Instructor
Joined: Aug 2009
Posts: 242
Likes: 0
From: Orlando Florida
Well my mods are:
Borla Exhaust
BBK UD
BBK Headers
K&N cai
Hypertech Tuner
And right now I'm currently running with the stock thermostat, but since it gets really hot here in Orlando I wanted to change that to help my car stay cooler. So back to my question "Is it worth buying the Hypertech thermostat for $60? rather than spending $30 for an autozone brand?"
Last edited by vetteboy850; Jul 24, 2012 at 01:49 AM.
Team Owner


Joined: Mar 1999
Posts: 22,025
Likes: 192
From: At the beach in little Rhody
I posted the following a couple of years ago but the thread has since been closed and the host server for the photos went away. So I uploaded the photos to Photobucket to duplicate the old thread. If you find the old thread, the photos are missing.
-----------------------------------------------------------------------------
In the first photo the thermostat has been disassembled. You can see one of the shims that I made and the hole into which it is installed. The shim is made from 1/8" aluminum rod from the local hardware store. The thickness of the shim will alter the opening point by lowering it, or as is the case if you get to approximately 0.100� thick shim, the thermostat will barely close.
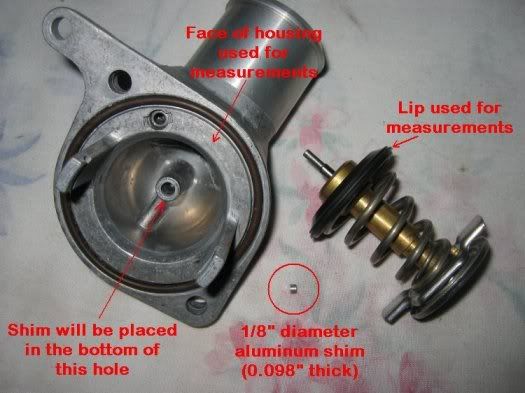
One of the problems I ran into was how to measure data so it wasn�t subjective and I could repeat the test fairly well between the different shims and get a good comparison. After some messing around with the test, I decided to take the temperature at three points in the opening sequence. First, by hanging the thermostat such that the neck was downward, it was easy to trap air behind the rubber door that opens in the thermostat. The first data point would then be when the thermostat opened enough to release the trapped air. This doesn�t take much movement at all and you can barely see the rubber door move at all when this occurs since the movement is so slight. The second point of measurement would be when the rubber lip on the seal was even with the flat mounting surface of the thermostat (see the photo). Finally, I took a third measurement when the rubber lip was 0.2� from the same flat mounting surface. While this seems to be a precise number, it is actually the width of my flat screwdriver that I could hold in the water and use for a measuring tool. With one edge of the screwdriver against the flat mounting surface of the thermostat, when the lip was even with the other edge of the screwdriver blade that is when I wrote down the temperature.
Below is a photo of the shim installed prior to re-assembly of the thermostat.

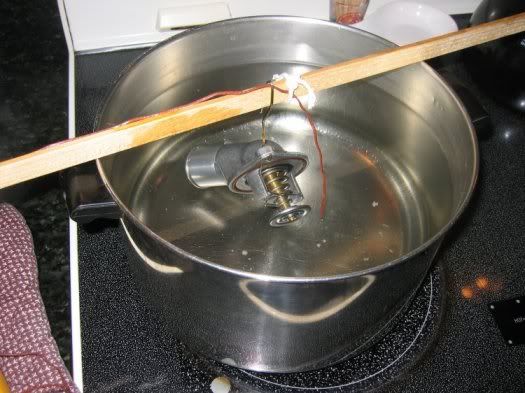
Next was the method of heating up the thermostat so it was immersed in water. In the next photo you can see I bent up a coat hanger and hung it from a small stick across a large pot of water (my wife thinks I should be committed at this point . The wire next to the thermostat is the thermocouple that was tied into a Fluke Meter for measuring the temperature.
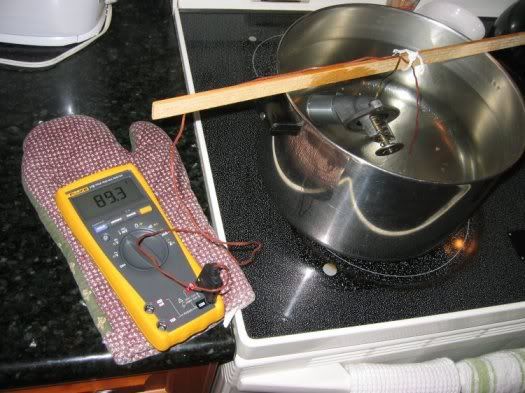
Below is the Fluke Meter that was used to monitor the temperature, which is accurate to 1/10th of a degree.
Here is the data that I obtained, noting each shim was tested several times to obtain these average values:

It appears that with the 0.098� shim, the thermostat is barely closed. The 0.075� shim didn�t quite get me to where I wanted to be. The performance of the 0.058� shim, which seems to seal the thermostat better when it closes down again, will hopefully provide me the temperatures I am trying to achieve in the motor. However, if it is too cool the data will be used to make adjustments as necessary to get to my final goals.
This modified thermostat is now running in a C5 with a DeWitts radiator. On a hot day cruising the motor temp stays right at 180, cooler temps and the engine temp goes to 178 and no lower. At this point, the motor is a little too cool and I plan to modify the thermostat this fall to hopefully bring the running temp up to 185 in cool temps, which is my target running temperature.
-----------------------------------------------------------------------------
In the first photo the thermostat has been disassembled. You can see one of the shims that I made and the hole into which it is installed. The shim is made from 1/8" aluminum rod from the local hardware store. The thickness of the shim will alter the opening point by lowering it, or as is the case if you get to approximately 0.100� thick shim, the thermostat will barely close.
One of the problems I ran into was how to measure data so it wasn�t subjective and I could repeat the test fairly well between the different shims and get a good comparison. After some messing around with the test, I decided to take the temperature at three points in the opening sequence. First, by hanging the thermostat such that the neck was downward, it was easy to trap air behind the rubber door that opens in the thermostat. The first data point would then be when the thermostat opened enough to release the trapped air. This doesn�t take much movement at all and you can barely see the rubber door move at all when this occurs since the movement is so slight. The second point of measurement would be when the rubber lip on the seal was even with the flat mounting surface of the thermostat (see the photo). Finally, I took a third measurement when the rubber lip was 0.2� from the same flat mounting surface. While this seems to be a precise number, it is actually the width of my flat screwdriver that I could hold in the water and use for a measuring tool. With one edge of the screwdriver against the flat mounting surface of the thermostat, when the lip was even with the other edge of the screwdriver blade that is when I wrote down the temperature.
Below is a photo of the shim installed prior to re-assembly of the thermostat.
Next was the method of heating up the thermostat so it was immersed in water. In the next photo you can see I bent up a coat hanger and hung it from a small stick across a large pot of water (my wife thinks I should be committed at this point
. The wire next to the thermostat is the thermocouple that was tied into a Fluke Meter for measuring the temperature.Below is the Fluke Meter that was used to monitor the temperature, which is accurate to 1/10th of a degree.
Here is the data that I obtained, noting each shim was tested several times to obtain these average values:
It appears that with the 0.098� shim, the thermostat is barely closed. The 0.075� shim didn�t quite get me to where I wanted to be. The performance of the 0.058� shim, which seems to seal the thermostat better when it closes down again, will hopefully provide me the temperatures I am trying to achieve in the motor. However, if it is too cool the data will be used to make adjustments as necessary to get to my final goals.
This modified thermostat is now running in a C5 with a DeWitts radiator. On a hot day cruising the motor temp stays right at 180, cooler temps and the engine temp goes to 178 and no lower. At this point, the motor is a little too cool and I plan to modify the thermostat this fall to hopefully bring the running temp up to 185 in cool temps, which is my target running temperature.
Tech Contributor
Joined: May 2008
Posts: 3,100
Likes: 17
From: Somers, CT and Clermont, FL
St. Jude Donor '09-'10-'11-'12-'13-'14-'15-'16
The Hypertech brand thermostat is overprisced in my opinion. The VERY SAME one is about $30 at Autozone. Both are made by Motorad in Germany, and then repackaged for sale under several different labels here in the US.
Racer
Joined: Dec 2010
Posts: 427
Likes: 2
From: Redding Ca
I posted the following a couple of years ago but the thread has since been closed and the host server for the photos went away. So I uploaded the photos to Photobucket to duplicate the old thread. If you find the old thread, the photos are missing.
-----------------------------------------------------------------------------
In the first photo the thermostat has been disassembled. You can see one of the shims that I made and the hole into which it is installed. The shim is made from 1/8" aluminum rod from the local hardware store. The thickness of the shim will alter the opening point by lowering it, or as is the case if you get to approximately 0.100� thick shim, the thermostat will barely close.
One of the problems I ran into was how to measure data so it wasn�t subjective and I could repeat the test fairly well between the different shims and get a good comparison. After some messing around with the test, I decided to take the temperature at three points in the opening sequence. First, by hanging the thermostat such that the neck was downward, it was easy to trap air behind the rubber door that opens in the thermostat. The first data point would then be when the thermostat opened enough to release the trapped air. This doesn�t take much movement at all and you can barely see the rubber door move at all when this occurs since the movement is so slight. The second point of measurement would be when the rubber lip on the seal was even with the flat mounting surface of the thermostat (see the photo). Finally, I took a third measurement when the rubber lip was 0.2� from the same flat mounting surface. While this seems to be a precise number, it is actually the width of my flat screwdriver that I could hold in the water and use for a measuring tool. With one edge of the screwdriver against the flat mounting surface of the thermostat, when the lip was even with the other edge of the screwdriver blade that is when I wrote down the temperature.
Below is a photo of the shim installed prior to re-assembly of the thermostat.
Next was the method of heating up the thermostat so it was immersed in water. In the next photo you can see I bent up a coat hanger and hung it from a small stick across a large pot of water (my wife thinks I should be committed at this point. The wire next to the thermostat is the thermocouple that was tied into a Fluke Meter for measuring the temperature.
Below is the Fluke Meter that was used to monitor the temperature, which is accurate to 1/10th of a degree.
Here is the data that I obtained, noting each shim was tested several times to obtain these average values:
It appears that with the 0.098� shim, the thermostat is barely closed. The 0.075� shim didn�t quite get me to where I wanted to be. The performance of the 0.058� shim, which seems to seal the thermostat better when it closes down again, will hopefully provide me the temperatures I am trying to achieve in the motor. However, if it is too cool the data will be used to make adjustments as necessary to get to my final goals.
This modified thermostat is now running in a C5 with a DeWitts radiator. On a hot day cruising the motor temp stays right at 180, cooler temps and the engine temp goes to 178 and no lower. At this point, the motor is a little too cool and I plan to modify the thermostat this fall to hopefully bring the running temp up to 185 in cool temps, which is my target running temperature.
-----------------------------------------------------------------------------
In the first photo the thermostat has been disassembled. You can see one of the shims that I made and the hole into which it is installed. The shim is made from 1/8" aluminum rod from the local hardware store. The thickness of the shim will alter the opening point by lowering it, or as is the case if you get to approximately 0.100� thick shim, the thermostat will barely close.
One of the problems I ran into was how to measure data so it wasn�t subjective and I could repeat the test fairly well between the different shims and get a good comparison. After some messing around with the test, I decided to take the temperature at three points in the opening sequence. First, by hanging the thermostat such that the neck was downward, it was easy to trap air behind the rubber door that opens in the thermostat. The first data point would then be when the thermostat opened enough to release the trapped air. This doesn�t take much movement at all and you can barely see the rubber door move at all when this occurs since the movement is so slight. The second point of measurement would be when the rubber lip on the seal was even with the flat mounting surface of the thermostat (see the photo). Finally, I took a third measurement when the rubber lip was 0.2� from the same flat mounting surface. While this seems to be a precise number, it is actually the width of my flat screwdriver that I could hold in the water and use for a measuring tool. With one edge of the screwdriver against the flat mounting surface of the thermostat, when the lip was even with the other edge of the screwdriver blade that is when I wrote down the temperature.
Below is a photo of the shim installed prior to re-assembly of the thermostat.
Next was the method of heating up the thermostat so it was immersed in water. In the next photo you can see I bent up a coat hanger and hung it from a small stick across a large pot of water (my wife thinks I should be committed at this point
. The wire next to the thermostat is the thermocouple that was tied into a Fluke Meter for measuring the temperature.Below is the Fluke Meter that was used to monitor the temperature, which is accurate to 1/10th of a degree.
Here is the data that I obtained, noting each shim was tested several times to obtain these average values:
It appears that with the 0.098� shim, the thermostat is barely closed. The 0.075� shim didn�t quite get me to where I wanted to be. The performance of the 0.058� shim, which seems to seal the thermostat better when it closes down again, will hopefully provide me the temperatures I am trying to achieve in the motor. However, if it is too cool the data will be used to make adjustments as necessary to get to my final goals.
This modified thermostat is now running in a C5 with a DeWitts radiator. On a hot day cruising the motor temp stays right at 180, cooler temps and the engine temp goes to 178 and no lower. At this point, the motor is a little too cool and I plan to modify the thermostat this fall to hopefully bring the running temp up to 185 in cool temps, which is my target running temperature.
 Man I love this forum, I mean this kind of ingenuity all I can say is