


IMPORTANT ELECTRICAL INFORMATION (Long!)
Intermediate

Joined: Sep 2014
Posts: 32
Likes: 4
From: Tampa
But you really need to find a place where you can clean them ASAP. They only get worse. And it will affect many components in your vehicle.

Instructor
Joined: Jul 2015
Posts: 127
Likes: 8
From: Cream Ridge NJ
It has been freezing and I don't garage my car. I wanna do the job right. With the freezing weather, I'll end up rushing and not doing the job as good as I can and possibly make things worse when my fingers are turning white and not moving. I am a perfectionist. Btw the plastic is 15 years old and extra brittle especially due to the cold if I break something I'm screwed. Did u use electric grease after u cleaned the grounds? My engine is spotless, but I know that probably doesn't matter, moisture has a way of finding its way anywhere/everywhere.
Intermediate
Joined: Sep 2014
Posts: 32
Likes: 4
From: Tampa
It has been freezing and I don't garage my car. I wanna do the job right. With the freezing weather, I'll end up rushing and not doing the job as good as I can and possibly make things worse when my fingers are turning white and not moving. I am a perfectionist. Btw the plastic is 15 years old and extra brittle especially due to the cold if I break something I'm screwed. Did u use electric grease after u cleaned the grounds? My engine is spotless, but I know that probably doesn't matter, moisture has a way of finding its way anywhere/everywhere.
But -.
But the grounds do get corroded. Hard to see until you get to work on them.
No plastic. Just be careful when loosening to nut.
I sprayed with WD 40 first and let set for 5 minutes.
Then wiped all from around the ground.
So it was clean.
I used an emery board to manually file back the affected area - gently to make sure of good contact.
Then apply a dielectric spray.
I use CorrosionX. Its the best but not cheap.
I live in florida and do this every 6 months. The humidity here causes problems.
www.corrosionx.com
Instructor
Joined: Jul 2015
Posts: 127
Likes: 8
From: Cream Ridge NJ
U guys are right on with the corrosion issue. I had to go into the door jam today because my driver door controls went out. The plug was corroded, when I touched it the power came back on, so I cleaned it up. I will get to the grounds hopefully this week. Usually after a big snow storm we get some nice weather. I was telling someone else on here, my hands are half numb from a spine injury and mixed with the cold, doing things become difficult and I don't trust anyone to do the job like I would. Thanks!

Thread Starter
Tech Contributor


Joined: Dec 1999
Posts: 32,910
Likes: 2,402
From: Anthony TX
CI 6,7,8,9,11 Vet
St. Jude Donor '08
U guys are right on with the corrosion issue. I had to go into the door jam today because my driver door controls went out. The plug was corroded, when I touched it the power came back on, so I cleaned it up. I will get to the grounds hopefully this week. Usually after a big snow storm we get some nice weather. I was telling someone else on here, my hands are half numb from a spine injury and mixed with the cold, doing things become difficult and I don't trust anyone to do the job like I would. Thanks!
Your MAIN issue is most likely spread female contacts in that power connector. Look for that issue or it will continue to have issues..
BC
Instructor
Joined: Jul 2015
Posts: 127
Likes: 8
From: Cream Ridge NJ
Oops I left that out, I did. I was at a flee market years ago and bought a dental pick set for a dollar. My wife made fun of me for buying it and after about 10 years of it sitting in my tool box I finally used it! I may not have bent them enough though. I was worried about snapping one, but time will tell. Thanks Bill!

Instructor


Joined: Aug 2012
Posts: 194
Likes: 15
From: Orange County CA
U guys are right on with the corrosion issue. I had to go into the door jam today because my driver door controls went out. The plug was corroded, when I touched it the power came back on, so I cleaned it up. I will get to the grounds hopefully this week. Usually after a big snow storm we get some nice weather. I was telling someone else on here, my hands are half numb from a spine injury and mixed with the cold, doing things become difficult and I don't trust anyone to do the job like I would. Thanks!
Instructor
Joined: Jul 2015
Posts: 127
Likes: 8
From: Cream Ridge NJ
Ok, I did the 2 grounds/connectors like in the pic originally posted. Drivers side one was like new, but I still cleaned it any way. The passenger side was a little green, so I cleaned it up as well. Neither side looked anything like the original pics posted. I will look for other grounds tomorrow. Have any of you guys done the big three upgrade, if so did it make a difference? 50 degrees today my hands worked. Very quick and easy to do, for anyone thinking about it. Are there any other grounds that are more important to do than others, just doing them as I go along this is my daily driver and I can't get too involved till the weekend. Thanks!
Corvette Stories
The Best of Corvette for Corvette Enthusiasts

Top 10 Most Expensive Corvettes Ever Sold on Bring A Trailer
Brett Foote
10 Things Every Corvette Owner Needs (2026 Edition)
Michael S. Palmer
8 Most "Only Corvette Owners Understand" Quirks and Problems
Pouria Savadkouei
10 Reasons the C6 Z06 is Still A Performance Benchmark After 20 Years
Joe Kucinski
How Much Horsepower Every Corvette Engine "LOST" in 1972
Joe Kucinski
Top 10 DOs and DON'Ts for Protecting Your Convertible Top!
Michael S. Palmer
Top 10 Most Explosive Corvettes Ever Made: Power-to-Weight Ratio Ranked!
Joe Kucinski
150 hp to 1,250 hp: Every Corvette Generation Compared by the Specs That Matter
Joe Kucinski
8 Coolest Corvette Pace Cars (and Replicas) of All Time
Verdad Gallardo
7th Gear
Joined: Feb 2016
Posts: 7
Likes: 0
Hey fellas got a little problem. On my '01 Vette C-5, when I cut the car off, and turn the lights off then drivers front turn signal/Park light continues to burn until it kills the battery. I replaced the bulb in the passenger side and it worked fine then it started again. At that point I ordered a new socket from Chevrolet and put a new bulb in it and it worked fine for about an hour then the passenger side light went out again and the driver side continued to burn. I just unhooked the battery to keep from killing it. Can anyone help??

Le Mans Master


Joined: Dec 2006
Posts: 7,251
Likes: 16
From: Phoenix Arizona
Hey fellas got a little problem. On my '01 Vette C-5, when I cut the car off, and turn the lights off then drivers front turn signal/Park light continues to burn until it kills the battery. I replaced the bulb in the passenger side and it worked fine then it started again. At that point I ordered a new socket from Chevrolet and put a new bulb in it and it worked fine for about an hour then the passenger side light went out again and the driver side continued to burn. I just unhooked the battery to keep from killing it. Can anyone help??
 I kinda like the stealth mode


Advanced


Joined: Dec 2015
Posts: 83
Likes: 10
From: Oro Valley Arizona
Cody
YES,,,,,,, Its the first steps in the correct direction. Make SURE that the people doing your key /tumbler work knows that they have to do the tumbler work around a KEY with the proper RESISTANCE of your old key.
The key resistor pellet reader is on the end of the lock tumbler and that is most likely your issue. HOWEVER,,,,,,, anywhere in the PassKey circuit there could be an issue.
One way to prove out the bad key reader theory is to insert the key into the tumbler and read the resistance of the key at the connector end of the key reader connector. Compare the actual pellet resistance reading in the key with the reading you get at the connector of the key reader..
They should MATCH!!
Bill
Thread Starter
Tech Contributor
Joined: Dec 1999
Posts: 32,910
Likes: 2,402
From: Anthony TX
CI 6,7,8,9,11 Vet
St. Jude Donor '08
YES! Just use an OHM Meter and put the leads on the two little metal contacts on either side of the key. That will give you the resistance of the chip inside the key.
Once you know that value, you can read it on the connector for the sensor and at the connector at the BCM to verify that you have proper continuity all the way through the circuit.
Here is the C5 GM key resistance chart. Your reading should fall within one of those values:
Once you know that value, you can read it on the connector for the sensor and at the connector at the BCM to verify that you have proper continuity all the way through the circuit.
Here is the C5 GM key resistance chart. Your reading should fall within one of those values:
Advanced
Joined: Dec 2015
Posts: 83
Likes: 10
From: Oro Valley Arizona
YES! Just use an OHM Meter and put the leads on the two little metal contacts on either side of the key. That will give you the resistance of the chip inside the key.
Once you know that value, you can read it on the connector for the sensor and at the connector at the BCM to verify that you have proper continuity all the way through the circuit.
Here is the C5 GM key resistance chart. Your reading should fall within one of those values:

Once you know that value, you can read it on the connector for the sensor and at the connector at the BCM to verify that you have proper continuity all the way through the circuit.
Here is the C5 GM key resistance chart. Your reading should fall within one of those values:

Instructor
Joined: Aug 2012
Posts: 194
Likes: 15
From: Orange County CA
I have no knowledge or experience here but doesn't it sound as though the button on the remote is stuck or shorted so it's like it is being held down?
Thread Starter
Tech Contributor
Joined: Dec 1999
Posts: 32,910
Likes: 2,402
From: Anthony TX
CI 6,7,8,9,11 Vet
St. Jude Donor '08
See if that works. That SHOULD eliminate that from happening. Its all covered in your OWNERS MANUAL.
Bill
4th Gear
Joined: Feb 2015
Posts: 4
Likes: 0
From: Phoenix Arizona
I have a 2004 convertible & when I hit the key remote for the trunk to open RADIO came on, it has only did this 1 time so far any info would be greatly appreciated.
Thank you
Toni
Thank you
Toni
Many of you have asked me for help on solving electrical problems and I thought this would be VERY interesting!
My 98 coupe would get the infamous "REDUCED ENGINE POWER", "TRACTION CONTROL FAILURE" and a host of random failure codes. After many, many hours of troubleshooting, replacing the BCM and TAC module, I solved most of the driveability issues. Still getting the random DTC failure codes, I thought that I may be having ground issues. Back in June I cleaned ALL of the chassis grounds and the car virtually stopped throwing the "RANDOM" DTC failure codes. Just moving the wires in the chassis ground connector was enough to change the indications and make the issues stop happening.
I had a chance to speak with some GM C5 Trouble Desk Engineers when I went to Bowling Green KY in April and they pointed out that MANY of the C5 electrical issues can be directly linked to chassis ground problems. The engineer even went as far as to recommending that I chop off the factory under hood chassis ground connectors and combine all of the wires into a single ground lug. Not wanting to just LOP off the factory connector, I took a chance and disassembled one of the ground plug connectors and to my surprise it was indeed full of corroded connections.
I strongly recommend that any C5 owner that has had or who are having electrical issues, examine and clean the chassis ground connectors. This may save you from needlessly replacing expensive electronics modules. Each ground connector can be disassembled and cleaned in about 20 min.
Just cleaning the metal ground connection between the chassis and the plug is only a band aid solution. Now that I look back, when I cleaned my chassis grounds and initially solved my issues, I believe that when the connector is being removed to clean the connection between chassis and the connector, just the wires being moved inside the plug is what changed the indications and made everything work better.
Disassembly of the chassis ground plug and cleaning the contacts inside the connector is the correct method of solving the issue!
I took some pictures of the under hood chassis ground connector and the corrosion that was in it. I cleaned the two connections on the frame rails and the left one was significantly corroded! Taking it apart and cleaning it is a very straight forward procedure and I believe that if you follow this recommendation, you will be on the way to solving the many of the electrical issues.
Here are some detailed pictures of the ground connector and the corrosion that was found inside it!
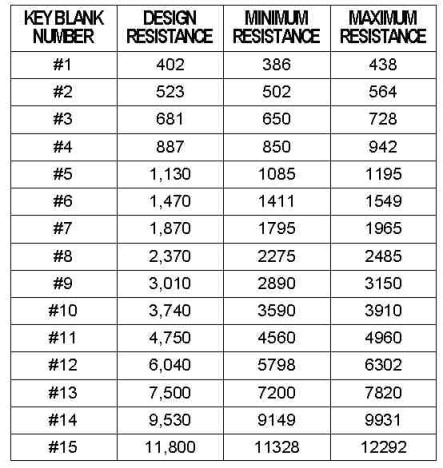
Picture of under hood Chassis Ground connector G-101
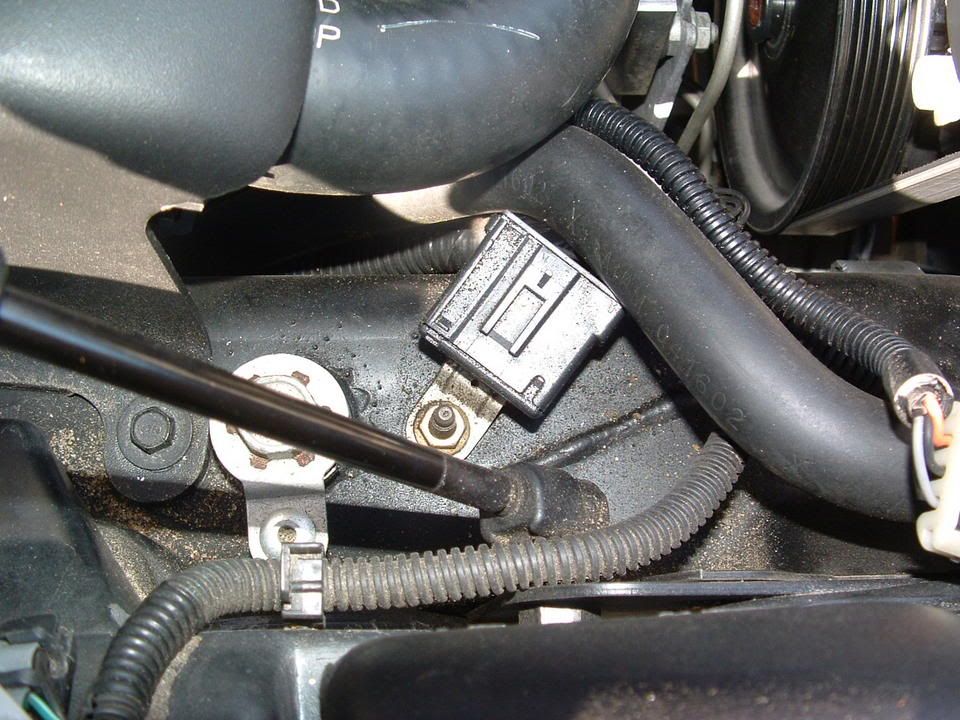
Corrosion inside connector! (You ain't seen nothing yet!)
[IMG] [/IMG]
Next three photos are of the corrosion found on the connector terminals!
[IMG]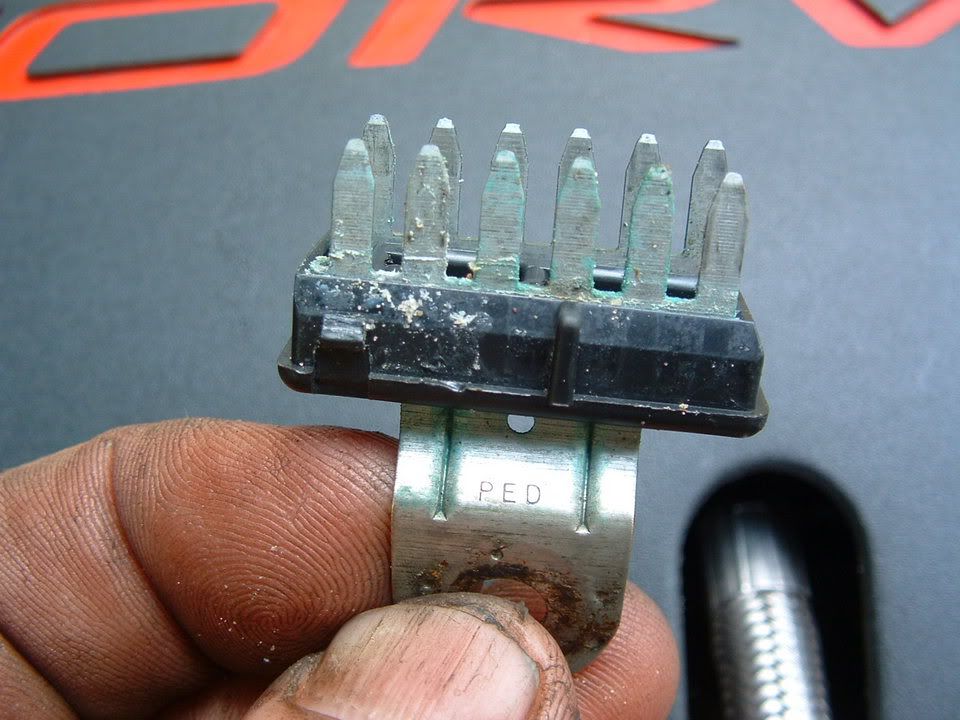 [/IMG] [IMG]
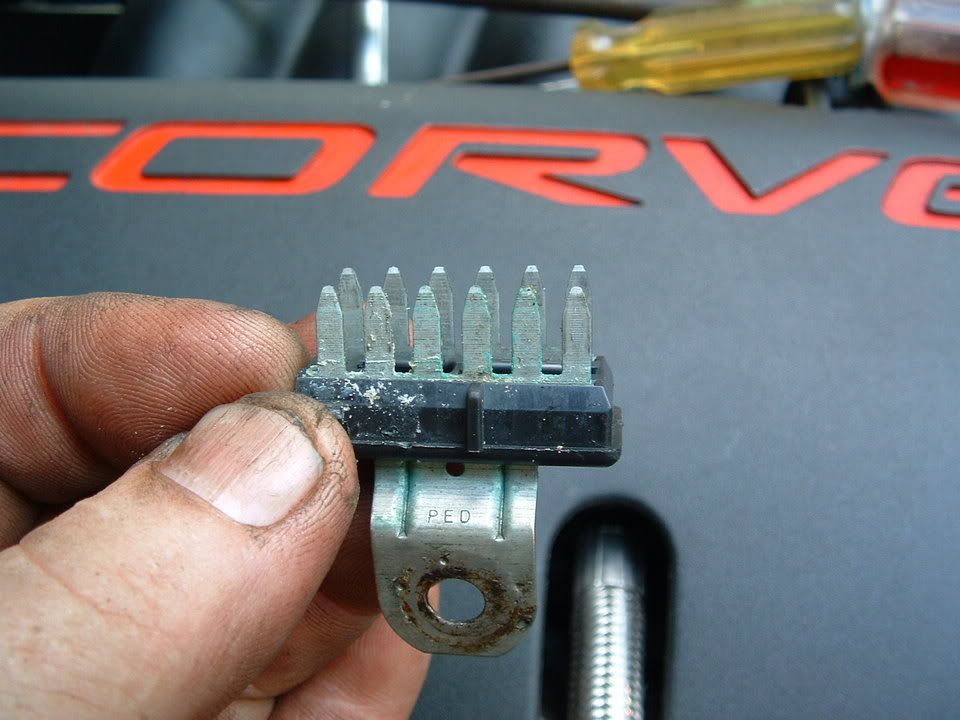 [/IMG] [IMG]
 [/IMG]
Self tapping ground screw and star washer. This is what you will need if the ground stud breaks off during removal!
[IMG]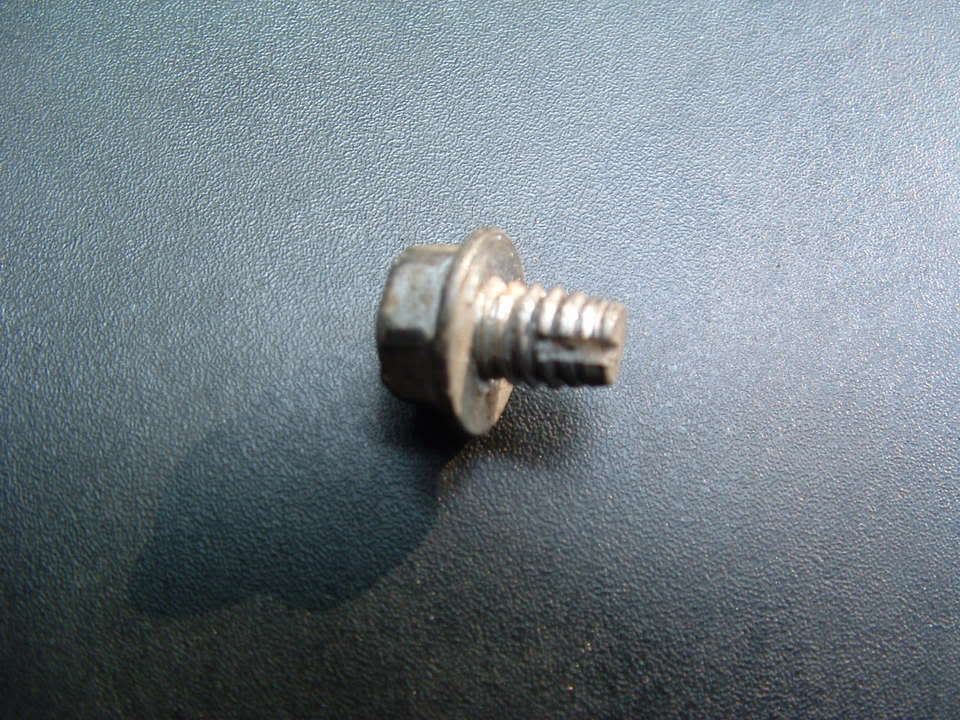 [/IMG] [IMG][IMG]
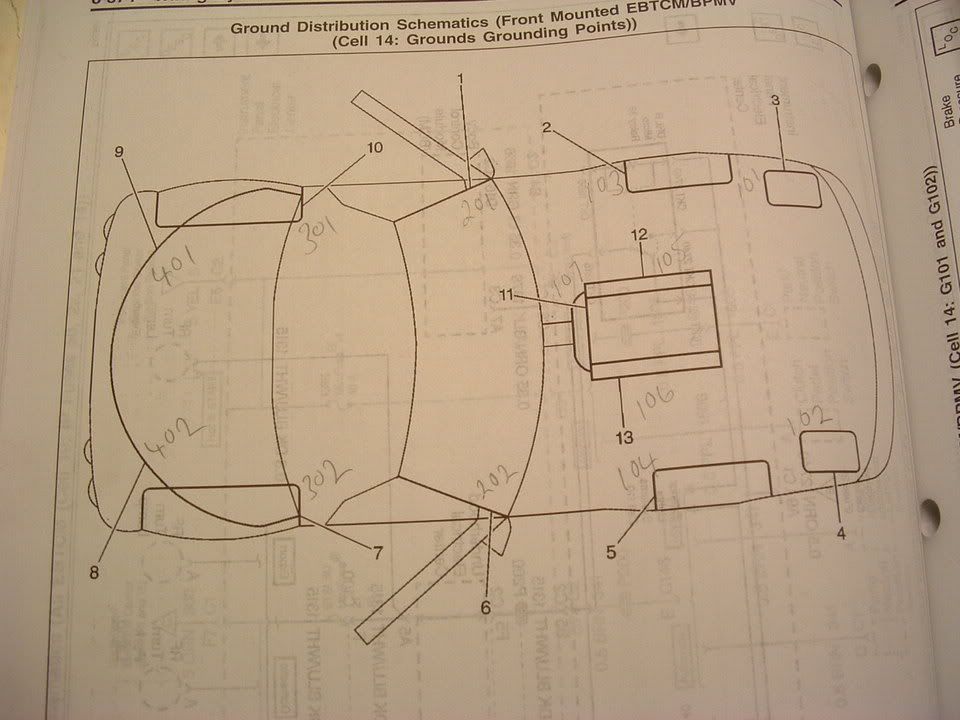
Here are where the chassis ground points are on a C5:


PLEASE let me know if you have any questions.
Bill Curlee
updated 02 March 06
My 98 coupe would get the infamous "REDUCED ENGINE POWER", "TRACTION CONTROL FAILURE" and a host of random failure codes. After many, many hours of troubleshooting, replacing the BCM and TAC module, I solved most of the driveability issues. Still getting the random DTC failure codes, I thought that I may be having ground issues. Back in June I cleaned ALL of the chassis grounds and the car virtually stopped throwing the "RANDOM" DTC failure codes. Just moving the wires in the chassis ground connector was enough to change the indications and make the issues stop happening.
I had a chance to speak with some GM C5 Trouble Desk Engineers when I went to Bowling Green KY in April and they pointed out that MANY of the C5 electrical issues can be directly linked to chassis ground problems. The engineer even went as far as to recommending that I chop off the factory under hood chassis ground connectors and combine all of the wires into a single ground lug. Not wanting to just LOP off the factory connector, I took a chance and disassembled one of the ground plug connectors and to my surprise it was indeed full of corroded connections.
I strongly recommend that any C5 owner that has had or who are having electrical issues, examine and clean the chassis ground connectors. This may save you from needlessly replacing expensive electronics modules. Each ground connector can be disassembled and cleaned in about 20 min.
Just cleaning the metal ground connection between the chassis and the plug is only a band aid solution. Now that I look back, when I cleaned my chassis grounds and initially solved my issues, I believe that when the connector is being removed to clean the connection between chassis and the connector, just the wires being moved inside the plug is what changed the indications and made everything work better.
Disassembly of the chassis ground plug and cleaning the contacts inside the connector is the correct method of solving the issue!
I took some pictures of the under hood chassis ground connector and the corrosion that was in it. I cleaned the two connections on the frame rails and the left one was significantly corroded! Taking it apart and cleaning it is a very straight forward procedure and I believe that if you follow this recommendation, you will be on the way to solving the many of the electrical issues.
Here are some detailed pictures of the ground connector and the corrosion that was found inside it!
Picture of under hood Chassis Ground connector G-101
Corrosion inside connector! (You ain't seen nothing yet!)
[IMG]
[/IMG] Next three photos are of the corrosion found on the connector terminals!
[IMG]
[/IMG] [IMG][/IMG] [IMG][/IMG] Self tapping ground screw and star washer. This is what you will need if the ground stud breaks off during removal!
[IMG]
[/IMG] [IMG][IMG]Here are where the chassis ground points are on a C5:
PLEASE let me know if you have any questions.
Bill Curlee
updated 02 March 06

Cruising
Joined: Jan 2014
Posts: 13
Likes: 0
http://www.amazon.com/CAIG-DeOxit-Cleaning-Solution-Spray/dp/B0002BBV4G
Thread Starter
Tech Contributor
Joined: Dec 1999
Posts: 32,910
Likes: 2,402
From: Anthony TX
CI 6,7,8,9,11 Vet
St. Jude Donor '08