


Disabled my shift lock...finally.
Racer


Joined: Mar 2006
Posts: 470
Likes: 0
From: Pittsburgh,Bradenton PA,FL
Not much room but let the left hand tunnel wall serve as your second hand. The shifter lever bottom is reasonably close to the left side wall so push the lever bottom to the left wall and use your right hand or perhaps a large screwdriver in your right hand to push the cable eyelet onto the shifter pin. At least that is what I seem to remember from last year when I did this. (or I may have used the torque tube on the right side for the assist.) I don't know about the 10" needle nose pliers with a bent tip. Might be too big for working inside the grommet ID. My biggest worry in replacing the grommet was dropping tools into the tunnel. Once the grommet was snapped into place with silicon spray and several gentle attempts with a pair of standard adjustable pliers searching for just the right alignment of the grommet to eyelet, reconnecting the cable to the shifter pin was relatively uneventful and straight forward in all reality.

Heel & Toe

Joined: Oct 2012
Posts: 16
Likes: 1
From: Jacksonville Florida
Second time was a charm. I have to say that without everyone's help I would not have been able to do this. For the life of me I would never have found the shift boot clips that needed to be released without your help. It was not easy at 6'4", 210 lbs and poor eye sight. Most importantly it was actually seeing those clips that needed to be released. the whole job took me 2 hours this time. It's done... Thanx all
Race Director


Joined: Sep 2000
Posts: 11,142
Likes: 1,913
From: Missouri City, TX
Second time was a charm. I have to say that without everyone's help I would not have been able to do this. For the life of me I would never have found the shift boot clips that needed to be released without your help. It was not easy at 6'4", 210 lbs and poor eye sight. Most importantly it was actually seeing those clips that needed to be released. the whole job took me 2 hours this time. It's done... Thanx all

Racer
Joined: Mar 2006
Posts: 470
Likes: 0
From: Pittsburgh,Bradenton PA,FL
Installed my new shifter. Should the car start with the console off, leaving the hazzard flashers, heated seats, and cig lighters disconnected?

Race Director


Joined: Sep 2009
Posts: 11,349
Likes: 2,443
From: Eastern
Racer
Joined: Mar 2006
Posts: 470
Likes: 0
From: Pittsburgh,Bradenton PA,FL
Corvette Stories
The Best of Corvette for Corvette Enthusiasts

Top 10 Most Expensive Corvettes Ever Sold on Bring A Trailer
Brett Foote
10 Things Every Corvette Owner Needs (2026 Edition)
Michael S. Palmer
8 Most "Only Corvette Owners Understand" Quirks and Problems
Pouria Savadkouei
10 Reasons the C6 Z06 is Still A Performance Benchmark After 20 Years
Joe Kucinski
How Much Horsepower Every Corvette Engine "LOST" in 1972
Joe Kucinski
Top 10 DOs and DON'Ts for Protecting Your Convertible Top!
Michael S. Palmer
Top 10 Most Explosive Corvettes Ever Made: Power-to-Weight Ratio Ranked!
Joe Kucinski
150 hp to 1,250 hp: Every Corvette Generation Compared by the Specs That Matter
Joe Kucinski
8 Coolest Corvette Pace Cars (and Replicas) of All Time
Verdad Gallardo
Racer
Joined: Jan 2010
Posts: 498
Likes: 77
From: DFW Texas
Ok guys I am new to working on my C6 as previous experience is mostly C3 but I want to assure everyone that this task can be handled in less than 2 hours. I did mine today with the tie back technique and it works great. I want to thank everyone for posting up here and otherwise about this issue. If you will read the directions here and about how to remove the center console, you will have no issues!
Thanks again to everyone who post on this forum.
Save the wave!
Thanks again to everyone who post on this forum.
Save the wave!


Racer
Joined: Aug 2005
Posts: 448
Likes: 0
From: Temecula California
A lot of great info here,
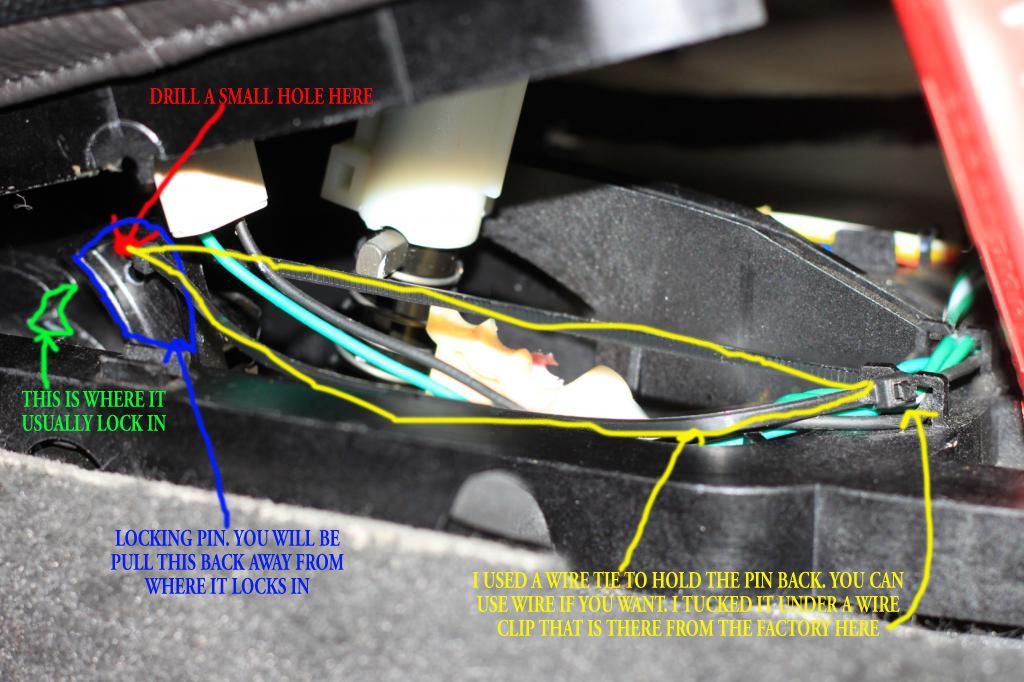
Quick question, I may be looking at the photos wrong, I see where you drilled the hole but why was it necessary?
(yes I read the answers to the other guy which asked this question too)
From the photos it looks like there are two holes in that part already, can you just fit a wire through them instead of having to drill a new one all the way up top?
Like I said I may be looking at the pictures incorrectly as it looks like there are two holes in that part already right below where you drilled your hole.
Thread Starter
Race Director
Joined: Oct 2010
Posts: 14,475
Likes: 785
From: Las Vegas NV
A lot of great info here,
Quick question, I may be looking at the photos wrong, I see where you drilled the hole but why was it necessary?
(yes I read the answers to the other guy which asked this question too)
From the photos it looks like there are two holes in that part already, can you just fit a wire through them instead of having to drill a new one all the way up top?
Like I said I may be looking at the pictures incorrectly as it looks like there are two holes in that part already right below where you drilled your hole.
Racer

Joined: Oct 2008
Posts: 467
Likes: 102
From: Torrance CA

Having done this 3 times to 3 different cars, .... 5 seconds with a pair of dikes (diagonal cutting pliers) to snip off the plastic locking pawl off will also take care of the problem.
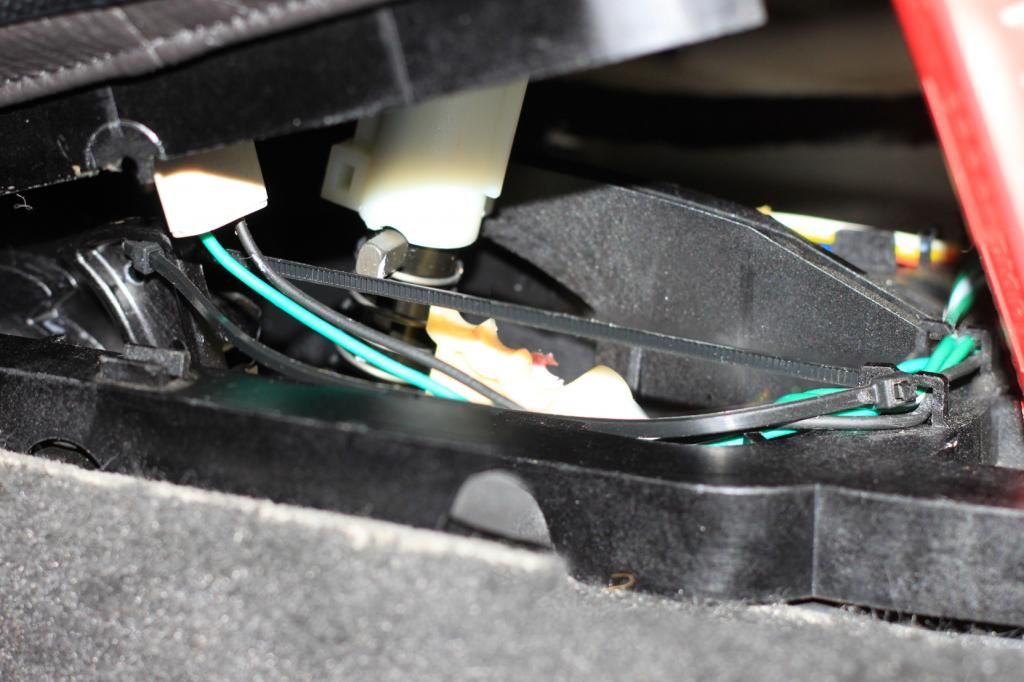
Others ... have chosen to drill a hole in the locking pawl in order to tie the locking pawl in the up position (instead of cutting the locking pawl off) .... but the result is the same with either method you choose:
"no more stuck in park"

Race Director
Joined: Sep 2000
Posts: 11,142
Likes: 1,913
From: Missouri City, TX
Quick answer .... it's not necessary
Having done this 3 times to 3 different cars, .... 5 seconds with a pair of dikes (diagonal cutting pliers) to snip off the plastic locking pawl off will also take care of the problem.
Others ... have chosen to drill a hole in the locking pawl in order to tie the locking pawl in the up position (instead of cutting the locking pawl off) .... but the result is the same with either method you choose:
"no more stuck in park"
 However, drilling the hole and tying back the pawl allows you to reverse this action later if you don't feel comfortable selling the car like this.
Instructor
Joined: May 2016
Posts: 245
Likes: 41
From: Crystal River Florida
I did this "fix" on my 2005 a couple of years ago.
I offered to help Sparky (ufso) to do the same "fix" to his 2005.
A mutual friend of Sparky and I was having the same problem with his 2007 A6.
After reading several forum posts about the 2006+ A6 shifter being different, I was not sure if we would be able to do the same "fix" with the 2007, but we were willing to give it a try.
Turns out ....the 2007 A6 shifter has the same solenoid controlled latch that fails in the 2005 A4 shifter and the "fix" was the same.
I'm using the word fix in quotes ("fix") because by doing this "fix" you are disabling the shifter lock mechanism which is considered a safety feature (do so at your own risk). The "correct" fix would be to spend a lot of money to replace the whole shifter assembly (that could fail again).
Two helpful hints that I didn't see anyone else post:
#1 - After you remove the radio surround, as seen here:
http://forums.corvetteforum.com/c6-t...l-removal.html
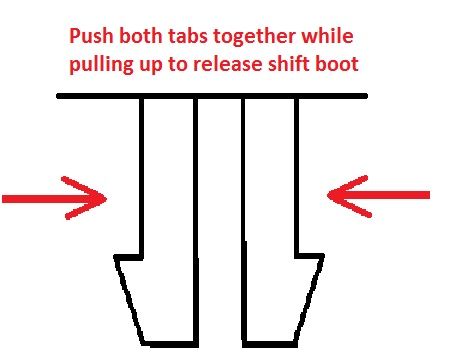
You also need to remove the shifter boot housing, there are (2 prong) release clips located on the shifter boot housing (one towards the dash side and the other towards the center console side). To release these clips, you need to pinch the tabs together while pulling up on the shift boot at the same time. We used 2 small flat head screw drivers at both sides of the tabs to push the tabs together.
Here is a drawing I made to "hopefully" explain this better:
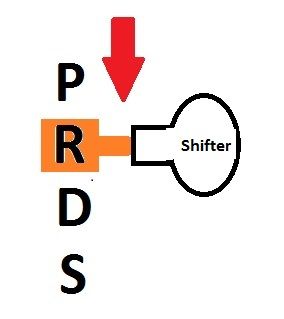
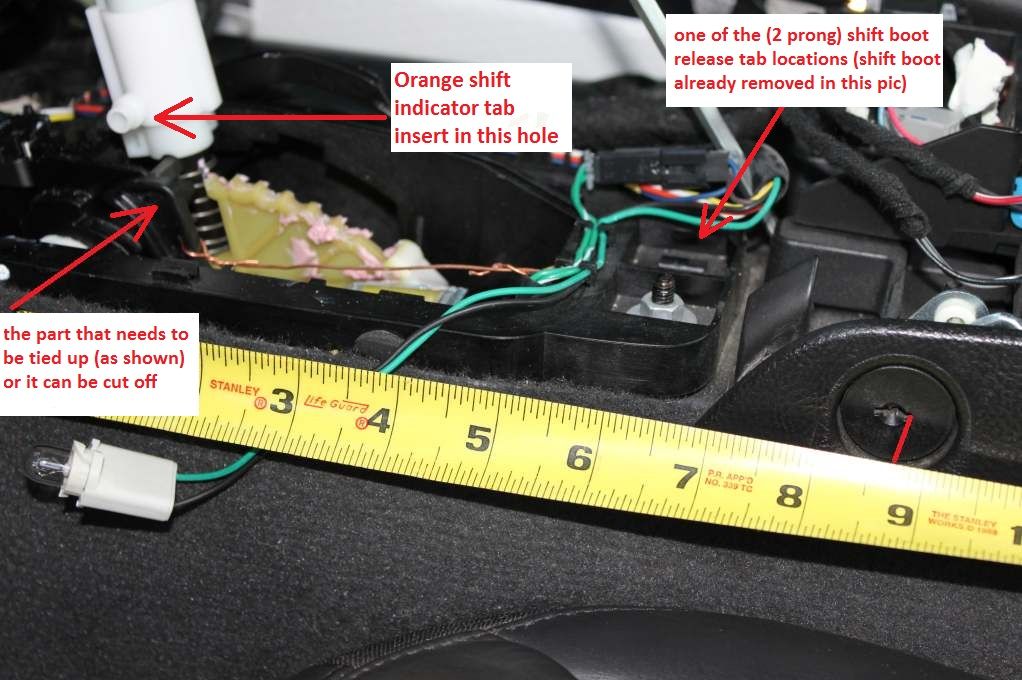
#2 � Make sure the orange shift indicator (the indicator that shows you what gear you are in when you shift gears) is working properly before you reassemble everything back together. The shift indicator connects to the shifter via a small round tab that is inserted into a hole in a plastic part located on the side of the shifter shaft. It will likely come un-done when you pull up on the shift boot. It�s easy to put back together, but it can also be easily overlooked during reassembly. The red arrow below shows where the shift indicator comes disconnected from the shifter.
I offered to help Sparky (ufso) to do the same "fix" to his 2005.
A mutual friend of Sparky and I was having the same problem with his 2007 A6.
After reading several forum posts about the 2006+ A6 shifter being different, I was not sure if we would be able to do the same "fix" with the 2007, but we were willing to give it a try.
Turns out ....the 2007 A6 shifter has the same solenoid controlled latch that fails in the 2005 A4 shifter and the "fix" was the same.
I'm using the word fix in quotes ("fix") because by doing this "fix" you are disabling the shifter lock mechanism which is considered a safety feature (do so at your own risk). The "correct" fix would be to spend a lot of money to replace the whole shifter assembly (that could fail again).
Two helpful hints that I didn't see anyone else post:
#1 - After you remove the radio surround, as seen here:
http://forums.corvetteforum.com/c6-t...l-removal.html
You also need to remove the shifter boot housing, there are (2 prong) release clips located on the shifter boot housing (one towards the dash side and the other towards the center console side). To release these clips, you need to pinch the tabs together while pulling up on the shift boot at the same time. We used 2 small flat head screw drivers at both sides of the tabs to push the tabs together.
Here is a drawing I made to "hopefully" explain this better:

#2 � Make sure the orange shift indicator (the indicator that shows you what gear you are in when you shift gears) is working properly before you reassemble everything back together. The shift indicator connects to the shifter via a small round tab that is inserted into a hole in a plastic part located on the side of the shifter shaft. It will likely come un-done when you pull up on the shift boot. It�s easy to put back together, but it can also be easily overlooked during reassembly. The red arrow below shows where the shift indicator comes disconnected from the shifter.


I did this fix yesterday on my 05 z51 and it went well thanks to the instructions here. I had the most trouble getting the gear shift indicator post back into the gear shift slot. I finally pulled the elastic edge of the gear shift boot up off the thick plastic ring it's on and then by putting the car in 2nd where the post and receiver are toward the back, I could reach down between the gear selector and indicator with a finger to guide them together. This was driving me batty for about 15 min.
Race Director
Joined: Sep 2000
Posts: 11,142
Likes: 1,913
From: Missouri City, TX
I did this fix yesterday on my 05 z51 and it went well thanks to the instructions here. I had the most trouble getting the gear shift indicator post back into the gear shift slot. I finally pulled the elastic edge of the gear shift boot up off the thick plastic ring it's on and then by putting the car in 2nd where the post and receiver are toward the back, I could reach down between the gear selector and indicator with a finger to guide them together. This was driving me batty for about 15 min.
Le Mans Master

Joined: Oct 2005
Posts: 6,652
Likes: 2,106
From: Left Coast, San Diego
I did this "fix" on my 2005 a couple of years ago.
I offered to help Sparky (ufso) to do the same "fix" to his 2005.
A mutual friend of Sparky and I was having the same problem with his 2007 A6.
After reading several forum posts about the 2006+ A6 shifter being different, I was not sure if we would be able to do the same "fix" with the 2007, but we were willing to give it a try.
Turns out ....the 2007 A6 shifter has the same solenoid controlled latch that fails in the 2005 A4 shifter and the "fix" was the same.
I'm using the word fix in quotes ("fix") because by doing this "fix" you are disabling the shifter lock mechanism which is considered a safety feature (do so at your own risk). The "correct" fix would be to spend a lot of money to replace the whole shifter assembly (that could fail again).
Two helpful hints that I didn't see anyone else post:
#1 - After you remove the radio surround, as seen here:
http://forums.corvetteforum.com/c6-t...l-removal.html
You also need to remove the shifter boot housing, there are (2 prong) release clips located on the shifter boot housing (one towards the dash side and the other towards the center console side). To release these clips, you need to pinch the tabs together while pulling up on the shift boot at the same time. We used 2 small flat head screw drivers at both sides of the tabs to push the tabs together.
Here is a drawing I made to "hopefully" explain this better:
#2 – Make sure the orange shift indicator (the indicator that shows you what gear you are in when you shift gears) is working properly before you reassemble everything back together. The shift indicator connects to the shifter via a small round tab that is inserted into a hole in a plastic part located on the side of the shifter shaft. It will likely come un-done when you pull up on the shift boot. It’s easy to put back together, but it can also be easily overlooked during reassembly. The red arrow below shows where the shift indicator comes disconnected from the shifter.
Last edited by Vet Interested; Dec 16, 2016 at 03:09 PM.

Drifting

Joined: Sep 2014
Posts: 1,924
Likes: 392
From: Atlanta - - - - - Save the manuals
Advantage - No change to the original design
Disadvantage - It might lock up again
Good luck, I'd probably tie back the pawl if it happens to me again

Cruising
Joined: May 2012
Posts: 14
Likes: 0
It's been getting worse and worse and after being stuck for half an hour on Saturday I decided enough is enough and disabled the shift lock on Sunday. Took about an hour. Did not have to take the console all the way off. Only disconnected the active handling switch harness and the passenger seat belt light then propped the console up on the e-brake handle. The red thing is propping the shifter cover up.

Here's an updated picture.
Here's an updated picture.
HOW DO YOU GET GEAR SHIFT **** OFF?? I HAVE A 2006 C6.....THANKS
