When you click on links to various merchants on this site and make a purchase, this can result in this site earning a commission. Affiliate programs and affiliations include, but are not limited to, the eBay Partner Network.
How fast was the shipping of the Eonon unit? I was waiting for a Pumpkin unit to arrive at thir UK supplier (to make shipping to Sweden cheaper/faster), but that might take weeks, time I don't really have.
It should be the same unit, except the Eonon unit is slighty smaller in depth.
It took 5 days from this seller. They have a US based shipping point and I'm in the US.
This weekend I moved from a Pumpkin quad core with 2 GB RAM Android 5.1 unit to an Eonon octa core Android 8.0 head unit with 8 GB RAM. I went with Eonon because of the extra 2GB of RAM on top of Pumpkin's offering.
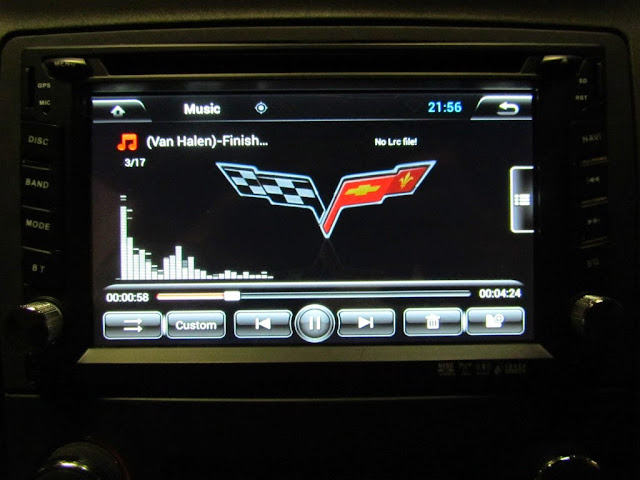
My goodness, the difference is astounding. It boots immediately, doesn't experience the shutdown and dual booting issues, doesn't freeze and I can run several apps concurrently with no lag. Split screen mode is also really helpful for when I'm using Spotify and Google Maps, etc. It's just crisp in every action.
I also run aftermarket speakers with no external amp, and sound quality is considerably better.
I loved my 5.1 unit, but this thing is a whole different beast. I'd highly recommend dropping the ~$250 for an upgrade if you're on an older unit and it's in your budget.
As an added bonus all of the harnesses were the same between the units, so it was a 10 minute plug and play direct swap.
I just ordered this setup. New 8.0 Eonon with backup camera, dashcam, PAC GM interface, USB Carplay dongle. Trying to decide whether or not speakers are worth the effort.
I'll probably have a few videos to post of the install and my thoughts.
I just ordered this setup. New 8.0 Eonon with backup camera, dashcam, PAC GM interface, USB Carplay dongle. Trying to decide whether or not speakers are worth the effort.
I'll probably have a few videos to post of the install and my thoughts.
Please do, think that would help a lot of us that are new to this.
Did guy get the GA2170 unit? Which backup camera did you end up with? Figured id install one while I'm changing the HU, was thinking about a forward facing one as well, but don't know if 2 cameras are supported.
Please do, think that would help a lot of us that are new to this.
Did guy get the GA2170 unit? Which backup camera did you end up with? Figured id install one while I'm changing the HU, was thinking about a forward facing one as well, but don't know if 2 cameras are supported.
yes the newest 2170. Cameras are both the Eonon ones. Also got the OBD2 adapter. Haven�t messed with electronics since mid 90s high school days. Should be fun.
Thanks for all of the ideas. I like the "automatic video switcher" device. I've ordered the parts and will report progress. FWIW, the Y-cable I was using is shielded, high quality, so I'm glad to move on to a better solution. Thanks again. Bill
UPDATE AFTER INSTALLATION 3/5/18
I installed this video switching device and it works perfect for my application.
I purchased the switch from Amazon using the link above from GCG. The first review on Amazon is by Peter Robinson and he helps by labeling the inputs and outputs for the backup camera, and two more cameras. He also outlines that you'll need male to male and female to female RCA gender menders or a female to female RCA extension wire to correctly join the HEAD UNIT and REVERSE RCA connections. I stuffed the switch in a gap to the right of the radio unit so the extension wire and one male to male gender mender worked for me.
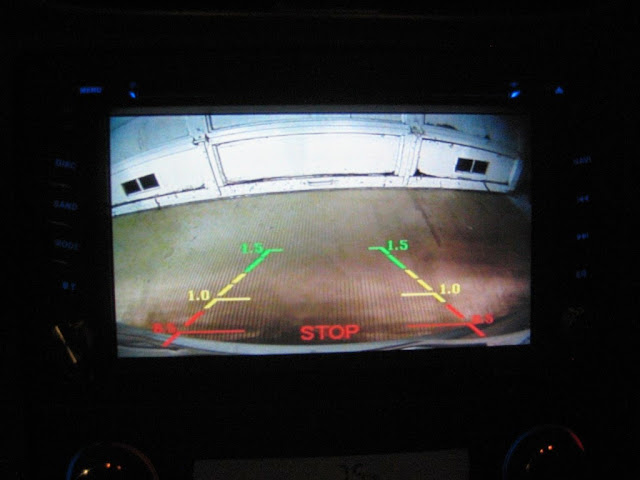
I connected CAMERA 1 to my front camera, HEAD UNIT to my Android backup camera input, and REVERSE to my reverse camera. I use a switch that I mounted on the side of the console to give power to the front camera and the 18gauge red CAMERA 1 power line.
When I put it in Reverse, the reverse camera comes on. When I power the front camera, it displays on the unit instead of the reverse image. If not in reverse, the front camera shows on the display.
This is a great way to get front and rear cameras working together. So far, no noise on the line and perfect images!
Thanks again, GCG, for giving direction to this switcher!
I recently replaced the dashcam with an action cam that supports an external microphone since I am interested in hearing the exhaust rather than sound in the cabin:
Quick question while I�m still waiting on parts. Do the android HUs (Eonon specifically) need an antenna adapter? I�m seeing mention of it in some posts.
doomi, Thanks for the information. After owning it for a while, is there any other new features worth mentioning. What is the EQ like?
The EQ screen itself exactly matches my old unit, although overall sound quality is significantly better. I find myself using the new split screen mode regularly when I'm using Maps and listening to Spotify, etc.
I think the main difference cuts down to this:
If you asked about my Android 5.1 unit I'd have said I'm extremely happy with the unit... for the price. There were a lot of bugs that I lived with simply because of the price and I wanted Android functionality. One example is losing my radio presets every time I rebooted my old unit. Or the lagginess that occurred if I tried to run maps with another program. The extremely long boot up times and the propensity to boot then immediately reboot for some reason.
If you ask about my new unit I'd say that I'd put it up against any other multimedia/navigation unit on the market and for my needs the new Android unit is far superior. It's quick, it can run any app on the Playstore with ease, it boots in under 2 seconds. The only thing I've noticed so far is occasional disconnects in WIFI. But I'm thinking it's because my T-Mobile Hotspot is losing connectivity, not the head unit. I'm going to test it by using my phone as my hot spot for a few days.
Originally Posted by downhil
Quick question while I�m still waiting on parts. Do the android HUs (Eonon specifically) need an antenna adapter? I�m seeing mention of it in some posts.
Both of my android head units require an antenna adapter.
Quick question while I�m still waiting on parts. Do the android HUs (Eonon specifically) need an antenna adapter? I�m seeing mention of it in some posts.
The EQ screen itself exactly matches my old unit, although overall sound quality is significantly better. I find myself using the new split screen mode regularly when I'm using Maps and listening to Spotify, etc.
I think the main difference cuts down to this:
If you asked about my Android 5.1 unit I'd have said I'm extremely happy with the unit... for the price. There were a lot of bugs that I lived with simply because of the price and I wanted Android functionality. One example is losing my radio presets every time I rebooted my old unit. Or the lagginess that occurred if I tried to run maps with another program. The extremely long boot up times and the propensity to boot then immediately reboot for some reason.
If you ask about my new unit I'd say that I'd put it up against any other multimedia/navigation unit on the market and for my needs the new Android unit is far superior. It's quick, it can run any app on the Playstore with ease, it boots in under 2 seconds. The only thing I've noticed so far is occasional disconnects in WIFI. But I'm thinking it's because my T-Mobile Hotspot is losing connectivity, not the head unit. I'm going to test it by using my phone as my hot spot for a few days.
Both of my android head units require an antenna adapter.
Thanks again. They usually come out with firmware updates for the quirks. You might want to send an email to them. It would be interesting to know how quick the customer support responds.
Just received my GA2170 HU today. Im going to have to read this thread through before attempting installation. Should be alright with the PAC RP5-GM11 module. Hoping to put it in the car this weekend if i have the time. Bought it from Eonon UK via eBay, ordered it on the 5th of march, and today the 8th i picked it up from DHL. Extremely pleased with that!
I'm curious, has anyone used a 4G internet USB dongle with theirs? I'm not super happy with how my new wireless hotspot is performing and am considering changing it up.
Step 1 complete. I�m not totally happy with it so I�ll be trying again with a scoring/utility knife method. This was a dremel cutoff and various sanding cylinders. We�ll see how it looks in the car.
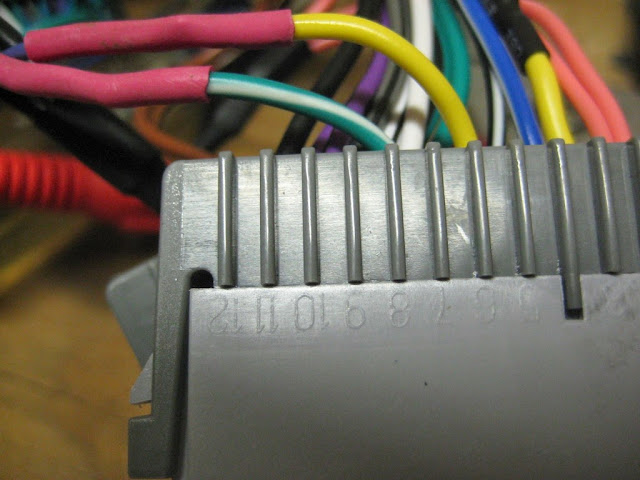
I used the PAC Radio Pro 5 Radio Replacement Interface (RP5-GM11) for compatibility with OnStar and the Bose amp. Cut the ISO plug off of the new head unit (HU) harness and connect the wires to those of the same color from the PAC harness (I used solder and shrink tubing). There is no dedicated amplifier trigger wire, so connect the HU red ACC wire to the PAC red ACC wire and the PAC blue/white AMP wire. Use double-sided tape to adhere the GPS antenna to the top of a center vent (or use an adapter to connect the stock GPS antenna, which looks the same and is just to the left of that location). Use a screwdriver to turn down the chime speaker module volume and make sure that module ends up in an accessible location for later adjustment.
The PAC has two types of steering wheel control (SWC) connections; a mini phono jack and a single blue/yellow wire. It also has a 10-position switch that determines SWC signal compatibility with mainstream HUs. This HU has two wires labeled KEY1 and KEY2 and according to the documentation works with only resistive signals like the Corvette's (see Volume 1 of the shop service manual for schematic). I tried the single wire, and I cut off the phono jack and tried the red and white wires, and I tried all ten switch settings, but nothing worked and I couldn't make sense of the PAC SWC signals with my multimeter. I solved it by cutting the yellow and green/white wires from the PAC that correspond to the purple (6) and dark blue (7) wires from the car and connecting them to the KEY1 and GND leads from the HU. The HU immediately recognized the buttons and made it easy to map them to the desired functions (my 1-6 button now controls mute).
So, to recap:
Since the head unit supports SWC natively and the SWC section of the RP5-GM11 is bypassed, those who follow can go with a cheaper interface as suggested here:
For the camera, connect the power and ground to the passenger-side reverse lamp wiring. Reach in from the exhaust side to twist out the bulb socket, pop the wire routing clip out for more length, remove a few screws from the under body panel behind the rear tire and pull the socket through so there is room to work on it. Drill a hole behind the inner brake light, feed the wire through and seal with silicone (or a grommet). Remember to run the RCA wire up through the center console before snapping that back in place.
The Metra 95-3304 Double DIN Installation Kit has a 173mm x 97mm opening that must be modified to fit the 178mm x 102mm HU bezel. To do this I used a caliper and masking tape to mark 3mm from each side. I then used a rotary tool with my largest cut-off wheel on medium-low speed to trim away the excess. For the bottom I used a sharp utility knife to slice through from the back at the first corner. The top I left alone. It turned out nicely.
I am really pleased with this HU. It is very high quality, integrated well with my car, and can run any Android app I want. My favorite so far is Torque, which offers real-time monitoring of my car via an OBDLink MX. I should also mention that delivery took only four business days, and the seller replied to my questions within 12 hours (I couldn't figure out the navigation volume mixing settings, so they hooked one up and took photos to show me what to do).
Designer Imagines A Corvette That Looks More Like a Corvette Than the Corvette
Slideshow: A Jaguar designer's personal project imagines what a modern front-engined Corvette might look like if Chevrolet revisited the golden age of the Stingray.


 Mar 25, 2015, 01:53 PM