When you click on links to various merchants on this site and make a purchase, this can result in this site earning a commission. Affiliate programs and affiliations include, but are not limited to, the eBay Partner Network.
Not that my opinion matters...but I can say this from experience. When you begin down the path of repairs that seem to be 'good enough'...knowing that they can be better. When you get paint on the car...and are siting there poilishing it out or walking by it and your sub conscience tells you to look at it again. Because you now know it is there.
You will then begin to try to tell yourself that it is still OK when in reality...you know that you should have taken it to the next level and got the panel flush with VPA.
And the reason I know this...is because if I were doing this to your car and you were paying me $$$$$ (obviously). When you looked at it and saw what it looked like I would bet that you would comment saying: "Don't you think you can get that to fit better?"
I wish more times than you can imagine that I could stop and let things go...but I have seen the end result and I know what I have to do to get it to the point of no regrets....or the "WOULDA-COULDA-SHOULDA".
And if you are concerned about licesne plate bezel fiitng too tight agaions the body and it 'holding water'. Simpoly apply two layers of masking tape....or maybe three layres to the backside edge of the bezel so when you install it with the VPA.....the maskign tape is now a shim. And when it is removed...you do have a bit of a gap but it is even.
DUB
I discussed with my husband this afternoon and he said pretty much the same thing as you. So I'll have another go at getting a better fit on the license plate bezel.
So, another big frustration today. I decided to drill the holes for the C O R V E T T E letters on the back. Fortunately ACI fiberglass placed little raised circles where the holes for the letters go. Unfortunately, the little raised circles aren't in precisely the right locations so some of the holes aren't aligned well enough to get both pins in the holes and when I did get them in the holes the letters are crooked.
Thanks ACI fiberglass!
If you're not going to put the marks in the right places then don't put them there at all!
Will you be able to correct this easily?
Good luck
Will you be able to correct this easily?
Good luck
Steve
What I'll have to do is mark which holes are out of place, feather out the back side of the holes with a grinder so I can layer in fiberglass matt and resin, smooth both sides, mark and re-drill the holes.
Its not that its a huge job but I'd rather not have after the fact laminations where they don't need to be.
Hi P,
Is the red rear convertible clip still around?
If so, could you use the holes in it to make a paper templet for all the holes?
Regards,
Alan
One more,
Don't make the holes one bit bigger than they need to be OR you'll see them when the letters are in place.
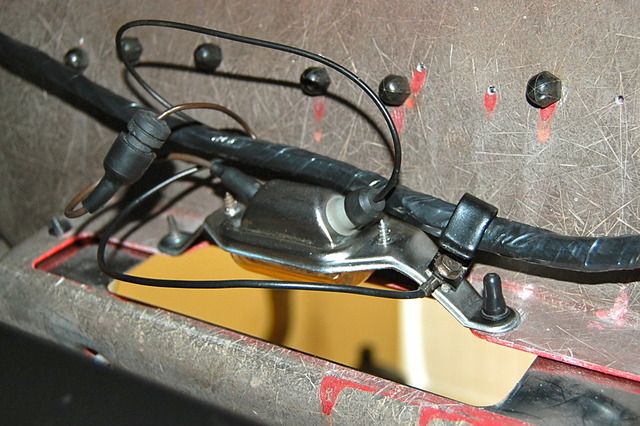
Note the very small diameter and that the pin without the acorn nut doesn't even extend through the fiberglass.
So, another big frustration today. I decided to drill the holes for the C O R V E T T E letters on the back. Fortunately ACI fiberglass placed little raised circles where the holes for the letters go. Unfortunately, the little raised circles aren't in precisely the right locations so some of the holes aren't aligned well enough to get both pins in the holes and when I did get them in the holes the letters are crooked.
Thanks ACI fiberglass!
If you're not going to put the marks in the right places then don't put them there at all!
OUCH. I know what you mean. I have done that ONCE and now I have an old section of an original taillight panel that I use as a guide/stencil.
That area is super critical for me. Nothing I cannot stand is being able to tell letters are not level and correctly spaced.
If you get frustrated when doing it again....and need me to send you a stencil to go by...let me know.
Don't make the holes one bit bigger than they need to be OR you'll see them when the letters are in place.[/B]
Note the very small diameter and that the pin without the acorn nut doesn't even extend through the fiberglass.
I have to politely contradict this.
Drill bits come in fractional, numnbered and lettered. So...the next size up drill bit in thousandths is more than like NOT the drill bit in your fractional kit. It may be a numbered or lettered bit. I do not have my drilll gauge chart here so I can not say which one because I do not have a letter that I can measure to find out what the diameter is.
But regardless of that. KEEP IN MIND...you are going to be priming this panel....painting and more than likely clearcoating it. When all that is done and you go in and try to install these letters they will NOT go in...because the primer, paint and clear has closed up the holes.
This is when I the go in with the drill bit and manually clean out these holes and if needed...I use a very small diameter rat tail file I have and make it so the letters pins can easily slide in WITHOUT forcing them in.
And the reason I do not want to force them in is because some of the emblem kits I have seen had the wrong spreed nuts that cut new threads in the shaft of the pin. In doing so...this new thread DOES increase the diameter of the pin due to the cut metal has to go somewhere...so if you try to go and take it off. These cut threads can hang up in the fiberglass hole if it is too tight...and 'possibly' grab your paint on the edges of the holes and pull it off the car.
I am commenting from experience. And this also goes for the nose emblem and any other emblem that is secured to a Corvette that go through the body.
On the off chance someone else finds themselves with a license plate bezel fitment issue like this and wants to address it as I did you may have to remove more material than just the lip area shown by the yellow line in the picture below. Once you shave that lip area a bit and want to go further you'll also have to shave the area outlined in pink as well to allow the lower part of the bezel to recess. As you can't see where the license plate bezel is contacting the panel in the pink area to know if you need to remove more material to get the lower edge of the bezel flush to the lip (yellow), I used a 1/2 wide strip of paper to put between the bezel and the panel and anywhere it resisted being pulled out I shaved more off.
You may also have to shave the bump for the round rubber license plate bumper shown in red below. You'll have to add fiberglass mat to these areas on the backside to give you room to shave these areas. I didn't want to shave the area surrounding the square holes for the license plate screws and didn't need to in order to push in the bottom of the license plate bezel. If I were to decide to further recess the lower end of the license plate bezel I'd need to add fiberglass to the back of the panel over the area where the square holes are and reform the square holes afterwards. This is why I decided to stop at this point.
You do not have to remove all the gelcoat...but making sure you get it scuffed really well and NO SHINE from the gelcoat is showing where you apply the VPA is fine.
I generally grind and feather back the gelcoat and expose the fiberglas under it...but no matter what you do... the VPA will eventually go onto the gelcoat so you can feather it and get your body work correct.
Just make sure the surface that the VPA is going on is prepped well.
Have you used VPA before. Because if you have not...there are some tricks that can make this go faster and you not kill yourself in sanding it. It has everything to do with timing.
DUB
Thanks Dub. I kept these notes on VPA application from your posts:
"VPA is NOT a BONDO. That is like saying a CORVETTE is just like a CHEVETTE. So yes...you add hardener to VPA just like 'Bondo'...and apply it much the same way....and sand it. But the capabilities of VPA outweigh BONDO much like the performance and handling of a CORVETTE outweigh a CHEVETTE.
ALWAYS....and I MEAN ALWAYS verify and CONFIRM ...even if you have to call EVERCOAT DIRECTLY and MAKE SURE that the DATE CODE on your can of VPA ( or any other product) is in the 'window' of being a good usable product. You skip this...then the PROBLEMS are ALL ON YOU. "Why are you so demanding on this issue"...you may ask. BECAUSE this product is NOT generally used...so stock in some auto body supply houses may be old...or it has been sitting on a shelf where the SUN can bake the can EVERYDAY....or out in a FREEZER BOX of a warehouse.
When you get it make sure that you stir it VERY WELL...and I mean VERY WELL...and I can spend 30+ minutes a in getting it all good and consistent. And...often times...when I get my fresh new gallon..I go and mix it.... BUT DO NOT use it right away....because I know I still have some on my other gallon and I can come in the next day and mix my fresh stuff some more and then use it.
" Why not use it right away???" Well I can and I have ( sorry about the contradiction)...BUT what I also KNOW is that if I am using freshly mixed VPA....when I am mixing it on my mixing board...I am really mashing it hard to work out any air that may still be present from the stirring that I just performed.
The VPA is a heavy body filler.....so thus it is somewhat thicker.....but yet it can still be runny and want to run off a panel of you are applying too much at one time.
SO...making sure you mash it out by picking up the VPA on your spreader and mashing it down and spreading it across your mixing board is what I do and I do it quickly. Depending on the volume I am mixing....a 'golf ball' size I will pick up and mash out about 50 times in one minute. VERIFY the color is consistent and then I am ready to apply.
Now...if you spread the VPA and it looks like 'stucco'. The main thing is to make sure that you STAY WITH it when it is beginning to set up...and DO NOT walk away. The reason is...that there is a very short window of time ( depending on how much hardener you used and the air temps at the time) that will allow you to do some sanding on the VPA to get it close to the end result.
I do not spread like I am spreading 'stucco'...BUT YES...there are some times when it looks like stucco because the process I am doing just does not allow me to worry about how slick I am applying it on the INITIAL APPLICATION. SO...when I have a 'stucco' appearance to my VPA...I stand there with my 36 grit on my sanding block, radiator hose section or long board and I feel the VPA. Using this stuff for 30+ years I know what I am waiting for...but what you want to do is scuff across the VPA and then look at your 36 grit sand paper and see if clogged the paper. NOW...will the VPA pop out of the paper by smacking it with a paint stick???? If the VPA was still the paper and a little 'gooey'...you need to wait about another MINUTE and test again. WHAT you are wanting to happen is that when you sand across the VPA and when it clogs your paper...you 'pop' it with the paint stick and a majority of the VPA falls out. WHEN that happens...you BETTER get to sanding FAST. Stopping and cleaning you paper with the paint stick and KEEP MOVING QUICKLY.
"Why am I doing this????" Because.... when the VPA is at that stage of being a little bit 'gummy' but gong towards the SOLID/CURED stage...is the BEST time to sand any major defects in your application. YES...you can use a 'cheese grater' if you like. But you better haul @ss.... because..... LITERALLY...in one stoke with the cheese grater it bites in and takes out some VPA...and then the next stroke...it does NOTHING and just glides across the surface....and YES...it can happen that quick!
YES...you can wait and let it cure and use air sanders. Me...I prefer to get it 'roughed in' by hand. BUT....depending on the amount of surface area I am doing...sometimes I will use my sanders to get it 'kinda' close.....then re-apply my final coat of VPA and then do it by hand so I know I am getting it right.and do it manually.
AS a starting point...I tell people that a 'golf ball' size of VPA to ONE INCH of blue cream hardener. BUT the main thing is that I KNOW the color that I am wanting when the VPA mixes with the blue hardener.....and I try to keep ALL of my mixes VERY CONSISTENT. SO...do NOT mix up one batch that look as blue as the blue field in the American flag...and then you next batch is light baby blue. If you did that working for me...you would be grinding it ALL back out and doing it over again. This ratio I gave is just a 'starting point'...because in the heat of the summer...i may lessen the hardener amount if I need some more work time...and in the winter months..I may add some more hardener.
Knowing that you mash the VPA when you mixed it...then when applying it DO NOT PLAY around with it. REMEMBER ...applying a thinner ...more controllable coat is better than you trying to apply it all in one coat and having to fight it. BECAUSE...when my employees would see me doing a large fill with a lot of VPA...and they tried to do it...one of those 'Monkey see---monkey do' scenarios. When they ground and sanded the VPA...they had air bubbles in it due to their spreading technique.
So ...If I had an area prepped an sanded and cleaned and ready for VPA...I take a small amount and spread the VPA onto the surface and apply a lot of pressure making sure that I am forcing the VPA into the textured surface. NOW...with there being a 'wet-bed' of VPA. I can apply the rest of the VPA and spread it out accordingly. EVEN if I have to put some VPA on my spreader and begin filling in a bonding seam on the driver side quarter and starting at the rear and moving towards the door opening...for example. I would put about a 1/2' round bead of VPA on my spreader and apply it and move towards the door area and stop....refill my spreader the same and do it again starting where I left off...then keep doing this all the way to the end. NOW...you have a covered bonding seam with a lot of 'starts and stops'. This is when I would fill up my spreader again the SAME WAY...and from the rear to the front go over what I just applied....this will allow you to go much further....then repeat this again until I reach the door. This may take only two or three refills on your spreader. Then I fill up the spreader AGAIN and go ONE pass from rear to front. So now you have a single pass with the spreader and NO BREAKS IN IT...thus easier to sand and prep.
TRICKS:
NOW...if you have a deep ground out bonding seam area that you want to fill.. DO NOT be afraid to apply the VPA several times allowing it to set up to where you have to sand and grind it and re-apply. What you DO NOT want to happen is when you grind/sand the VPA...you have large pinholes/air pockets THROUGHOUT what you just applied. THAT IS NOT GOOD...and YES...I would make you grind it all out and do it again. WHY???? Like I would ask my employees who had air pockets/pinholes... "OK SUPERMAN....tell me if that 'right here' ( pointing at a spot) is there a large air bubble that is just below the surface of the VPA...so when the car goes outside and gets hot...I get a bubble under my paint".
OBVIOUSLY they did not have X-ray vision so it all comes out. and surprising ..when I am standing there watching them grind it...there are some seriously large air bubbles....the size of a 'B-B'.
When applying the VPA...at all costs try to make sure the edges that contact the panel and end...make sure that you really apply pressure to get them to go flat and NOT leave a harsh edge like if you applied a 'bad of butter' on the panel. When the outer edges of the VPA are tapered...when you go and sand...the transition of the body panel to the VPA is so slight...the VPA will feather quickly.
Sometimes taking the VPA to an edge is also helpful...even if you feel that you are going to sand it off. It is a smarter move....so when I am doing bonding seams...I take the VPA all the way to the top fender/quarter panel styling line...and make sure that I taper the bottom edge. I do not care if you have the center if this area high and having a 'peak' 'so-to-speak'...because when you go and block it...you will be able to shape down the peak and get it to creating the curve you are looking for.
Having a thick edge at the end of your VPA in a center of a panel is dangerous....because it will be really had to get that to come out....UNLESS you do it while it is in the 'setting up stage' and previously mentioned. So if I am filling in the the bottom of a door...and wanting to make sure the VPA stops in the center of teh door...I make sure that where I want it to stop I really apply pressure to taper the VPA so when I block it I can 'whisp' that edge in a few light passes with my sanding block. In some scenarios...I keep applying the VPA across the bottom of the door but applying a lot of pressure so I am only applying a very thin coat all the way to the other end of the door.. This makes it so I do not have to worry about a transition and possibly creating a problem in the center of the door when it was not there but it got put in there due to improper sanding techniques.
When using the VPA...you can allow it to being to react a little bit on your mixing board before applying it if you need it thicker. BUT...you better 'be on your GAME'...because it can harden in a snap. I do it..and I also MESS UP doing it....so it all depends on what I am doing. And IF I have a huge glob. I can use my scalpel and or razor blades and actually cut the VPA into a shape and allow it to harden fully and then sand it.
Fiberglass mat can be used with the VPA...but you will need to filet.shear or separate the sheet of mat so it is not as thick...then when a 'wet bed' of VPA has been applied...you can carefully add the fiberglass strands or thin mat sections ...work it in and then apply another thin layer of VPA and work it down into the VPA giving it some fibers to help it or...if trying to make area section will not fall off. BUT....you better know you mixing ration and not 'dilly-dally' around.
TEST...PRACTICE...and get familiar with it. I can not give away ALL my tricks...but this should help."
Its a more expensive project building a Corvette in Canada than in the States. American readers may not be aware, but businesses often raise their prices a great deal when they sell a product in Canada versus what the same product costs in the States.
I got a new toy today - a Hutchins inline sander. Up until now I've been using cheapy Princess auto inline sanders at about $60. The first one I had worked well but was stolen and I've had 3 since then that have all performed poorly. The last one was running painfully slowly and often stopped and I had to slide the pad back and forth a few times to get it working again. It was driving me crazy so I bit the bullet and bought the Hutchins. Hubby told me Hutchins makes the best inline sander but they're quite pricey at $525 new. The one I got was also new but from a private person (how she came to have it I don't know) and cost me $390.
YEP...Hutchins is the way to go. I have two of them and they are a time saver.
And not that this may matter...but many people might add a drop of oil when they go and use the air tool...but what they may forget is to add a drop of two when you get done with it and pull the trigger withe the air still attached to it for a second or two...and then put it in the tool box. That way...when you go and use it the next time it is not locked up because the possible moisture you have in your air line got into the mechanism and rusted it all up. Mine may sit for a month and then I need it.
Hello Priya, Dub suggested I come read post 292, so an hour and a half later I am now finished reading all the way through. The pic is of my 66 clone GTO. I like and wanted 67 tail lights so I cut the back 12" off of the car and procured the parts to convert it. I know many, maybe most, don't like the idea but it's mine and that's what I wanted so I did it. Most asked why didn't you just buy a 67 GTO to begin with. My answer like you mentioned at the opening was cost. To buy a real 67 GTO and convert it to an LS with a 4L60 didn't make sense either. I am now about 6 weeks into my idea do what a 61 c1 should look like. Good luck with your build and I will definitely be following the rest of it.
The tail lights on the 67 GTO and the grills were much better looking than the 66.if I were ever to own a GTO, it would be a 67. 67 was a great year for G.M styling the 67 442 looked better than 66 the Chevelle was nicer and the big block Stingray had a better hood.and people like Priya make what could have been.
Nice car Robert. Pretty ambitious of you to cut the back 12 inches off a steel car and graft on a new rear. That takes a lot of ability, much more difficult than doing it in fiberglass - way to go!