Priya's 79 chrome bumper conversion project
#22
Race Director


Just throwing this 'out there'.
First off...if I used chemical stripper on this clip I would make sure that I masked off any areas where there are cracks so nothing could get in them...but...knowing that these cracks will need some repair....if a little got in them...it would not be a big deal because you are going to be grinding this clip like crazy to repair cracks and defects. In some scenarios...ti is actually faster to sand it off with 36 or 80 grit than mess with the chemical. AND if I did use chemical...it would be in the tight spots and 'nooks and crannies' where trying to sand it out is too time consuming.....which in some cases...I sand blast it out also. AND now you may wonder why not just sand blast the areas that are needed.....because in some areas...the vortex of air when you are sand blasting can do more damage to the fiberglass when you are trying to remove some tight spots where paint is stuck.
Hopefully you have this clip supported very well when doing all of this work.
This photo basically 'says' it all. YES...you do have your work cut out for you...but it CLEARLY seems like you are determined to get your vision of what you want to become a reality....so these 'hurdles' will not be as bad as some may feel especially when the end result is worth it to you. TIME, PATIENCE, ATTENTION to DETAIL, FOCUS and DEDICATION is what will be needed to make this all come together. The rest is all a part of the learning curve and as many that I have tried to help find out.....with more 'hands on time'...'things' do become a but easier because you are now knowing what to do and how to do it.
Just keep this in mind that when and if you get this clip stripped and down to raw fiberglass.....when it is in that state ( raw / bare fiberglass). It is really important to make sure that the environment where you are doing this work is good for doing this type of work. SO,,,if your environment is where oil and other products are sprayed...and stuff floating in the air can settle down on the fiberglass. You are opening up PANDORA'S BOX and that is not good.
DUB
First off...if I used chemical stripper on this clip I would make sure that I masked off any areas where there are cracks so nothing could get in them...but...knowing that these cracks will need some repair....if a little got in them...it would not be a big deal because you are going to be grinding this clip like crazy to repair cracks and defects. In some scenarios...ti is actually faster to sand it off with 36 or 80 grit than mess with the chemical. AND if I did use chemical...it would be in the tight spots and 'nooks and crannies' where trying to sand it out is too time consuming.....which in some cases...I sand blast it out also. AND now you may wonder why not just sand blast the areas that are needed.....because in some areas...the vortex of air when you are sand blasting can do more damage to the fiberglass when you are trying to remove some tight spots where paint is stuck.
Hopefully you have this clip supported very well when doing all of this work.
Just keep this in mind that when and if you get this clip stripped and down to raw fiberglass.....when it is in that state ( raw / bare fiberglass). It is really important to make sure that the environment where you are doing this work is good for doing this type of work. SO,,,if your environment is where oil and other products are sprayed...and stuff floating in the air can settle down on the fiberglass. You are opening up PANDORA'S BOX and that is not good.
DUB
The following users liked this post:
Priya (12-03-2015)
#23
Drifting


Member Since: Jun 2011
Location: iowa city iowa
Posts: 1,540
Received 253 Likes
on
139 Posts
2020 Corvette of the Year Finalist (appearance mods)
C3 of Year Winner (appearance mods) 2019

Glad to see you are getting to move forward on your project. That is a really clean looking car you are starting with. Looking forward to seeing the progress.
#24
Le Mans Master


Thread Starter
Member Since: Dec 2009
Location: Saskatoon Saskatchewan
Posts: 6,397
Received 640 Likes
on
463 Posts

Just throwing this 'out there'.
First off...if I used chemical stripper on this clip I would make sure that I masked off any areas where there are cracks so nothing could get in them...but...knowing that these cracks will need some repair....if a little got in them...it would not be a big deal because you are going to be grinding this clip like crazy to repair cracks and defects. In some scenarios...ti is actually faster to sand it off with 36 or 80 grit than mess with the chemical. AND if I did use chemical...it would be in the tight spots and 'nooks and crannies' where trying to sand it out is too time consuming.....which in some cases...I sand blast it out also. AND now you may wonder why not just sand blast the areas that are needed.....because in some areas...the vortex of air when you are sand blasting can do more damage to the fiberglass when you are trying to remove some tight spots where paint is stuck.
Hopefully you have this clip supported very well when doing all of this work.
This photo basically 'says' it all. YES...you do have your work cut out for you...but it CLEARLY seems like you are determined to get your vision of what you want to become a reality....so these 'hurdles' will not be as bad as some may feel especially when the end result is worth it to you. TIME, PATIENCE, ATTENTION to DETAIL, FOCUS and DEDICATION is what will be needed to make this all come together. The rest is all a part of the learning curve and as many that I have tried to help find out.....with more 'hands on time'...'things' do become a but easier because you are now knowing what to do and how to do it.
Just keep this in mind that when and if you get this clip stripped and down to raw fiberglass.....when it is in that state ( raw / bare fiberglass). It is really important to make sure that the environment where you are doing this work is good for doing this type of work. SO,,,if your environment is where oil and other products are sprayed...and stuff floating in the air can settle down on the fiberglass. You are opening up PANDORA'S BOX and that is not good.
DUB
First off...if I used chemical stripper on this clip I would make sure that I masked off any areas where there are cracks so nothing could get in them...but...knowing that these cracks will need some repair....if a little got in them...it would not be a big deal because you are going to be grinding this clip like crazy to repair cracks and defects. In some scenarios...ti is actually faster to sand it off with 36 or 80 grit than mess with the chemical. AND if I did use chemical...it would be in the tight spots and 'nooks and crannies' where trying to sand it out is too time consuming.....which in some cases...I sand blast it out also. AND now you may wonder why not just sand blast the areas that are needed.....because in some areas...the vortex of air when you are sand blasting can do more damage to the fiberglass when you are trying to remove some tight spots where paint is stuck.
Hopefully you have this clip supported very well when doing all of this work.
This photo basically 'says' it all. YES...you do have your work cut out for you...but it CLEARLY seems like you are determined to get your vision of what you want to become a reality....so these 'hurdles' will not be as bad as some may feel especially when the end result is worth it to you. TIME, PATIENCE, ATTENTION to DETAIL, FOCUS and DEDICATION is what will be needed to make this all come together. The rest is all a part of the learning curve and as many that I have tried to help find out.....with more 'hands on time'...'things' do become a but easier because you are now knowing what to do and how to do it.
Just keep this in mind that when and if you get this clip stripped and down to raw fiberglass.....when it is in that state ( raw / bare fiberglass). It is really important to make sure that the environment where you are doing this work is good for doing this type of work. SO,,,if your environment is where oil and other products are sprayed...and stuff floating in the air can settle down on the fiberglass. You are opening up PANDORA'S BOX and that is not good.
DUB
http://forums.amceaglesden.com/index.php?topic=15595.0
That one took me 4 years, so I'm in it for the long haul if need be, lol!
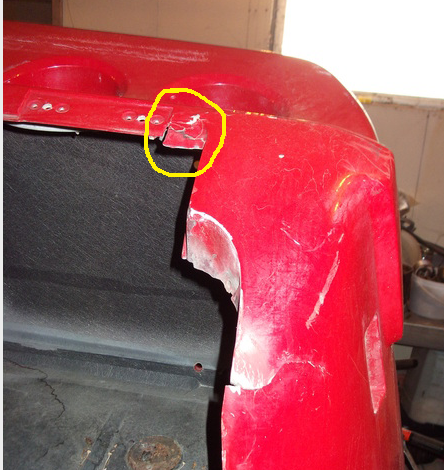
I like the idea of sandblasting in tricky areas. The spot shown in the picture below is an ideal spot as it would be pretty tough/impossible to sand it by hand. And the side marker light area. I'm not sure how my husband is going to react to me wanting to sandblast in his garage, I did a lot of it when I was doing my Eagle and he was pretty unhappy about it. I'll also be glassing in the exhaust filler panel to eliminate the lines where it joins the tail light panel.

I'm going to do the fiberglass repairs around the tail light panel and glass in the exhaust filler panel first, then when it comes time to repair the cracks in the wheel well lips I'll lay the clip down in its normal position and prop it up where the suspension points would if they were there.
I'm a bit nervous about having the clip stripped to bare glass as based on my history it could be that way for several months. If I remember correctly its a good idea to spray it with an epoxy primer once its down to bare glass to help protect it from contamination.
Question for you Dub:
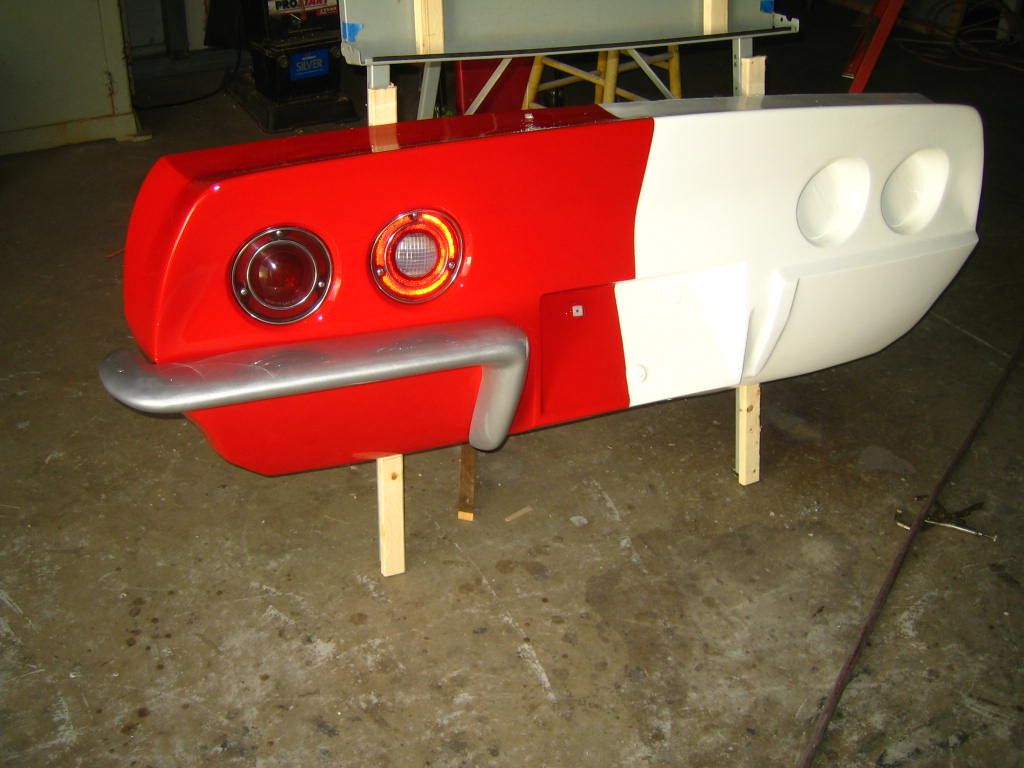
I was originally planning to remove the rear quarters from my 79 and seperate the rear quarters from the 69 rear clip at the bonding seams and make a cut along the top just behind the gas tank filler and then bond the 69 quarters and rear 8 inches or so of the 69 rear clip to my 79 and then glass in the join on the top edge. I understand that making joins at the wheel well lips can be prone to cracking and I'm nervous about getting the 69 rear quarters as straight as I'd like so I'm wondering if you would recommend going with my original plan or if I should just cut off the 69 rear clip just ahead of the rear wheel well opening and graft that to my 79 as shown in the picture below?

Last edited by Priya; 12-02-2015 at 07:49 PM.
The following users liked this post:
Aggitated Monkey (01-09-2020)
#30
Melting Slicks


Priya,
WOW what a great idea and project! Glad to see you getting in and getting the hands dirty. Appreciate your photos and questions, because my body has a few cracks that look similar to the ones you are facing, so I will be following closely. Good luck and stay at it!
WOW what a great idea and project! Glad to see you getting in and getting the hands dirty. Appreciate your photos and questions, because my body has a few cracks that look similar to the ones you are facing, so I will be following closely. Good luck and stay at it!
#33
Le Mans Master


Thread Starter
Member Since: Dec 2009
Location: Saskatoon Saskatchewan
Posts: 6,397
Received 640 Likes
on
463 Posts

Priya,
WOW what a great idea and project! Glad to see you getting in and getting the hands dirty. Appreciate your photos and questions, because my body has a few cracks that look similar to the ones you are facing, so I will be following closely. Good luck and stay at it!
WOW what a great idea and project! Glad to see you getting in and getting the hands dirty. Appreciate your photos and questions, because my body has a few cracks that look similar to the ones you are facing, so I will be following closely. Good luck and stay at it!
#36
Melting Slicks


Priya, that is quite a project you are getting into. A few yrs back I posted a tutorial on fiberglass repair techniques. I stand by that thread. My car is painted black and Ive been told the car is stunning. So I guess I did ok. The point is, fiberglass is easy to do correctly and also easy to screw up if not done correctly. My avatar shows the rear end on my corvette. I totally rebuilt that whole right lower quarter panel, the exhaust filler panel and had the tail light panel out, rebuilt it and reinstalled it. I had cracks in every quarter panel, some of the cracks were in misalignment. What I did was take aluminum and mold it to the shape of the area being repaired and screw it down to hold the panel in alignment. Then I repaired the backside of the damage area first, removed the aluminum and repaired the outside. Good luck with your project, its ambitious for sure, but do able.


