When you click on links to various merchants on this site and make a purchase, this can result in this site earning a commission. Affiliate programs and affiliations include, but are not limited to, the eBay Partner Network.
Hi P,
I was looking at this again and noticed something�.
on the 2 small brackets for the exhaust filler the upper connection is adjustable only 'side to side', while the lower connection is adjustable 'up and down'.
I think this can only mean that 'they' had to allow for a variation in the relationship of the body and frame from car to car at this point.
I don't know if this helps you or not?
Is this something that you can use to your advantage?
Is it something you need to allow for too?
????
Regards,
Alan
Alan, the reason I would like some side to side adjustment is that I have to sort out the bumper brackets with the 70-73 ACI rear clip clamped in place so I can remove it as I modify and make attachments points for the modified brackets. I may have to do this several times and I'm not sure I can get it in exactly the same place each time I mock it back up and when I finally fiberglass it into place.
I'm going to attach plumb bobs to the middle of the 79 upper deck and the middle of the 70-73 ACI rear clip so I can more accurately position the 70-73 ACI rear clip each time I remove and replace it. Perhaps this way I can have enough repeatability that I don't need to worry about side to side adjustment?
Hi p,
My experience has been that when trying to locate something precisely, or having something you need to locate precisely and repeatedly, working from a 'center line' is a good way to do it.
So that sounds good.
Regards,
Alan
Priya................"When you are up to your * * * in alligators it's hard to remember you re there to drain the swamp".
Keep up the good work. I have a few (extra spare) parts that "didn't pan-out", myself. You are doing good working out the problems as you go along.
I also want to permanently attach the rear lower valence, but considering the headaches I may cause which I have learned by reading your thread, I will keep the valence "removable".
My main goal is to keep the car's outward appearance as close to original as possible. Any hidden modifications that I must do to reach that goal "will be re-designed as necessary (LOL)" to make my goal attainable.
Keep at it......you are about to pass me up......and my clip has been fitted for a while!
Thanks be to you, the other members who are offering information, and to the Moderator for getting the thread back on track!
Right Doorgunner, I really wanted that molded in exhaust filler panel but its caused an awful lot more work. I suppose if a person had a factory rear clip, factory exhaust filler panel and factory 68-73 rear frame crossmember they wouldn't have encountered any of the problems I've had.
Right Doorgunner, I really wanted that molded in exhaust filler panel but its caused an awful lot more work. I suppose if a person had a factory rear clip, factory exhaust filler panel and factory 68-73 rear frame crossmember they wouldn't have encountered any of the problems I've had.
Rookie me....I completely forgot that your clip is a 1-piece unit! NOW I completely understand why you have to make all the "hidden pieces" fit correct before you can permanently attach the clip
You and I have "bitten-off" a lot, but I think we can get it done.
You said something about tight fits when assembling everything.........In the past I have taken wrenches/sockets/whatever and bent them, cut them, welded them to have "specialty tools" so I could complete a project.
My rear clip and exhaust filler panel were seperate units. The rear clip was all one piece though unlike the factory rear clip which had seperate quarter panels, tail light panel and upper deck panel.
Perhaps I'll have to fabricate some tools as well to get the brackets done.
Hi Priya, I saw you asking how long it took to remove the front clip. So far I have removed 2 clips without damaging them. That's one of the import things. Not sure how many hours you work on th car but it does take a little time and more important some creative tools. The heat gun and starting at the bottom by the door seems to work well. Putt knives of various sizes and a slim jim (what they use to unlock car doors years ago). It works great for reaching into the deep areas that are glued. The quick and dirty way is to just cut into areas that you can't reach and make the repairs later or not. The choice is yours. Pretty tedious at times but VERY rewarding when completed.
Hope this helps. Notice I did not place a restriction on time nor should you.
RVZIO
Thanks for the tips RVZIO. I generally don't put in more than 10 hours a week on the car. I'm just hoping it doesn't take me months to get it off. I suppose I could cut apart the present clip on the car as I don't think any one will want to ship a 75-79 front clip from Saskatchewan.
Thanks for the tips RVZIO. I generally don't put in more than 10 hours a week on the car. I'm just hoping it doesn't take me months to get it off. I suppose I could cut apart the present clip on the car as I don't think any one will want to ship a 75-79 front clip from Saskatchewan.
If discarding the clip, instead of cutting it up, cut it at the bonding strips and sell/ship it. Or if you have a local Vette club, donate to them to see if a member could use it.
Just a thought.
Still reading your thread every day.
I wondered why GM did a split rear valence....now we know.
Your challenges have saved me a lot of headaches on my project as I get ready to tackle it now with the body off.
Hi,
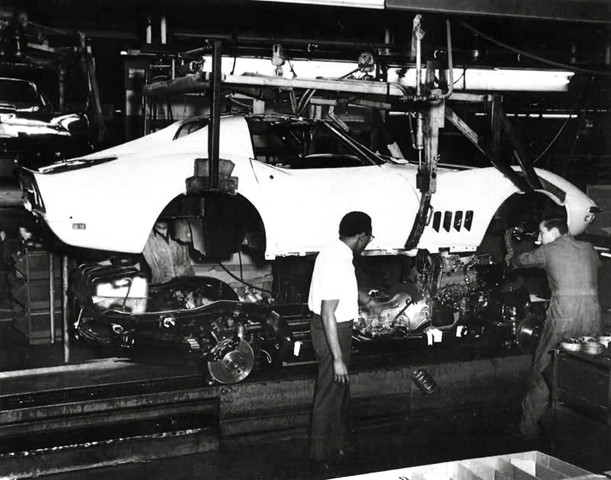
About the exhaust filler panel being separate�.
I believe it has to do with the way the body was lowered onto the almost complete chassis.
In looking at photos of the plant during that era it appears the body needed to come straight down� it couldn't be 'tipped'. The exhaust panel prevents that.
The front was a different situation though� there the front valance could be in place and still allow the body to lower straight down.
Doing the exhaust panel the way it was done was a lot of work. The panel was put in place on the car with at least 2 bolts before the body was painted. After it was prepped and painted the panel was removed and put into(?) the car. After the body was lowered the panel was put back in place using 4 new bolts at the top and 2 at each side (on under car exhaust cars).
I don't think St.Louis would have done it this way if there was a viable way to avoid the work.
Regards,
Alan
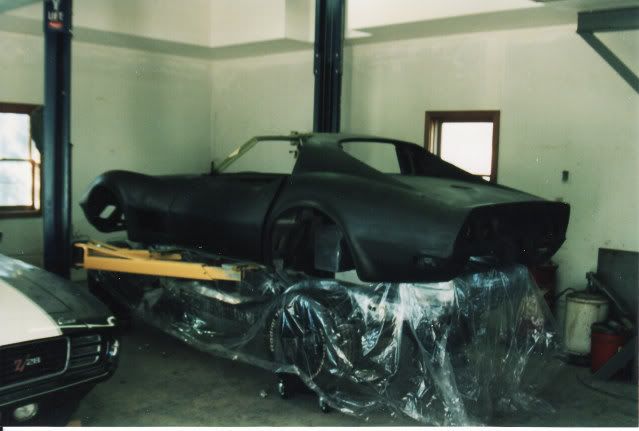
Here's another example of the filler panel being off so the body can come straight down.
So I tried the plumb bob idea for lining up the 70-73 ACI rear clip on the 79. If the bobs are lined up the quarter panels are misaligned. If the quarter panels are aligned the plumb bobs are out of line. So much for that idea.
I spent about an hour being baffled holding up the factory rear brackets to my frame and the 70-73 ACI rear clip.
Actually I don't think it'll be too bad except for the uber thick brackets shown below.
If I put the one thick piece on the hole in the ACI rear clip and the other piece on the bottom of the 79's rear frame crossmember the two pieces are a couple or three inches apart from each other and that will mean some fun work with some very thick pieces of metal when I'm only used to working with 20 gauge sheet metal. It will also result in quite long join between the two pieces as shown in the diagram below and I wonder if despite the thick metal that will flex too much:
If I leave the two pieces bolted together they hit in the middle of the 79's rear frame crossmember and I'll have to modify the 79 frame to make a mounting point. That's easier in that its much thinner metal but I'm not sure I'll be able get a wrench on the bolt and nut on the new frame mount once I'm done and I'm not really liking the idea of cutting away part of the frame and welding in new pieces in a different place.
I.....uhhhhh.......would.....Naaaaaaaa.. ....that won't work
(Pardon my rambling, I know your frame is quite different from mine, but maybe you could compromise between the '68 and '76designs and still have a solid safe vehicle)
I understand the need for an extension to join the pieces of bumper bracket together at the correct length/distance.
Now.........Not that this has anything to do with solving your problem:
I used heavy-wall rectangular steel tubing and drilled/shaped slotted bolt holes where needed in the NEW rear cross member. Then, on the opposite side of the slotted bolt holes I drilled a hole large enough to get the correct socket onto the bolt head.
It was much extra work, but the heavywall tubing even with slots/socket holes/etc is still many times stronger than the original crossmember. If hit hard from the rear I know the "skinny" left & right frame rails will buckle but something has to give/NOT the gas tank.
In other places on the cross member, as needed, I drilled oversize holes in the tubing side nearest the bumper brackets and welded the correct size nut flush into each hole (practice-practice).
Good suggestions there Doorgunner. Just out of curiousty, what did you use to drill and slot holes in the thick metal? I had to drill some holes in some material something over 1/16 th inch thick and it took forever. I had to start with a drill bit a couple of sizes smaller than 1/8th inch and then go up a couple sizes, redrill the hole and so on until I got to 5/16 or 3/8 or whatever it was I was drilling. I actually think that's going to be the hardest part of this, particularly when I have to drill the brackets I posted above that look to be around 1/4 inch thick.
Good suggestions there Doorgunner. Just out of curiousty, what did you use to drill and slot holes in the thick metal? I had to drill some holes in some material something over 1/16 th inch thick and it took forever. I had to start with a drill bit a couple of sizes smaller than 1/8th inch and then go up a couple sizes, redrill the hole and so on until I got to 5/16 or 3/8 or whatever it was I was drilling. I actually think that's going to be the hardest part of this, particularly when I have to drill the brackets I posted above that look to be around 1/4 inch thick.
I use these whenever possible to speed up the drilling process/run the drill motor at 50% or less of maximum rpm.......CLAMP those thick brackets to a bench when drilling holes to avoid breaking fingers........
A milling machine designed for metal would be nice and FAST......but....not easy to locate one.......
You can apply a light coat of bright paint to the crossmember/clampthe member intoplace on the frame and mark all the areas that need slots or round holes or weld nuts since you are modifying most of your parts. Then remove the member and drill the needed holes/slots.......(I should have used wider tubing for looks)........You can see a couple slots that I didn't remove the excess metal from before taking the pic......a couple slots weren't even needed to hold the tank straps (advice per another member) since I was fabbing a custom mounting assembly for my fabbed fuel tank......I used socket-head bolts in most places since there was room to tighten them........
For slotted holes I scribe the pattern onto the metal/drill the correct size hole at each end of the pattern/drill as many holes as possible between the end-holes (without letting the drill(bit) contact the hole next to it so the drill(bit) doesn't grab-snap in two......then I use a dremel/place TWO cutoff wheels side/by/side for strength.....then cut out the extra metal with the dremel.......
OR..........buy a quality carbide deburring tool and grind the extra material from the slot.........
I usually buy a couple (bits) the size I need in case of dulling or breaking (being a machinist I sharpen my own drills(bits). Run the electric drill at 50% or less of maximum to make the drill(bit) last much longer/same thing with the deburring tools. A few drops of metal cutting oil while drilling also makes the bit last much longer/drills better.
It helps a lot to use a drill press ($100 cheapie at harbor freight will do the job). If you learn to sharpen a drill(bit) you could buy a $50 bench grinder with an 80 or100 grit metal grinding wheel.
It's a pain at first cutting slots, but once you catch on you can make a 1" long by 3/8" wide slot in a few minutes.
Practice'practice
Last edited by doorgunner; Apr 27, 2017 at 01:42 AM.
Hi P,
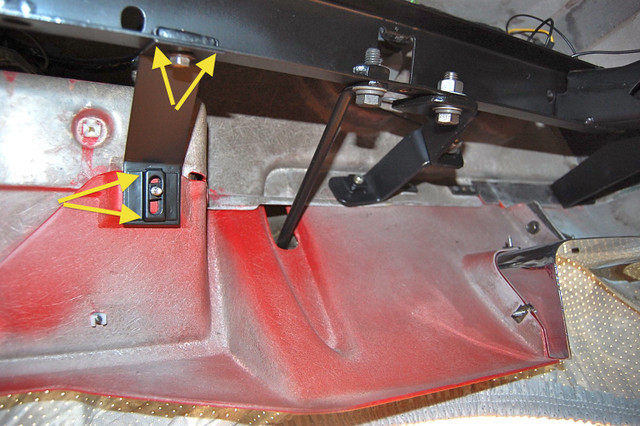
IF !!!!!! you had the rear of a chrome bumper frame� say from just behind the rear body mounts on back�. COULD you position it so that all the bumper brackets would fit normally or would there still be bumper fitting problems?
I bring this up because I feel you're nibbling at the problem and not addressing the actual trouble spot� the rear configuration and location of the frame crossmember and it's relationship to the bumpers.
???
Regards,
Alan
Could the bumper frame section be spliced along this area?
If I could get the 68-73 rear frame piece spliced exactly it would in theory allow the bumper brackets to fit normally assuming I put the 70-73 ACI rear clip very close to the factory distance from the frame but I doubt the ACI rear clip will be in that position. Also my husband would not allow me to splice the rear frame, he's already saying I better not cut or modify the 79 rear frame crossmember in any way which I don't think I can avoid if I want to complete this job.
Alan those two bolts shown in the picture that go through the oval hole in the frame rails, does the gas tank being installed prevent access to them? My frame rails do not have that oval hole and I was thinking of making one for access to the bracket bolts (if my husband will let me) but when the gas tank is in position it prevents access to that area.


 Rookie me....I completely forgot that your clip is a 1-piece unit! NOW I completely understand why you have to make all the "hidden pieces" fit correct before you can permanently attach the clip