When you click on links to various merchants on this site and make a purchase, this can result in this site earning a commission. Affiliate programs and affiliations include, but are not limited to, the eBay Partner Network.
Hi P,
Can the holes for the 2 bolts be elongated so there's room for some side-to-side movement?
You could then use a star washer under the nut to lock the bracket in place once it's were you want it to be.
Chevrolet did this for some of the regular bumper brackets and bolts. For the front bumper a 'serrated' washer was used for that very purpose.
Regards,
Alan
If you look closely you can see the 'serrations' and the 'trail' they leave. (I realize these are much bigger bolts but the use is similar to the taillight panel brackets.)
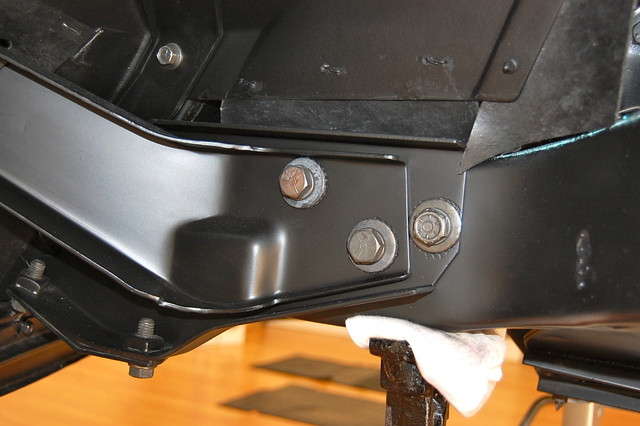
Yes, I can elongate the holes in the rear frame crossmember to allow side to side movement. I'm just not sure if once its all together I will be able to get a wrench on the nut on the inside of the rear frame crossmember to tighten it. I was initially thinking of welding the nut to the frame but then there would be no side to side adjustment.
Hi P,
I was 'imagining' that the tank was out.
�.. you'd have access then!
I love cars that are at least 'partially' disassembled.
I can still remember one weekend in 2011 when my car was together!
Makes me anxious just to think about it.
Regards,
Alan
Hi P,
I was 'imagining' that the tank was out.
�.. you'd have access then!
I love cars that are at least 'partially' disassembled.
I can still remember one weekend in 2011 when my car was together!
Makes me anxious just to think about it.
Regards,
Alan
The "C" channel of the rear frame crossmember on the 79 faces the opposite direction from the 68-73 so perhaps I can get a wrench on the nut even with the gas tank installed. I'll have to reassemble and try it out, it looked pretty tight in there last time I had it together.
Yes, I can elongate the holes in the rear frame crossmember to allow side to side movement. I'm just not sure if once its all together I will be able to get a wrench on the nut on the inside of the rear frame crossmember to tighten it. I was initially thinking of welding the nut to the frame but then there would be no side to side adjustment.
Just a thought. Make the frame connection a non adjustable one with a welded in cage nut. Cut the bracket after that and make it adjustable with some sort of sliding hole/bolt and nut assy that you can reach easily. Or heat and bend the bracket to fit after setup of the fixed connection at the frame.
Just a thought. Make the frame connection a non adjustable one with a welded in cage nut. Cut the bracket after that and make it adjustable with some sort of sliding hole/bolt and nut assy that you can reach easily. Or heat and bend the bracket to fit after setup of the fixed connection at the frame.
I might be able to create an oblong hole in some of the brackets but not others as they already have a front to back oblong hole and so I can't add a side to side oblong hole as well. I might have to weld the nut to the frame and then do as you say, when final assembly time comes bend the brackets or even cut and re-weld to one side or the other at that time. Its too bad I can't sort this out with the 70-73 ACI rear clip fiberglassed into place as I have to make my modifications with it clamped in place and then hope I get it very close to the same position when I fiberglass it in place.
Hi P,
Just for your info�..Here's the cage. It looks like there's 1/2"-3/4" adjustment?
I'd think you can come up with the adjustment you'll need without having to duplicate the cage.
Regards,
Alan
Your doing just fine Priya on 2 counts, your moving along with your project and you got Alan to respond to a so called soap opera post. Good job.
RVZIO
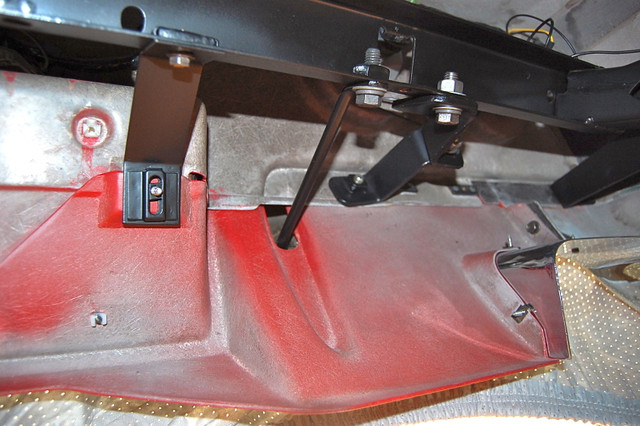
Here's another problem I didn't see coming. The hole in the picture below outlined in yellow. I was looking at the bumper today and it occurred to me that with the exhaust filler panel fiberglassed in place there's no way to attach a nut and bolt to the bracket that goes through this hole to the bumper - you can only do that with the exhaust filler panel off. So, now what do I do, scrap all the work I've done so far and go spend another $1000 on another rear clip? I thought of welding a nut onto the bumper at this location but there's not enough room through this hole to thread the bolt into the nut or to turn a wrench in the hole. The only thing I can think of is to weld the bumper bracket to the bumper and then thread the bracket through the hole when its time to mount the bumper.
I was sure I read about other people fiberglassing on their exhaust filler panel. Did I imagine that or did they just leave this bracket off or what?
Your doing just fine Priya on 2 counts, your moving along with your project and you got Alan to respond to a so called soap opera post. Good job.
RVZIO
This soap opera is getting way to dramatic for my tastes.
LOL, scratch that previous post, I just realized I can bolt that bracket to the bumper first, then thread it through the hole and bolt it to the frame. I feel pretty stupid now.
Hi P,
I 'believe' you can bolt the bottom of the rod in place on the 'down-turn' part of the bumper, and then CAREFULLY thread (Twist and Turn) the upper part of the rod through that hole as you 'ease' the bumper in place.
I 'think'!?!
Regards,
Alan
You posted while I was looking for the pic.
You need to do it that way regardless, since if the bumper and exhaust filler are installed properly, you can't reach that bolt once the bumper is in place.
Yes soaps can get that way, but you can do it you have a lot of support on the forum.
Oh, here's one of Alan' s great posts to me!
Hi r,
If you read back through your thread you'll see very few of the posts have anything substantive to do with your restoration.
Personally I find nothing amusing reading about goals for posts and views while you spin in circles in your garage.
If you want to set a post/view record fine, but that's not going to get your car restored.
Sorry!!!
Regards,
Alan
So I responded " then don't read my thread anymore"
Response:
Hi Roger,
Well, ok then.
You've just blown off one of the few SERIOUS people who can be of real help to you in what you're doing in the garage.
I wasn't part of your thread to 'stroke you', I was there to actually answer questions.
Some times what a person wants LEAST to hear is the truth.
Regards,
Alan
Okay I am done, sorry Priya, just watching out for you. I will get you those parts you asked.
RVZIO
I am almost afraid to even open my mount and comment.
I have commented on this forum about the problems that can occur when the exhaust filler panel is fiberglassed in permanent. I have to deal with some of my customer that have this done to their Corvette and when I have to get into that area...they pay dearly for the added grief I have to go through due to the exhaust filler panel can not be easily removed. So...doing work with it glassed in is do-able...but it just takes more time and effort.
I knew you were going to run into major fitment issues that you would have to tackle when it came to the point of trying to get your bumper brackets installed...which is WHY I tried to emphasize the usage of the impact bar...which is flat and thus...brackets could be installed to it. I hate to say that doing stuff like this..i have learned to stop and look at it and keep going deeper and deeper into it...so I have some idea of what I am going to have to deal with. I was not always that lucky....I learned as I went back in the day and paid the price for not taking things into consideration. But now-a-days...I can see what I need to do and know what is likely up ahead that will cause me to stop and take a close look. THAT is all I am trying to offer to you....my experiences...and they are form a person who does not dismiss or overlook things that are important. Simply due to I am liable for my work.
I am NOT trying to derail your progress...but you have to understand this is stuff I deal with...and I am only trying to enlighten you as politely as I can WITHOUT 'others' feeling that i am trying you kill your MOJO. That can not be father from the truth.
I HONESTLY do not feel that you need to scrap any of what you have done...at this time....BUT...as I ahve learned and had to do myself...sometimes I did have to back track...because I got a bit ahead of myself and I would have to cut something apart and do it differently...ONLY because for me trying to work around something that is causing me a bunch of grief...it would be faster for me to do that and get the job back on track. That is that 'learning curve' that is often times mentioned. It can happen to anybody.
I will write this and this is from experience... IF you are using reproduction brackets that will make contact with the backside of the ACI clip where the bumper is attached. I have mentioned my process on the forum somewhere to MAKE SURE that those brackets/ braces are PERFECTLY flat against the fiberglass clip....so when you go and tighten the bolts...you do not crack the fiberglass due to the metal bracket/brace is not a the correct angle. And I also do something to the backside of the hand laid fiberglass so it is not slick and flat JUST LIKE the press molded fiberglas panels were so when you go and tighten up those bolts you do not hear fiberglass popping and making noises...or crack it....which can happen. Just ask me how I know it can crack.
Yes soaps can get that way, but you can do it you have a lot of support on the forum.
Oh, here's one of Alan' s great posts to me!
Hi r,
If you read back through your thread you'll see very few of the posts have anything substantive to do with your restoration.
Personally I find nothing amusing reading about goals for posts and views while you spin in circles in your garage.
If you want to set a post/view record fine, but that's not going to get your car restored.
Sorry!!!
Regards,
Alan
OUCH!!!!
Well...we know Roger that you are doing the work yourself and doing a good job without someone being there to actually show you how to do it....or sending it to someone to do it all for you. that says a LOT!
There are numerous thoughts on the drilling of a small round hole at the end of a slit. It has to do with stress transmission, crack propagation and interlaminate shear.
Since fiberglass is a thermoset composite, there are different coefficient's of expansion between the glass and resin. Remembering that the glass provides the strength and the resin provides the stiffness and protection of the glass fiber. Also what must be taken into account is the structure of the glass; unidirectional, bidirectional, weave pattern, fold pattern or roving - milled or in-milled and finally if chopped mat w/wo roving backing.
By causing a round end to a slit the stress is better controlled.
I do agree that most times a repair on a car / boat will do ok due to the mass (thickness) of the fiberglass vs the stress induced.
But on a pounding race boat or a pressure vessel the result on a more highly loaded fiberglass panel will ultimately be different. (stress per square inch)
This may show up on a car that is lightly bumped in a parking lot by another vehicle.
We did tests in the lab with both thermal cycling and aging + flex and vibration testing using ultrasound and stress testing instruments and found the holes actually helped in most applications.
just some thoughts..
I can not dispute in what you wrote....and if your tests proved the hole is the ONLY way to do it...then it must be right...but that means that all of the repairs that I did not do it that have not failed must be dumb luck...or... the stress in/on the panel is NOT that great to cause for a crack to start.
And as we all should know..if the panel gets hit in an impact again..it is going to bust somewhere anyway.
Yes soaps can get that way, but you can do it you have a lot of support on the forum.
Oh, here's one of Alan' s great posts to me!
Hi r,
If you read back through your thread you'll see very few of the posts have anything substantive to do with your restoration.
Personally I find nothing amusing reading about goals for posts and views while you spin in circles in your garage.
If you want to set a post/view record fine, but that's not going to get your car restored.
Sorry!!!
Regards,
Alan
I support you RVZIO, I'm sorry that I don't have a lot of experience I can share with you.
just a few thoughts: have you looked at WELL-NUTS for attaching some panels - they work well on non stressed panels and come in many sizes. Could hold the exhaust panel on if the attachment points are reinforced . Some boat builders use them to hold interior panels together.
On the cross bar I would look at CARRAGE bolts. The square end could fit into a slot and will prevent the bolt from turning while you tighten the nut. They can be purchased in grade 8 if needed.
You may also be able to use NUT-SETS , they are like rivets but are threaded. You may be able to glass them into a panel and then screw the other panel to it. I put a steel shim on the nut-set like a washer - shaped to what was convenient and glassed the nut-set + shim in to the panel. (put a waxed screw into it to keep the threads clean)
Went a little to deep the other day. TOO many years of Composite R&D. We designed / made every thing from disposable bazookas to helicopter blades , 1973 run flat tires, air tanks, Navy vehicles (still restricted) , deep sea buoy , high pressure vessels -25k psi.. portable fueling stations (JP4), submarine - piping & parts, fire lines for salt water, it was fun but left a mark... it was fun explaining how I was designing a mold out of SALT and then dissolving it to get the tank off.