When you click on links to various merchants on this site and make a purchase, this can result in this site earning a commission. Affiliate programs and affiliations include, but are not limited to, the eBay Partner Network.
Hi P,
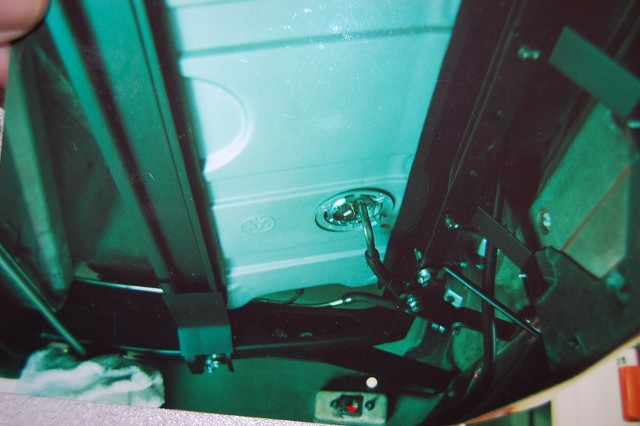
On 68-73 cars the rear of the tank sits on top of the rear crossmember.
This allows access to those 2 bumper bracket bolts on each side.
Regards.
Alan
Not quite as obvious but you can just make out the washers from those 2 bumper bolts.
For those of you watching this thread and thinking about converting your own rubber bumper car I think an easier alternative to the heavy steel/chrome rear bumpers would be fiberglass rear bumpers which I understand can be painted with a chrome like look. Being much lighter I think you could skip some of the factory 68-73 rear bumper brackets, in particular the ones I previously showed (comment #715) that look the most difficult to modify.
As Alan suggested it may be that the engineering of the chrome rear bumper cars is such that part of the reason for the rear bumper brackets is to provide support for the fiberglass tail section. I think (and give my inexperienced opinion all the weight it deserves ) one could use the outer two brackets that attach to the frame rails and the innermost two that attach to the license plate area and that would be sufficient to support the tail panel section with the lighter fiberglass bumpers and those brackets appear to be the most easily modified to fit the chrome fiberglass tail section to the rear frame crossmember of a rubber bumper car.
When drilling in metal, carbide drills will help. Also lower speeds keep the bits from heat tempering. (actually loosing their temper and sharpness) . I always try to use either Kerosene or cutting fluid on the drill bits. It helps in keeping the tool bit cooler and helps wash away chips.
I use a trigger oil can and just keep squirting on the part and bit.
If you have access to a lathe, a 90 degree plate on the tool post can turn it into a milling machine. Kind of a homemade milling attachment.
Harbor Freight has a crank / slide table 2 axis that will turn a good drill press into a useable milling machine. It's not the best but I purchased one and use it for slots. (my drill press is a Walker / Turner 3 hp with a wet- cast iron table. 1950's vintage)
When I was working I had a Milling machine, Plasma cutter etc... miss those toys....
Actually today the Plasma cutters are getting cheap.
Just another thought: when framing a square / rectangle is strong, a triangle is stronger and a circle is super strong. Sometimes to go around an obstruction I would use a triangle or square or rectangle.
Hi P,
My feeling is that the bumper brackets ARE there to support the bumpers, not the body.
BUT, certainly, the 2 thinner steel flat brackets seem to me to be there to stabilize the centers of the taillight panel and exhaust filler panel.
Regards,
Alan
Okay, maybe it was someone else who suggested the brackets were partly there to support tail of the fiberglass body. Or maybe I just imagined someone said that...
Priya, I've done paint and body for a very long time, fiberglass/composite repair and a ton of fabrication of parts, and I'd say you're on the right track. I just read thru a lot of this thread, and the comments. This place can be a myriad of opinions, and attitudes. But, with the experience I have, you're doing it right. You're taking your time with your steps.
I would say the biggest/best advice I could give, at this point, is don't second guess yourself. You're deep enough into this project now, and you have an extremely good idea of what you want, and how to do it. Just do it. Any gaps can be easily filled to be strong, with the right cloth/material and I would say probably never crack.
I don't care what anybody says, 16 and 24 grit sandpaper/grinding discs are for getting busy, and not buffing. So, get after it with those discs and get the job done to your liking.
I'm waiting for the finished product, gonna be bitchin!!!
Last edited by USAFVeteran; Apr 27, 2017 at 03:57 PM.
Thanks for the encouragement USAFVeteran. Having spent some more time planning the grafting on of the ACI rear clip and modifying the bumper brackets I'm feeling more confident.
before I can modify all the brackets I'm now on the rear bumpers. As described above I need to tilt a couple of the mounting pads outward in order to get the bumper to sit flush to the rear clip so I started on that today.
I couldn't get the cutoff wheel all the way to the place where the bracket meets the bumper metal without cutting into the bumper surface so I had to cut them a little short. I needed the smallest possible cutoff wheels to get as close as possible to the metal of the bumper so at one point I was holding the cutoff tool on a piece of an old piece of train rail to get the diameter smaller.
Tomorrow I bend the tabs out until I get everything sitting flush and then I weld it up.
I see that you have done what I have had to do at times like I wrote in the thread you linked us to. I HATE IT when I have to do it...but sometimes that is the only method that will get the job done....without opening up another 'can of worms' trying to do it another way.
The outer bumper brackets and the inner ones you are dealing with do not support the body...IF...the definition of the word 'support' in this scenario is being taken as a way to hold UP the body. They do not do they. Simply because the body does not fall down when they are removed (as many of us know).and that is due to the integrity of the number 4 body mount and how it is shimmed. But rather...these brackets...they provide support for the bumpers (obviously) and in doing so....becasue the body is there also as an integral part of structure...ALL of these parts all work in unison to make the rear area a more structurally solid component. SO...impact bar or support beam, brackets, body and bumpers when all joined together make it a rather stout area.
Think if this just like the spot welds that are used when they make cars today. The number of spot welds...their placement ..the thickness of the metal that is being welded..and how it is stamped out ALL come into play to make a part strong. And even though it is strong...it is also designed to absorb impact and begin to fail accordingly due to all of the factors listed above. That is WHY it is so IMPORTANT when panels are being replaced and spot welding has to be done again. The number of spot welds and their size, also and the distance between each of them and all that stuff DOES make a difference due to these current cars have been crash tested and any MAJOR alteration how it was made can come back and haunt me due to I am liable for that cars repairs as long as that car is on the road.
SO...with that said...even though this is a fiberglass car that will bust up like crazy if it gets hit in the rear ..as we all know...bit it STILL has some structural integrity in order to absorb some of the impact....which is why all of those brackets and where they are attached, etc is/are important ( just like the spot welds in the above paragraph).....and all of this ONLY MATTERS IF a person cares to consider this.
Here's how the rear bumpers were originally sitting with the bumper mounting points sitting flush on the rear clip. note the misalignment on the outer mount on the quarter panel:
Now after tilting out the two rear mounting points on the bumper:
This side isn't welded up yet but the passenger side is welded up and sitting nice and flush. I was going to weld up the driver's side bumper but while I was test fitting it I noticed another issue and got sidetracked...
Note how the horizontal character line about midpoint in the license plate area doesn't line up the same on each bumper.
It turns out the character line on the right side is 1/4 inch lower than the one on the left side. I matched the two lines to the license plate bezel which itself was crooked so it lines up with that but not the bumpers. So, I'm not sure exactly what I'm going to do about this. Two steps forward, one step back.
Push down on the rear clip without the bumpers and bumper braces in place and tell me this structure does not support the body. The rear clips on these cars would be bouncing all over the place if you tried to drive them without these supports in place. Yes it was me who wrote that.
Push down on the rear clip without the bumpers and bumper braces in place and tell me this structure does not support the body. The rear clips on these cars would be bouncing all over the place if you tried to drive them without these supports in place. Yes it was me who wrote that.
CLEARLY we disagree in this. I stand behind my comments that area of the rear body DOES NOT need to be picked up in order for those brackets to be installed....nor should be pushed down. The brackets are installed and adjusted to fit WHERE the body is resting.
I KNOW the IF someone where to put serious weight on the back of the car it would move...that is a 'no-brainer'. The amount of movement
for teh weight applied is debatable...BUT by shear design...due to the end of the body is about a foot + out past from where the #4 body mounts are located...IT only seems logical that it would take a lot of pressure to actually bend the rear clip...when it is locked in place at the #4 mounts. I have worked on so many of these cars...I can not see that the rear area where the bumpers would be mounted if left un-attached would cause that area to move nothing more than micro fractions of an inch. UNLESS the rear of that specific Corvette was damaged and the key stress points were not longer strong.
AND...on a 1979..there is an understructure that is under the rear upper panel by the fuel tank door which further increases it strength and rear rear glass and less like to be able to move when pressure is applied to it....then take into account the rear splash shield bonded in to the quarters and the rear inner tub area.....and the top body feature lines which is an upside down 90 degree angle....which is strong just like an angle iron a...which is hard to bend....so...if you feel that the rear is going to be bouncing all a round...that your choice.
I know there would be some slight movement...but nothing drastic...but do and think as you wish. Unless you care to contradict what I just wrote about angles and such.
It turns out the character line on the right side is 1/4 inch lower than the one on the left side. I matched the two lines to the license plate bezel which itself was crooked so it lines up with that but not the bumpers. So, I'm not sure exactly what I'm going to do about this. Two steps forward, one step back.
I thought that when you bonded in the lower exhaust panel..that you fitted in the license plate bezel to make sure all was good?
Now you cats have me curious, the laser kit car had,a design flaw if the rear wasnt supported it would sag and buckle out right at the rear axle line if the stock inner fuel tank that was part of the rear structure had been removed and not replaced the same way, the rear was huge heavy and no real curves or tapers,
But the rear of my 69 tapers back, and the sides roll under, a lot of compound curved panels, i cant really see the rear sagging or moving around if left unsupported, i do plan to run my bumpers and support but you guys got my mind engaged
Push down on the rear clip without the bumpers and bumper braces in place and tell me this structure does not support the body. The rear clips on these cars would be bouncing all over the place if you tried to drive them without these supports in place.
??? Our 71 coupe sat for a few years without rear bumpers, tire tub, gas tank, braces, or brackets of any kind. We pushed, pulled, and dragged the car around a lot during the rebuild, and the rear clip never seemed to budge. I can`t believe the bumper braces have anything to do with supporting the rear clip. Or else I`m one lucky SOB!
Thank you 'The13Bats' and 'oldgto' for commenting. Your comments have further supported my views. The contours and such DO make the rear of the car stout.
I am sure I am going to get my backside handed to me again ...which often times happens...but unless someone can come in and try to explain to me HOW the body is going to move inches or even a half an inch (which I feel is a HUGE stretch of the imagination)...let them have at it. but they better bring their 'A' game...is all I am saying.
And for what it is worth..I have a 197O in my shop right now with no rear bumpers and brackets on it...so they better be certain of their claims. And OH YEAH...I have the Lingerfelter drag car on a raised body dollie where I have that thread on its repairs also. And I can tell you...it does NOT move.
I've been busy with non-Corvette stuff for a while but I check out your thread periodically Priya. Excellent progress. You should be very proud of your work on that C3 so far. You're gonna love the end result.
And.. if you're anything like me, when you're finished you'll solemnly swear you'll never do another one. I've built two V8 Ford Rangers so far and I said that after both projects were done. I have a 3rd Ranger waiting it's turn in my shop (`93 Splash stepside and a 5.0 Mustang engine/tranny). But when it's done I'm never doing another one!
Last edited by army; Apr 30, 2017 at 06:28 AM.
Reason: typo


 ) one could use the outer two brackets that attach to the frame rails and the innermost two that attach to the license plate area and that would be sufficient to support the tail panel section with the lighter fiberglass bumpers and those brackets appear to be the most easily modified to fit the chrome fiberglass tail section to the rear frame crossmember of a rubber bumper car.


