


LS3 into my 72
Thread Starter
Race Director


Joined: Dec 1999
Posts: 19,610
Likes: 778
From: Forked River NJ
Here is a little more progress. This wiring to make it fit and look decent and the Vintage Air setup requires a whole rewire of the front of the car. Very time consuming. It still looks somewhat like a mess but it is an organized mess and I know where everything will be going.


Here is the fuse center for the new wiring for the computer and fuel injection harness. Not mounted solid right now but this is where it is going. The computer will be down a little further on the back side of the inner fender. It is accessable here for easy servce.

Here is the coil relocation and my power center. The top lugs are connected to the starter terminal/battery and the other one is a dedicated line from the alternator. Going down from there is the AC feed, next 2 are for the computer, next 2 are for the Spal fans and the bottom one is for the fuel pump feed.

Here is the fuse center for the new wiring for the computer and fuel injection harness. Not mounted solid right now but this is where it is going. The computer will be down a little further on the back side of the inner fender. It is accessable here for easy servce.
Here is the coil relocation and my power center. The top lugs are connected to the starter terminal/battery and the other one is a dedicated line from the alternator. Going down from there is the AC feed, next 2 are for the computer, next 2 are for the Spal fans and the bottom one is for the fuel pump feed.
Racer


Joined: Sep 2010
Posts: 302
Likes: 14
From: Northern Ca.
Sorry to back up, but did you brother-in-law's C2 LS7 have the Dry sump?
Thanks

Melting Slicks


Joined: Sep 2004
Posts: 2,655
Likes: 19
Question on the Kwik alt/PS bracket....
How close is the PS pulley to the A arm? And what diameter pulley did you use?
I've been wanting to add power steering but wasn't sure if the Kwik bracket would clear.
How close is the PS pulley to the A arm? And what diameter pulley did you use?
I've been wanting to add power steering but wasn't sure if the Kwik bracket would clear.
Thread Starter
Race Director
Joined: Dec 1999
Posts: 19,610
Likes: 778
From: Forked River NJ
Go back to some of the earlier pages in this post and you will see what i did to make it fit. Siting in the airport waiting to come home after a week away so i dont have all the info here with me but i did document about the pulleys on some of the earlier pages.
Race Director


Joined: Feb 1999
Posts: 19,659
Likes: 34
From: Lenoir City Tennessee
Ci 6, 8 & 10 Veteran
St. Jude Donor '05-'06-'07-'08-'09-'10-'11-'12-'13-'14-'15
I like what you have done to have a main power distribution center. Mine is not nearly that neat but it has been on my list of things to do to make my install neater.
Corvette Stories
The Best of Corvette for Corvette Enthusiasts

Top 10 Most Expensive Corvettes Ever Sold on Bring A Trailer
Brett Foote
10 Things Every Corvette Owner Needs (2026 Edition)
Michael S. Palmer
8 Most "Only Corvette Owners Understand" Quirks and Problems
Pouria Savadkouei
10 Reasons the C6 Z06 is Still A Performance Benchmark After 20 Years
Joe Kucinski
How Much Horsepower Every Corvette Engine "LOST" in 1972
Joe Kucinski
Top 10 DOs and DON'Ts for Protecting Your Convertible Top!
Michael S. Palmer
Top 10 Most Explosive Corvettes Ever Made: Power-to-Weight Ratio Ranked!
Joe Kucinski
150 hp to 1,250 hp: Every Corvette Generation Compared by the Specs That Matter
Joe Kucinski
8 Coolest Corvette Pace Cars (and Replicas) of All Time
Verdad Gallardo
Melting Slicks
Joined: Sep 2004
Posts: 2,655
Likes: 19
Thanks, I found the earlier post (page 2?) about the Dorman 300-301, but then saw your pics just a couple pages back and your comments.
It look really close in the pic, are you keeping that pulley?
Btw, I used the same pulley in my Olds swap. I couldn't find anything smaller.
It look really close in the pic, are you keeping that pulley?
Btw, I used the same pulley in my Olds swap. I couldn't find anything smaller.
Thread Starter
Race Director
Joined: Dec 1999
Posts: 19,610
Likes: 778
From: Forked River NJ
Yes I am keeping that pulley. It is not as close as it looks and engine torque will take it away from the frame. I did have to trim back the upper control arm mounting bolt some to gain a little clearance and I also had to modify the spreader bar mount some but it should all clear.
I will be back it it this week after being gone for a week goofing off. Key West is tough to take this time of year.
I will be back it it this week after being gone for a week goofing off. Key West is tough to take this time of year.


Thread Starter
Race Director
Joined: Dec 1999
Posts: 19,610
Likes: 778
From: Forked River NJ
Removed it all. The new wiring harness does not have any ofthat in it and the yremoved all that from the computer. The motor does get fresh air and there is a Vacuum port to suck the fumes back into the motor but nothingto do with the Evap system.
Racer
Joined: Sep 2010
Posts: 302
Likes: 14
From: Northern Ca.
One more little thing crossed off the list. MOunted and installed the filter/regulator on the frame. I am using the stock fuel line, cut to the right length of course and using the Vette fliter/regulator. I still have to plumb the lines from the pump down to the filter but I am doing that on the tank.
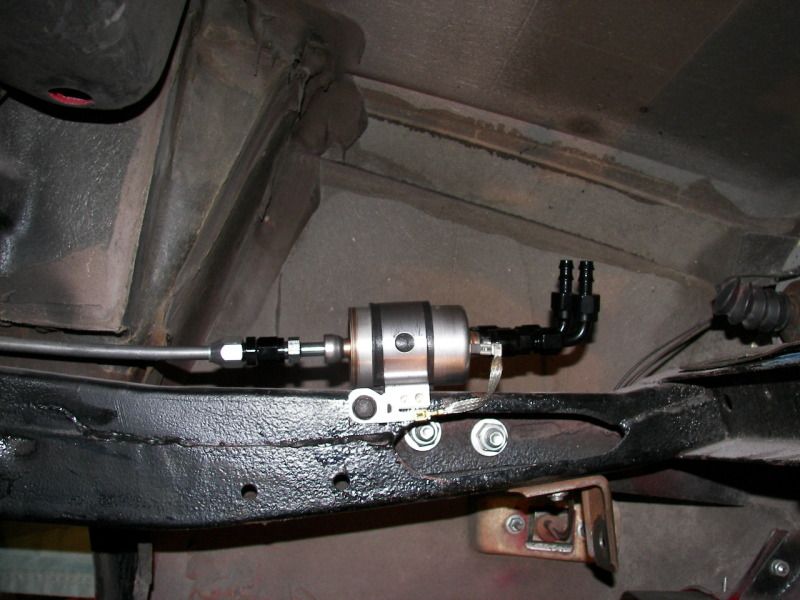
Is this filter/regulator adjustable or preset. Also, is anyone using an oil pressure shut off safety switch to shut down the pump in an accident. I've read and seen a C5 filter/regulator similar to this. Would this be the same type, and can the filter be changed, or the whole thing? Thanks.
Thread Starter
Race Director
Joined: Dec 1999
Posts: 19,610
Likes: 778
From: Forked River NJ
Is this filter/regulator adjustable or preset. Also, is anyone using an oil pressure shut off safety switch to shut down the pump in an accident. I've read and seen a C5 filter/regulator similar to this. Would this be the same type, and can the filter be changed, or the whole thing? Thanks.
Racer
Joined: Sep 2010
Posts: 302
Likes: 14
From: Northern Ca.
I'll be sending my stock harness to Current Performance; and after reading their info, I see that the fuel pump relay will be added.
As for the filter/reg, I've seen these listed for $125 and $29. Is there a flow difference between the two. I'll be using the Walbro 250 in tank pump.
Safety Car


Joined: May 2004
Posts: 4,364
Likes: 1,588
From: los altos hills california
Hi Gordon/all
I've been following this thread on and off for some time. I'm dropping a carburetted LS3 into my 69 and have had to face some of the same fit issues that were addressed in this post here and there. I realize I am visiting the "past" a bit but hopefully some of this is useful to share. So here goes!
Waterpump: Starting on the passenger side with the waterpump, I too threaded in some 45 degree fittings. In my case though I think I have enough clearance, for two reasons. First is the control arm itself. It's not the original stock, it is an adjustable arm from Savitske Classic and Custom. Because of the way it adjusts, there are no shims pushing the arm towards the pump. Second reason is that I hacksawed about 3/16" off the heater side face of the pump to move the fittings closer to the center of the car. There was still plenty of material left for the fittings to engage. As a result I have close to 3/4" of clearance which, with polyurethane mounts (Energy Suspension), should be enough. I plan to put in some telltales with plumber's putty to see what happens under torque. My fallback position would be to put in a solid motor mount on the passenger side.
Here's a photo:

And yes that is dust or maybe pollen from the neighbors pine trees. I didn't realize how much until the flash lit it up.
Spreader Bar: I think I saw a spreader bar in one of the earlier photos. I would like to get a little more detail on how that's been handled by anyone that cares to comment.
Clearly the stock thermostat housing can't be used, so in this photo

there's a straight housing installed. The difficulty is, how do I mount a bar and still get to the (DeWitts) radiator? I tried mounting the bar lower with a 45 degree bracket but decided that might be dumb as it would exert a significant torque on the shock tower. As you can see, I've moved the bar forward to gain some room. Pegasus has some 90 degree silicone hose sections so I suppose I could piece something together. But I don't like where that takes me, looks like TinkerToys I bet.
I also think I can slice the stock housing at the flat on my table saw and get Eddy the welder (Applied Welding Technology in Mt. View, CA) to put it back together with a better orientation. Great guy to work with, his motto is "no job too small". We'll see if that approach works. In any event, who's solved this and how? And what hoses did you use?
Power Steering: I went with the KWIK bracket set and the power steering pump they sell as well. As delivered, it was a no go with the straight brass return line that comes off the pump. But I happened to call Wayne at KWIK on the right day to ask what to do. He had a 90 degree fitting on hand that he says he gets occasionally, so he mailed it out to me for $15. It's probably cheaper somewhere but I was happy. Also he suggested a Loctite 609 compound specifically for pressed in fittings. And just to get the maximum surface area for the fitting to grip, I ground the rounded end of the pressed-in part almost flat and then pounded it in. There is only about 3/8" of metal in that part of the pump. So that, the adjustable control arms, and a hacksawed mounting bolt all look like they will work. I did have to pull the pulley out a bit to align the belt. I figure on some more of the Loctite.

Not shown is a Borgeson steering box. I think that is responsible for not having to swap out the Corvette oil pan on the motor. That box came later and I am the owner of a never used brand new Mast pan which if someone needs I can sell at a good price. My plan right now is to use an Accusump for oil control. I had that working just fine with the old motor and have autocrossed for over a decade.
Alternator: I managed to mount my stock alternator on the KWIK brackets. Means I don't have to rewire anything. A few years back, I'd converted my 350 to a serpentine setup, so that was good to go. The pulleys came from March Performance and there were a couple of parts with the kit that I didn't need, but were too pretty to throw out, so I stuck them in a drawer. Magically (I mean how often does this happen?) one of them was perfect for mounting the alternator. Here's the back view.

And here's the front view.

How cool is that! I sent Wayne a tracing, maybe he will decide to reproduce it, shouldn't be hard. I suppose you could also ask at March, it was in a complete kit however.
Clutch: I'm using my original bellhousing and M20 transmission aft of the motor. The bellcrank for the linkage was in the way of the stock exhaust manifold exhaust pipe. So Eddy the welder ground off the old welds and moved the arm inboard to clear the exhaust pipe. No job too small! Here's that picture:

You can also see here the aluminum arm that March sold me in their kit to mount the alternator on the old motor. I think this is the same arm in the picture of Gary's 68. I didn't use it, made my own bracket and threw theirs in the same drawer. It just happened to be the right length (!!!!! again) to substitute for the sloppy factory arm with anti-rattle springs and all that mess.
I have a centerforce flywheel and pressure plate installed. I guess the crank flat is in a different position as the whole business was moved forward a bit and the yoke was way out of place. After comparing the old with the new a couple of times, I found that McLeod sells a deeper throwout bearing (16021) on e-bay and that fit duplicated the original factory yoke position. The original transmission pilot shaft was fully engaged in the pilot bearing so everything is looking very promising.
That's my story so far! Now to go blow off some of that dust.
I've been following this thread on and off for some time. I'm dropping a carburetted LS3 into my 69 and have had to face some of the same fit issues that were addressed in this post here and there. I realize I am visiting the "past" a bit but hopefully some of this is useful to share. So here goes!
Waterpump: Starting on the passenger side with the waterpump, I too threaded in some 45 degree fittings. In my case though I think I have enough clearance, for two reasons. First is the control arm itself. It's not the original stock, it is an adjustable arm from Savitske Classic and Custom. Because of the way it adjusts, there are no shims pushing the arm towards the pump. Second reason is that I hacksawed about 3/16" off the heater side face of the pump to move the fittings closer to the center of the car. There was still plenty of material left for the fittings to engage. As a result I have close to 3/4" of clearance which, with polyurethane mounts (Energy Suspension), should be enough. I plan to put in some telltales with plumber's putty to see what happens under torque. My fallback position would be to put in a solid motor mount on the passenger side.
Here's a photo:
And yes that is dust or maybe pollen from the neighbors pine trees. I didn't realize how much until the flash lit it up.
Spreader Bar: I think I saw a spreader bar in one of the earlier photos. I would like to get a little more detail on how that's been handled by anyone that cares to comment.
Clearly the stock thermostat housing can't be used, so in this photo
there's a straight housing installed. The difficulty is, how do I mount a bar and still get to the (DeWitts) radiator? I tried mounting the bar lower with a 45 degree bracket but decided that might be dumb as it would exert a significant torque on the shock tower. As you can see, I've moved the bar forward to gain some room. Pegasus has some 90 degree silicone hose sections so I suppose I could piece something together. But I don't like where that takes me, looks like TinkerToys I bet.
I also think I can slice the stock housing at the flat on my table saw and get Eddy the welder (Applied Welding Technology in Mt. View, CA) to put it back together with a better orientation. Great guy to work with, his motto is "no job too small". We'll see if that approach works. In any event, who's solved this and how? And what hoses did you use?
Power Steering: I went with the KWIK bracket set and the power steering pump they sell as well. As delivered, it was a no go with the straight brass return line that comes off the pump. But I happened to call Wayne at KWIK on the right day to ask what to do. He had a 90 degree fitting on hand that he says he gets occasionally, so he mailed it out to me for $15. It's probably cheaper somewhere but I was happy. Also he suggested a Loctite 609 compound specifically for pressed in fittings. And just to get the maximum surface area for the fitting to grip, I ground the rounded end of the pressed-in part almost flat and then pounded it in. There is only about 3/8" of metal in that part of the pump. So that, the adjustable control arms, and a hacksawed mounting bolt all look like they will work. I did have to pull the pulley out a bit to align the belt. I figure on some more of the Loctite.
Not shown is a Borgeson steering box. I think that is responsible for not having to swap out the Corvette oil pan on the motor. That box came later and I am the owner of a never used brand new Mast pan which if someone needs I can sell at a good price. My plan right now is to use an Accusump for oil control. I had that working just fine with the old motor and have autocrossed for over a decade.
Alternator: I managed to mount my stock alternator on the KWIK brackets. Means I don't have to rewire anything. A few years back, I'd converted my 350 to a serpentine setup, so that was good to go. The pulleys came from March Performance and there were a couple of parts with the kit that I didn't need, but were too pretty to throw out, so I stuck them in a drawer. Magically (I mean how often does this happen?) one of them was perfect for mounting the alternator. Here's the back view.
And here's the front view.
How cool is that! I sent Wayne a tracing, maybe he will decide to reproduce it, shouldn't be hard. I suppose you could also ask at March, it was in a complete kit however.
Clutch: I'm using my original bellhousing and M20 transmission aft of the motor. The bellcrank for the linkage was in the way of the stock exhaust manifold exhaust pipe. So Eddy the welder ground off the old welds and moved the arm inboard to clear the exhaust pipe. No job too small! Here's that picture:
You can also see here the aluminum arm that March sold me in their kit to mount the alternator on the old motor. I think this is the same arm in the picture of Gary's 68. I didn't use it, made my own bracket and threw theirs in the same drawer. It just happened to be the right length (!!!!! again) to substitute for the sloppy factory arm with anti-rattle springs and all that mess.
I have a centerforce flywheel and pressure plate installed. I guess the crank flat is in a different position as the whole business was moved forward a bit and the yoke was way out of place. After comparing the old with the new a couple of times, I found that McLeod sells a deeper throwout bearing (16021) on e-bay and that fit duplicated the original factory yoke position. The original transmission pilot shaft was fully engaged in the pilot bearing so everything is looking very promising.
That's my story so far! Now to go blow off some of that dust.
Pro


Joined: Dec 2004
Posts: 590
Likes: 2
From: Fairfield CT
Waterpump: Starting on the passenger side with the waterpump, I too threaded in some 45 degree fittings. In my case though I think I have enough clearance, for two reasons. First is the control arm itself. It's not the original stock, it is an adjustable arm from Savitske Classic and Custom. Because of the way it adjusts, there are no shims pushing the arm towards the pump. Second reason is that I hacksawed about 3/16" off the heater side face of the pump to move the fittings closer to the center of the car. There was still plenty of material left for the fittings to engage. As a result I have close to 3/4" of clearance which, with polyurethane mounts (Energy Suspension), should be enough. I plan to put in some telltales with plumber's putty to see what happens under torque. My fallback position would be to put in a solid motor mount on the passenger side.
Here's a photo:
Do you have pn's and a source for the heater fittings. What I have right now are almost on top of the control arm.
Thanks
Here's a photo:
Do you have pn's and a source for the heater fittings. What I have right now are almost on top of the control arm.
Thanks
Safety Car
Joined: May 2004
Posts: 4,364
Likes: 1,588
From: los altos hills california
I ordered the fittings and hose from Pegasus. The hose fittings are
3288-10-045 - Aluminum 5/8" Barbed Hose End - 10AN Female Swivel 45 degree
3288-12-045 - Aluminum 3/4" Barbed Hose End - 12AN Female Swivel 45 degree
and go with their 5/8" ID and 3/4" ID hose 3491-10 and 3491-12 either black or blue. Ordinary heater hose would probably work just fine too. This hose was kind of pricey.
You will also need some taps, standard NPT 3/8"-18 and 1/2"-14. The holes were the right size but it was a bitch to get the inserts out. I used vise grips and a pickle fork and was slowly able to work them out. Recommend you put in some kind of sealant. I used the LocTite Thread Sealand Stick.
I lost track of the part numbers for the part that goes into the water pump but you can probably find 10AN - 3/8" NPT and 12AN - 1/2" NPT 45 degrees readily in the Earl's catalog or at Summit. You might find equivalent barbed fittings there too.
One last thing, I kept increasing the depth of the pipe thread tap until I had a minimum of thread showing in the fitting.
Cheers!
Last edited by ignatz; Mar 3, 2012 at 09:34 PM. Reason: additional info I forgot