


LS3 into my 72
Thread Starter
Race Director


Joined: Dec 1999
Posts: 19,610
Likes: 778
From: Forked River NJ
I did get the OEM computer with it. The computer is off right now getting all the not used stuff out of it like the VATS and stuff. It is getting a basic tune for my setup and will be tweaked by ECS once it gets up running.
Thread Starter
Race Director
Joined: Dec 1999
Posts: 19,610
Likes: 778
From: Forked River NJ
Here is the fuel pump setup. I used bulkhead fittings to pass through the plate and am using #6 twist lock hose to go from the tank over to the filter regulator. It is at an angle so it sits flat on the bottom of the tank. I took an old piece of aluminum fuel line for the return and angled it away from the pickup so there is no fuel spraying right at the pickup area. #6 hose should arrive this week. It was on backorder.


Just placed in the tank right now.

Just placed in the tank right now.
Drifting


Joined: Oct 2008
Posts: 1,496
Likes: 6
From: springfield ohio
Gordonm, I was wondering about the return as well, the info that came with the pump says to run the vent back into the tray, leaving it one inch short of the bottom of the tray. Are you thinking that by doing that it will disturb the flow of the pick up? I was thinking it would not be a problem and only help to insure that there is fuel in the tray when fuel levels are low. Whats your thought?
Riggs.
Riggs.

Le Mans Master


Joined: Dec 2003
Posts: 5,727
Likes: 38
From: Fremont CA
Those are the old 918 springs. Check out the new specs.
http://www.compperformancegroupstore...Category_Code=
They have gone with better wire and are good up to .625 lift. This is the same spring they did the cam comparison on the LS3 motors and they ran up to a .640ish lift with no problem. They also spun the motor past the 6500 rpm threshold many times with no issues with pushrods or springs. No question the stock rockers are a good piece and probably would never give me any problem. But I did it anyway.

Thread Starter
Race Director
Joined: Dec 1999
Posts: 19,610
Likes: 778
From: Forked River NJ
Gordonm, I was wondering about the return as well, the info that came with the pump says to run the vent back into the tray, leaving it one inch short of the bottom of the tray. Are you thinking that by doing that it will disturb the flow of the pick up? I was thinking it would not be a problem and only help to insure that there is fuel in the tray when fuel levels are low. Whats your thought?
Riggs.
Riggs.
I've been told too that stock LS pushrods wont have anything to do with 7K+ RPM and I would seriously consider upgrading them but, if your sticking with stock roller lifters and keep the rev limiter set low enough I guess you'll survive. I think you will be giving up some top end potential but it's your build. Looking good so far
Senior Member


Joined: Jan 2008
Posts: 12,146
Likes: 2,038
From: Easton, PA
St. Jude Donor '10
Just a couple of small things I have been working on in the evening. The water pump fittings have to be removed as they will hit the upper control arm mounting. I removed the nipples and threaded the holes. I installed 2 45 degree adapter fittings and then I will use 2 45 degree hose ends for the hot water. These will lead to the Vintage AC unit along the inner fender back to the AC unit.


I also needed to rework the power steering pump. As you have seen in previous posts I had to remount this and use a smaller pulley. The new mount brackets clock the pump 180 degrees from the stock location. This is actually good on the pressure side as it puts it straight up vertical. Not so good on the inlet side. It puts the tube dwon about 15 degrees and pointing away. I threaded this hole and installed a 90 degree Stainless steel fitting. This will allow me to run the remote reservoir. I have not decided if I will run the stock Vette one or have a custom one in there.


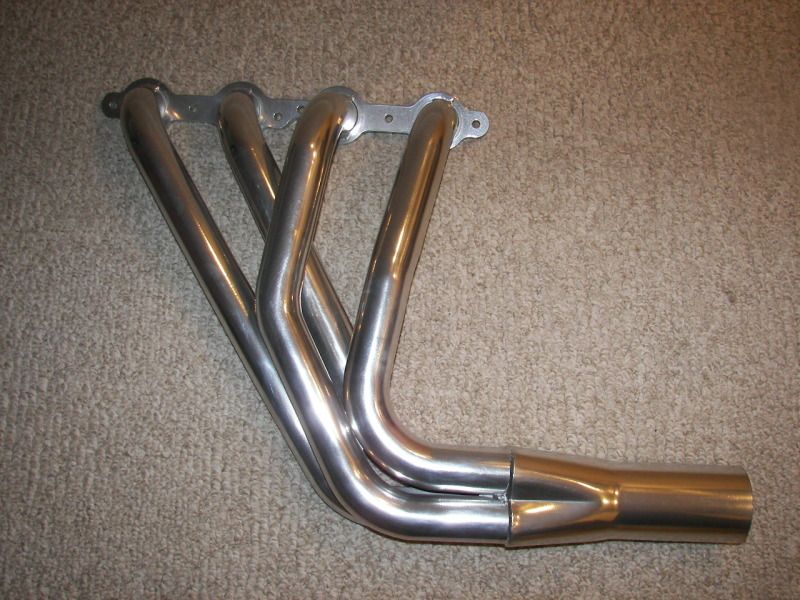
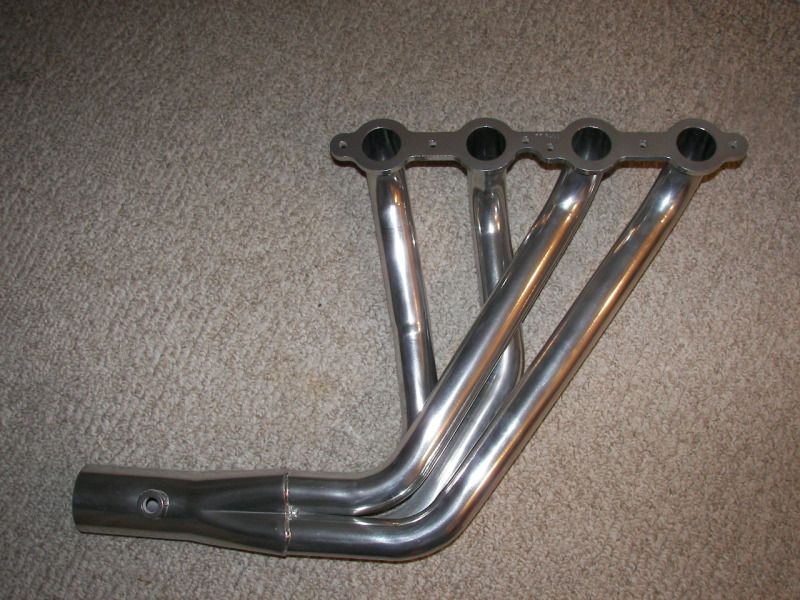
And last the new headers arrived yesterday.
I also needed to rework the power steering pump. As you have seen in previous posts I had to remount this and use a smaller pulley. The new mount brackets clock the pump 180 degrees from the stock location. This is actually good on the pressure side as it puts it straight up vertical. Not so good on the inlet side. It puts the tube dwon about 15 degrees and pointing away. I threaded this hole and installed a 90 degree Stainless steel fitting. This will allow me to run the remote reservoir. I have not decided if I will run the stock Vette one or have a custom one in there.
And last the new headers arrived yesterday.
 and let me know if you need anything from me along the way.
 Great job Gordon.

David
Corvette Stories
The Best of Corvette for Corvette Enthusiasts

Top 10 Most Expensive Corvettes Ever Sold on Bring A Trailer
Brett Foote
10 Things Every Corvette Owner Needs (2026 Edition)
Michael S. Palmer
8 Most "Only Corvette Owners Understand" Quirks and Problems
Pouria Savadkouei
10 Reasons the C6 Z06 is Still A Performance Benchmark After 20 Years
Joe Kucinski
How Much Horsepower Every Corvette Engine "LOST" in 1972
Joe Kucinski
Top 10 DOs and DON'Ts for Protecting Your Convertible Top!
Michael S. Palmer
Top 10 Most Explosive Corvettes Ever Made: Power-to-Weight Ratio Ranked!
Joe Kucinski
150 hp to 1,250 hp: Every Corvette Generation Compared by the Specs That Matter
Joe Kucinski
8 Coolest Corvette Pace Cars (and Replicas) of All Time
Verdad Gallardo
Thread Starter
Race Director
Joined: Dec 1999
Posts: 19,610
Likes: 778
From: Forked River NJ
Couple of shots from today. Removed most all of the interior. Took out all the old HVAC controls, cables and heater box. They are gone. Prepairing for the Vintage AC. I did some assembling and modified what need to be moded on the firewall in prep for the AC box. Took out all the wiring that was not needed and cleaned up the harnesses. Does not look very good but it is an organized mess at this point. I know what each wire is for and where it goes. Some I even labeled from the last time it was apart.


Thread Starter
Race Director
Joined: Dec 1999
Posts: 19,610
Likes: 778
From: Forked River NJ
Yea it has kind of morphed into a total redo again. The AC system requires some disassembly so I thought why not take it all out and start over again. The basement is pretty full right now. I have kept the garage pretty clear, have to if I want to stay organized.


Former Vendor
Joined: Aug 2011
Posts: 101
Likes: 0
From: Cincinnati OH
Those are the old 918 springs. Check out the new specs.
http://www.compperformancegroupstore...Category_Code=
They have gone with better wire and are good up to .625 lift. This is the same spring they did the cam comparison on the LS3 motors and they ran up to a .640ish lift with no problem. They also spun the motor past the 6500 rpm threshold many times with no issues with pushrods or springs. No question the stock rockers are a good piece and probably would never give me any problem. But I did it anyway.
http://www.compperformancegroupstore...Category_Code=
They have gone with better wire and are good up to .625 lift. This is the same spring they did the cam comparison on the LS3 motors and they ran up to a .640ish lift with no problem. They also spun the motor past the 6500 rpm threshold many times with no issues with pushrods or springs. No question the stock rockers are a good piece and probably would never give me any problem. But I did it anyway.
Glad to see you'll consider the pushrods, with everything you've done so far, it's just too easy to spend the $100 and have that peace of mind!
Good luck with the build, you're doing great so far!
Senior Member
Joined: Jan 2008
Posts: 12,146
Likes: 2,038
From: Easton, PA
St. Jude Donor '10
That looks like a familiar shot Gordon.  I have seen a similar one on both my cars, one of them twice. I know what you are capable having worked with you in the past so this is just a small case of organized chaos which will look beautiful when you are done and will be nice to have that air when the summer sun comes glaring. Nicely done.
David
I have seen a similar one on both my cars, one of them twice. I know what you are capable having worked with you in the past so this is just a small case of organized chaos which will look beautiful when you are done and will be nice to have that air when the summer sun comes glaring. Nicely done. David

Melting Slicks


Joined: Sep 2004
Posts: 2,655
Likes: 19
Just a thought as long as you're at this point. My 40 year old wiring harness was looking pretty rough. And the new truck alternators can put out as much as 250 amps.
You might consider a heavier aftermarket harness since you'll be adding relays for fans, fuel pump, AC compressor/HCV, etc.
I put one behind the passenger dash pad.
And with the VA, lots of people are having difficulties getting the 2 hoses to the center vents for factory AC cars. Mine was non-AC, and the single vent hose was tight.
Thread Starter
Race Director
Joined: Dec 1999
Posts: 19,610
Likes: 778
From: Forked River NJ
New pushrods should be here later this week.
As for the harness an aftermarket one from PSI is being used for the wiring. I will get the two together at some point and use what is needed from the 72 harness. The wire off the alternator looks like battery cable.
As for the harness an aftermarket one from PSI is being used for the wiring. I will get the two together at some point and use what is needed from the 72 harness. The wire off the alternator looks like battery cable.
Last edited by Gordonm; Nov 13, 2011 at 09:34 AM.
Melting Slicks
Joined: Sep 2004
Posts: 2,655
Likes: 19
Excellent choice. Just a heads up. I did the same thing, big wire to the aftermarket fusebox. Then wired the additional fans, fuel pump, etc relays off the opposite end of the copper strip that runs thru the fuse box. Dumb....the high current draw wasn't heating up the alternator wire, it was heating the copper strip in the fuse box!!!! Had to rewire....live and learn.
Thread Starter
Race Director
Joined: Dec 1999
Posts: 19,610
Likes: 778
From: Forked River NJ
Excellent choice. Just a heads up. I did the same thing, big wire to the aftermarket fusebox. Then wired the additional fans, fuel pump, etc relays off the opposite end of the copper strip that runs thru the fuse box. Dumb....the high current draw wasn't heating up the alternator wire, it was heating the copper strip in the fuse box!!!! Had to rewire....live and learn.

Thread Starter
Race Director
Joined: Dec 1999
Posts: 19,610
Likes: 778
From: Forked River NJ
Little more work today. I had some home stuff to do so not as much done as I wanted but you have to keep the other half happy. I installed the new pushrods as most said the stockers were not up to the task. Comp Cams stock length rods are in there now and all ready to go. I took the motor off the stand and back on the feet so I could get the clutch and Quick time housing on. Here you can see the LS7 style pilot bushing. Actually a big bearing. Also you can see the adapter fitting and 90 degree fitting so the oil pressure sender tucks in nicely out of the way.

Here I took the bellhousing and took of the bottom flange as it was hanging down below the oil pan. Looked horrible and a speed bump or something sticking up in the road would certainly do some damage. It is now perfectly even with the bottom of the oil pan. This required cutting it off and working a lot with a grinder and finishing disc. Painted it up and looks nice now. Thanks to 1coolC2 my brother inlaw for this trick. I saw it on his car and duplicated it.


Lightweight 18 lb steel flywheel

Funky clutch disc. Monster Stage II clutch and they assured me it will hold well over 500 RWHP and be very street driveable.

Pressure plate bolted up

Quick time bellhousing installed and all fasteners bolted up.

The motor is about ready to go back in but I want to get the Ac system installed before dropping in the motor. So for now it sits covered up waiting.
Here I took the bellhousing and took of the bottom flange as it was hanging down below the oil pan. Looked horrible and a speed bump or something sticking up in the road would certainly do some damage. It is now perfectly even with the bottom of the oil pan. This required cutting it off and working a lot with a grinder and finishing disc. Painted it up and looks nice now. Thanks to 1coolC2 my brother inlaw for this trick. I saw it on his car and duplicated it.
Lightweight 18 lb steel flywheel
Funky clutch disc. Monster Stage II clutch and they assured me it will hold well over 500 RWHP and be very street driveable.
Pressure plate bolted up
Quick time bellhousing installed and all fasteners bolted up.
The motor is about ready to go back in but I want to get the Ac system installed before dropping in the motor. So for now it sits covered up waiting.