


Second rebuild 1973

Melting Slicks


Joined: Feb 2004
Posts: 2,111
Likes: 32
From: Damascus MD
I did the same as Alan except that Bubba found a sale on black paint so I used paint remover on all the areas painted black where I knew it should be bare fiberglass. There must have been three coats of black paint on everything. The good news is it really preserved areas like the seat reinforcements.
I used paint remover on the battery and storage boxes and like Alan said only use a plastic putty knife. I also used some 000 steel wool and rubbed pretty lightly to get off some of Bubba's black paint. Final wipe was lacquer thinner and a clean rag.
I also used simple green with the 000 plastic steel wool when all I needed was to remove dirt. Simple green does work on grease and oil too. Don't rub any more than you have too. I found two or three original grease pencil marking which was pretty neat. One was on the rear valance. One on the underside of the rear deck. One was on the rear bulkhead and the last one was the shim mark/number on the driver's side frame. Also found the original frame stencil on the passenger side just in front of the rear wheels on the outside of the frame. Kinda like a treasure hunt.
Experiment on a small area to see what works best. I avoided lacquer thinner to some extent because the original paint was lacquer as was the black out. I wanted to preserve the original overspray and black out as best I could. Lacquer thinner will remove the original black out paint and body color overspray.
I am going back over the black out a little but at least I had an idea of how it looked when it left the factory.
Bill

Thread Starter
Drifting

Joined: Aug 2012
Posts: 1,650
Likes: 2
From: Tulsa Oklahoma
I did the same as Alan except that Bubba found a sale on black paint so I used paint remover on all the areas painted black where I knew it should be bare fiberglass. There must have been three coats of black paint on everything. The good news is it really preserved areas like the seat reinforcements.
I used paint remover on the battery and storage boxes and like Alan said only use a plastic putty knife. I also used some 000 steel wool and rubbed pretty lightly to get off some of Bubba's black paint. Final wipe was lacquer thinner and a clean rag.
I also used simple green with the 000 plastic steel wool when all I needed was to remove dirt. Simple green does work on grease and oil too. Don't rub any more than you have too. I found two or three original grease pencil marking which was pretty neat. One was on the rear valance. One on the underside of the rear deck. One was on the rear bulkhead and the last one was the shim mark/number on the driver's side frame. Also found the original frame stencil on the passenger side just in front of the rear wheels on the outside of the frame. Kinda like a treasure hunt.
Experiment on a small area to see what works best. I avoided lacquer thinner to some extent because the original paint was lacquer as was the black out. I wanted to preserve the original overspray and black out as best I could. Lacquer thinner will remove the original black out paint and body color overspray.
I am going back over the black out a little but at least I had an idea of how it looked when it left the factory.
Bill
I used paint remover on the battery and storage boxes and like Alan said only use a plastic putty knife. I also used some 000 steel wool and rubbed pretty lightly to get off some of Bubba's black paint. Final wipe was lacquer thinner and a clean rag.
I also used simple green with the 000 plastic steel wool when all I needed was to remove dirt. Simple green does work on grease and oil too. Don't rub any more than you have too. I found two or three original grease pencil marking which was pretty neat. One was on the rear valance. One on the underside of the rear deck. One was on the rear bulkhead and the last one was the shim mark/number on the driver's side frame. Also found the original frame stencil on the passenger side just in front of the rear wheels on the outside of the frame. Kinda like a treasure hunt.
Experiment on a small area to see what works best. I avoided lacquer thinner to some extent because the original paint was lacquer as was the black out. I wanted to preserve the original overspray and black out as best I could. Lacquer thinner will remove the original black out paint and body color overspray.
I am going back over the black out a little but at least I had an idea of how it looked when it left the factory.
Bill
I found the VIN stamp on the frame last night and got all excited about that. Hahaha I found several marks under the rear deck so I will be real cautious in the areas you mentioned to see what I may find there too!!
Thanks!
Scott
Team Owner


Joined: Sep 2006
Posts: 31,274
Likes: 4,366
From: Westminster Maryland
Hi FatCat,
On the production line there was a quick black-out in the wheel wells as was done in the engine compartment using the same semi-flat black paint.
But, not the entire wheel well was painted.
The easiest way to describe it is to say that the area the buyer could see as he walked around the car was painted... thus a little in front of, and behind, each wheel, and a little 'inside' of the wheel. None or almost none of the areas above the wheels were painted. Nor were the areas which could be described as the inside surface of the sides of the fenders.
There was also a bit of sound deadening material sprayed to the rear of each wheel, and also a quick spray inside of the rear wells in the area of the shoulder belt mounting reinforcement.
My car shows a bit more black-out, and it was done more carefully than was probably typical.
Regards,
Alan
You can see the 'swath' of black across the re-inforcement and down the front of the well.
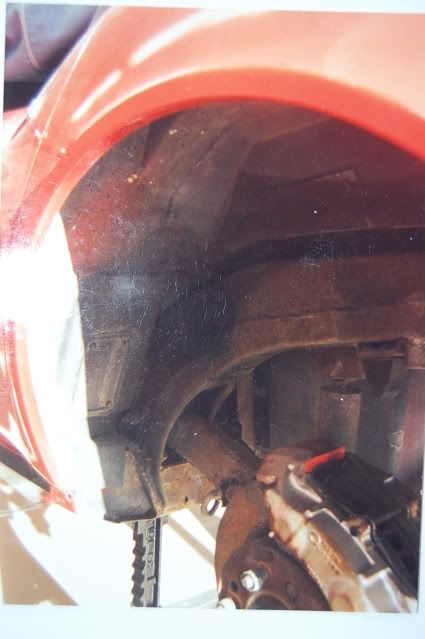
In this picture you can see that the jack compartment doesn't have any blackout on it while parts of the inner face of the wheel well does.

The frame stencil is as Bill mentions a nice find. Remember when the car's right side up the stencil is upside down.

Last edited by Alan 71; Oct 17, 2013 at 09:08 PM.
Thread Starter
Drifting
Joined: Aug 2012
Posts: 1,650
Likes: 2
From: Tulsa Oklahoma
Hi FatCat,
On the production line there was a quick black-out in the wheel wells as was done in the engine compartment using the same semi-flat black paint.
But, not the entire wheel well was painted.
The easiest way to describe it is to say that the area the buyer could see as he walked around the car was painted... thus a little in front of, and behind, each wheel, and a little 'inside' of the wheel. None or almost none of the areas above the wheels were painted. Nor were the areas which could be described as the inside surface of the sides of the fenders.
There was also a bit of sound deadening material sprayed to the rear of each wheel, and also a quick spray inside of the rear wells in the area of the shoulder belt mounting reinforcement.
My car shows a bit more black-out, and it was done more carefully than was probably typical.
Regards,
Alan
You can see the 'swath' of black across the re-inforcement and down the front of the well.
In this picture you can see that the jack compartment doesn't have any blackout on it while parts of the inner face of the wheel well does.
The frame stencil is as Bill mentions a nice find. Remember when the car's right side up the stencil is upside down.
On the stencil is it always in that same general area Bill discribed?
Thanks
Scott
Last edited by FatCat; Oct 17, 2013 at 09:31 PM.
Instructor


Joined: Nov 2012
Posts: 171
Likes: 9
From: Viking Longhouse North Wisconsin
Wow Scott - That's a huge undertaking - I'll probably never get into mine as far as you have in yours - (I envy the guys that do...) Nice work !! Good luck - I'll be following your thread as well... : )
Mike
Mike
Thread Starter
Drifting
Joined: Aug 2012
Posts: 1,650
Likes: 2
From: Tulsa Oklahoma
I have found this work is doable for anyone willing to just dive in and stay focused and organized to an extent.
I have chose to not pull the body for several reasons but one reason is I don't want to overwhelm myself.
I will finish this project and learn a ton and will probably work towards a body off restoration for another time.
Enjoy the thread and don't hesitate to post information, encouragement or even questions.
Scott
Corvette Stories
The Best of Corvette for Corvette Enthusiasts

Top 10 Most Expensive Corvettes Ever Sold on Bring A Trailer
Brett Foote
10 Things Every Corvette Owner Needs (2026 Edition)
Michael S. Palmer
8 Most "Only Corvette Owners Understand" Quirks and Problems
Pouria Savadkouei
10 Reasons the C6 Z06 is Still A Performance Benchmark After 20 Years
Joe Kucinski
How Much Horsepower Every Corvette Engine "LOST" in 1972
Joe Kucinski
Top 10 DOs and DON'Ts for Protecting Your Convertible Top!
Michael S. Palmer
Top 10 Most Explosive Corvettes Ever Made: Power-to-Weight Ratio Ranked!
Joe Kucinski
150 hp to 1,250 hp: Every Corvette Generation Compared by the Specs That Matter
Joe Kucinski
8 Coolest Corvette Pace Cars (and Replicas) of All Time
Verdad Gallardo
Melting Slicks
Joined: Feb 2004
Posts: 2,111
Likes: 32
From: Damascus MD
Bill
Thread Starter
Drifting
Joined: Aug 2012
Posts: 1,650
Likes: 2
From: Tulsa Oklahoma


Thread Starter
Drifting
Joined: Aug 2012
Posts: 1,650
Likes: 2
From: Tulsa Oklahoma
Thread Starter
Drifting
Joined: Aug 2012
Posts: 1,650
Likes: 2
From: Tulsa Oklahoma
Ok!!! TArms out and I decided to take Alan71's advice on this side and clean the wheel wells first. Ugh! Now wishing I had done the other side before painting the frame but you live and you learn. Thanks for the advice Alan!
Only had about an hour to spend since the TArms took so long but here are the results..laquer thinner and putty knife.


I am extremely happy with the results and though the undercoating was a PITA it wasn't as bad as expected.
Scott
Only had about an hour to spend since the TArms took so long but here are the results..laquer thinner and putty knife.
I am extremely happy with the results and though the undercoating was a PITA it wasn't as bad as expected.
Scott
Team Owner
Joined: Sep 2006
Posts: 31,274
Likes: 4,366
From: Westminster Maryland
Hi Scott,
You can re-do the frame stencil with the body on the car. ( I added it when I decided to have my car Flight Judged).
It ends up being about 3/4" closer to the ground, but I guess that's not too bad.
Originally the ink was applied over the stencil with a roller. Some people use a spray now which gives the image left on the frame a slightly different look.
The location of the stencil moved forward of the #1 body mount at some point.... I'm not sure when.... late 72-73??
Regards,
Alan


Thread Starter
Drifting
Joined: Aug 2012
Posts: 1,650
Likes: 2
From: Tulsa Oklahoma
I plan to shoot a light coat of under coat and paint according to the way they were done at the factory.
Scott
Thread Starter
Drifting
Joined: Aug 2012
Posts: 1,650
Likes: 2
From: Tulsa Oklahoma
Hi Scott,
You can re-do the frame stencil with the body on the car. ( I added it when I decided to have my car Flight Judged).
It ends up being about 3/4" closer to the ground, but I guess that's not too bad.
Originally the ink was applied over the stencil with a roller. Some people use a spray now which gives the image left on the frame a slightly different look.
The location of the stencil moved forward of the #1 body mount at some point.... I'm not sure when.... late 72-73??
Regards,
Alan
I did find a green grease pen mark on the pass side but you could make anything out of it so I took a picture for reference.
Bill and I discussed it and think it was probably a shim mark.
Scott
Last edited by FatCat; Oct 21, 2013 at 04:51 PM.
Melting Slicks
Joined: Feb 2004
Posts: 2,111
Likes: 32
From: Damascus MD
Hi Scott,
You can re-do the frame stencil with the body on the car. ( I added it when I decided to have my car Flight Judged).
It ends up being about 3/4" closer to the ground, but I guess that's not too bad.
Originally the ink was applied over the stencil with a roller. Some people use a spray now which gives the image left on the frame a slightly different look.
The location of the stencil moved forward of the #1 body mount at some point.... I'm not sure when.... late 72-73??
Regards,
Alan
You can re-do the frame stencil with the body on the car. ( I added it when I decided to have my car Flight Judged).
It ends up being about 3/4" closer to the ground, but I guess that's not too bad.
Originally the ink was applied over the stencil with a roller. Some people use a spray now which gives the image left on the frame a slightly different look.
The location of the stencil moved forward of the #1 body mount at some point.... I'm not sure when.... late 72-73??
Regards,
Alan
Now I am going to have to redo my stencil.
Bill