


IMPORTANT ELECTRICAL INFORMATION (Long!)

Cruising

Joined: Nov 2015
Posts: 11
Likes: 0
Pulled pass door speaker and disconnected 2 wire connector from harness to window regulator motor and attached my trusty volt meter. With key on and battery connected, depressed up/down window switch. Appears switch and module functioning as I get 12V at the motor when switch depressed. So now focus was on the window motor itself. I read a post suggesting holding up/down switch to lower window since window was raised. Then took small mallet and gently tapped door area next to motor and it moved. Repeated up/down cycles were successful, however, one time it stuck at bottom and would not move, without the mallet. So I will be calling Mark at VetteNuts for a good pass side window regulator assembly. While I was out there, I decided to give drivers side a workout. Worked fine couple times then stopped after rising about 5 inches. So I will add drivers side regulator to my VetteNuts list. Cant see me getting caught in rain with window stuck down. Damn, where is that hammer......

Burning Brakes


Joined: Nov 2011
Posts: 1,037
Likes: 120
Pulled pass door speaker and disconnected 2 wire connector from harness to window regulator motor and attached my trusty volt meter. With key on and battery connected, depressed up/down window switch. Appears switch and module functioning as I get 12V at the motor when switch depressed. So now focus was on the window motor itself. I read a post suggesting holding up/down switch to lower window since window was raised. Then took small mallet and gently tapped door area next to motor and it moved. Repeated up/down cycles were successful, however, one time it stuck at bottom and would not move, without the mallet. So I will be calling Mark at VetteNuts for a good pass side window regulator assembly. While I was out there, I decided to give drivers side a workout. Worked fine couple times then stopped after rising about 5 inches. So I will add drivers side regulator to my VetteNuts list. Cant see me getting caught in rain with window stuck down. Damn, where is that hammer......
Ordered a brand new one for like $55 (I think) - Vette tax for sure.
But my C5 is a DD so I need to keep the moisture out.

2nd Gear
Joined: Feb 2017
Posts: 2
Likes: 0
Many of you have asked me for help on solving electrical problems and I thought this would be VERY interesting!
My 98 coupe would get the infamous "REDUCED ENGINE POWER", "TRACTION CONTROL FAILURE" and a host of random failure codes. After many, many hours of troubleshooting, replacing the BCM and TAC module, I solved most of the driveability issues. Still getting the random DTC failure codes, I thought that I may be having ground issues. Back in June I cleaned ALL of the chassis grounds and the car virtually stopped throwing the "RANDOM" DTC failure codes. Just moving the wires in the chassis ground connector was enough to change the indications and make the issues stop happening.
I had a chance to speak with some GM C5 Trouble Desk Engineers when I went to Bowling Green KY in April and they pointed out that MANY of the C5 electrical issues can be directly linked to chassis ground problems. The engineer even went as far as to recommending that I chop off the factory under hood chassis ground connectors and combine all of the wires into a single ground lug. Not wanting to just LOP off the factory connector, I took a chance and disassembled one of the ground plug connectors and to my surprise it was indeed full of corroded connections.
I strongly recommend that any C5 owner that has had or who are having electrical issues, examine and clean the chassis ground connectors. This may save you from needlessly replacing expensive electronics modules. Each ground connector can be disassembled and cleaned in about 20 min.
Just cleaning the metal ground connection between the chassis and the plug is only a band aid solution. Now that I look back, when I cleaned my chassis grounds and initially solved my issues, I believe that when the connector is being removed to clean the connection between chassis and the connector, just the wires being moved inside the plug is what changed the indications and made everything work better.
Disassembly of the chassis ground plug and cleaning the contacts inside the connector is the correct method of solving the issue!
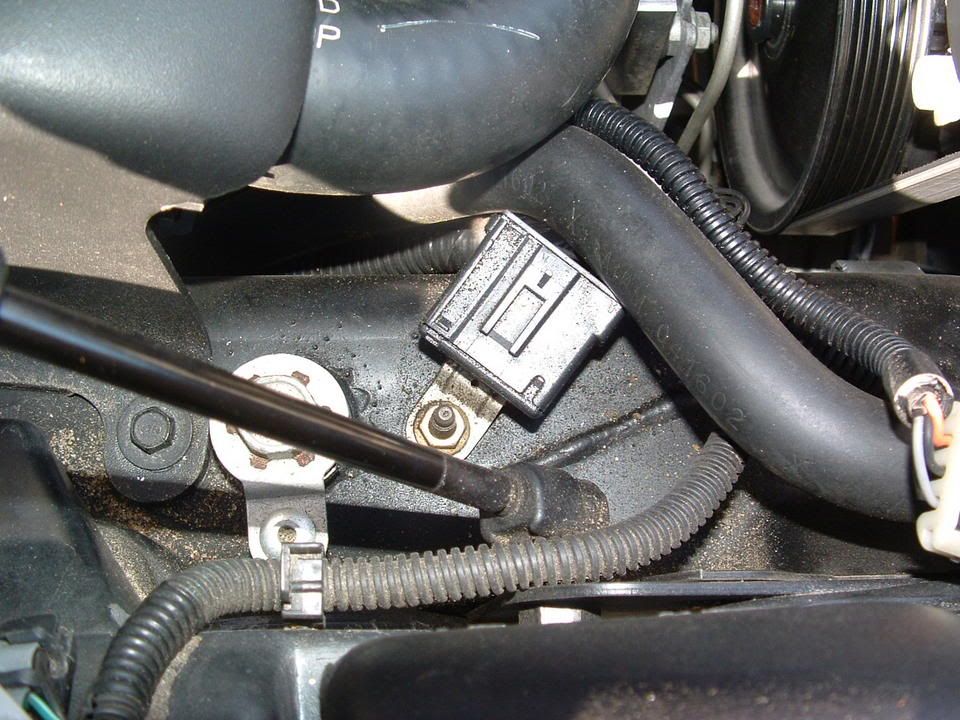
I took some pictures of the under hood chassis ground connector and the corrosion that was in it. I cleaned the two connections on the frame rails and the left one was significantly corroded! Taking it apart and cleaning it is a very straight forward procedure and I believe that if you follow this recommendation, you will be on the way to solving the many of the electrical issues.
Here are some detailed pictures of the ground connector and the corrosion that was found inside it!
Picture of under hood Chassis Ground connector G-101
Corrosion inside connector! (You ain't seen nothing yet!)
[IMG] [/IMG]
Next three photos are of the corrosion found on the connector terminals!
[IMG]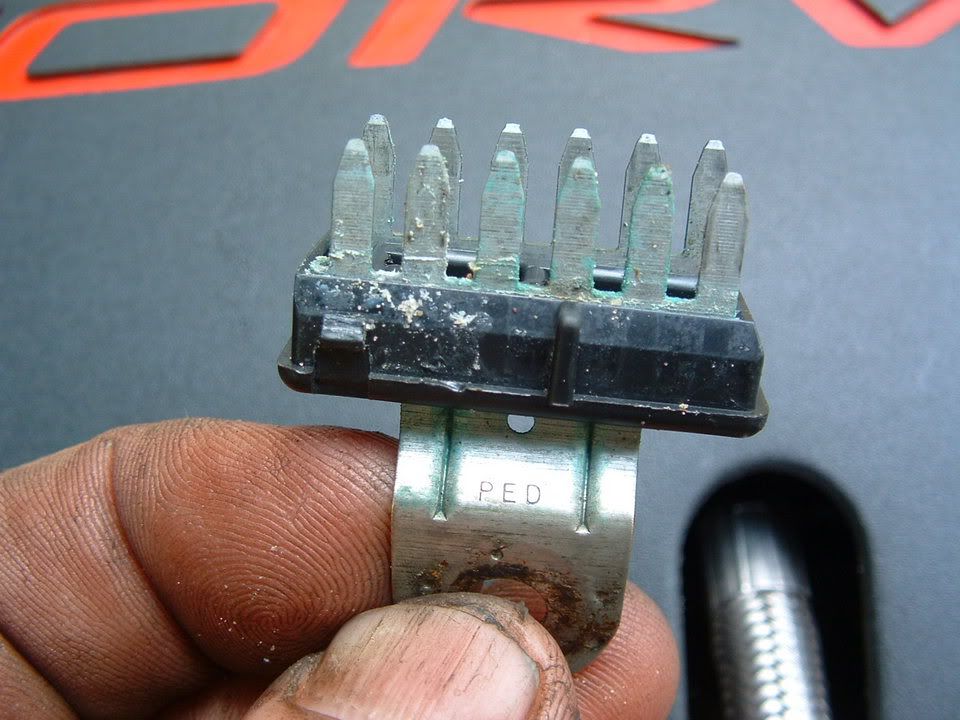 [/IMG] [IMG]
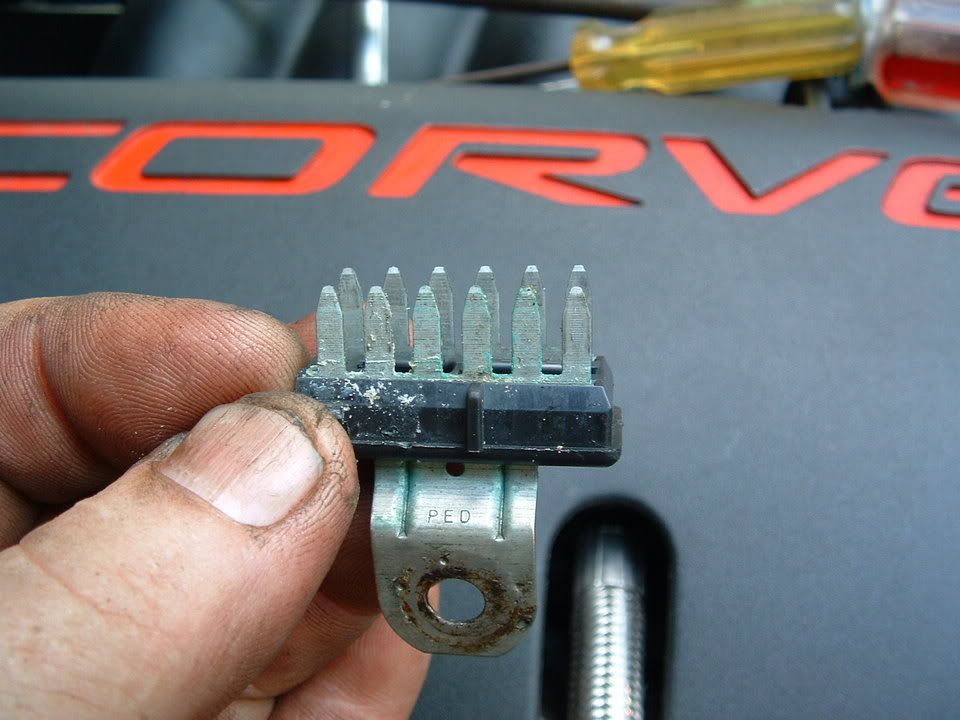 [/IMG] [IMG]
 [/IMG]
Self tapping ground screw and star washer. This is what you will need if the ground stud breaks off during removal!
[IMG]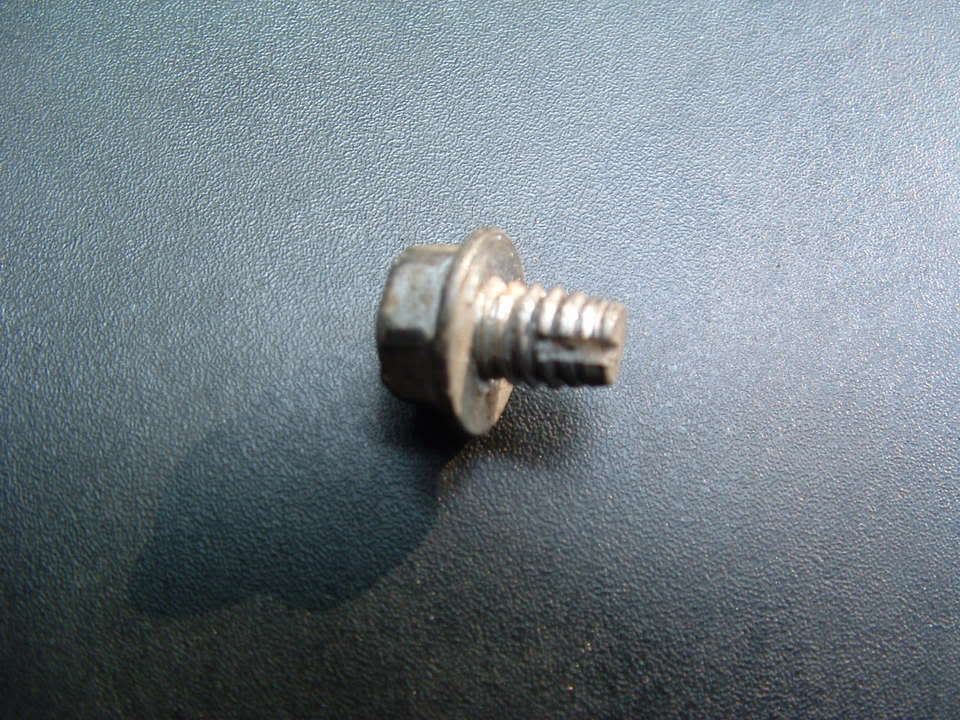 [/IMG] [IMG][IMG]
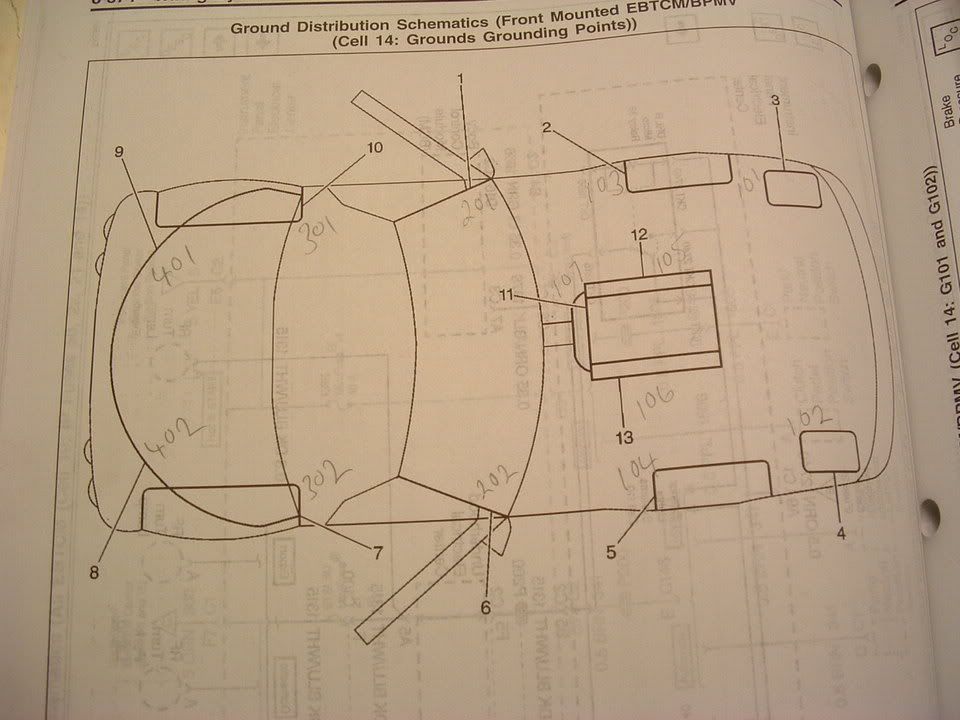
Here are where the chassis ground points are on a C5:


PLEASE let me know if you have any questions. NOTE! All of the pictures that I have of C5 Grounds have been posted on or in this post.
Bill Curlee
updated 02 March 06
My 98 coupe would get the infamous "REDUCED ENGINE POWER", "TRACTION CONTROL FAILURE" and a host of random failure codes. After many, many hours of troubleshooting, replacing the BCM and TAC module, I solved most of the driveability issues. Still getting the random DTC failure codes, I thought that I may be having ground issues. Back in June I cleaned ALL of the chassis grounds and the car virtually stopped throwing the "RANDOM" DTC failure codes. Just moving the wires in the chassis ground connector was enough to change the indications and make the issues stop happening.
I had a chance to speak with some GM C5 Trouble Desk Engineers when I went to Bowling Green KY in April and they pointed out that MANY of the C5 electrical issues can be directly linked to chassis ground problems. The engineer even went as far as to recommending that I chop off the factory under hood chassis ground connectors and combine all of the wires into a single ground lug. Not wanting to just LOP off the factory connector, I took a chance and disassembled one of the ground plug connectors and to my surprise it was indeed full of corroded connections.
I strongly recommend that any C5 owner that has had or who are having electrical issues, examine and clean the chassis ground connectors. This may save you from needlessly replacing expensive electronics modules. Each ground connector can be disassembled and cleaned in about 20 min.
Just cleaning the metal ground connection between the chassis and the plug is only a band aid solution. Now that I look back, when I cleaned my chassis grounds and initially solved my issues, I believe that when the connector is being removed to clean the connection between chassis and the connector, just the wires being moved inside the plug is what changed the indications and made everything work better.
Disassembly of the chassis ground plug and cleaning the contacts inside the connector is the correct method of solving the issue!
I took some pictures of the under hood chassis ground connector and the corrosion that was in it. I cleaned the two connections on the frame rails and the left one was significantly corroded! Taking it apart and cleaning it is a very straight forward procedure and I believe that if you follow this recommendation, you will be on the way to solving the many of the electrical issues.
Here are some detailed pictures of the ground connector and the corrosion that was found inside it!
Picture of under hood Chassis Ground connector G-101
Corrosion inside connector! (You ain't seen nothing yet!)
[IMG]
[/IMG] Next three photos are of the corrosion found on the connector terminals!
[IMG]
[/IMG] [IMG][/IMG] [IMG][/IMG] Self tapping ground screw and star washer. This is what you will need if the ground stud breaks off during removal!
[IMG]
[/IMG] [IMG][IMG]Here are where the chassis ground points are on a C5:
PLEASE let me know if you have any questions. NOTE! All of the pictures that I have of C5 Grounds have been posted on or in this post.
Bill Curlee
updated 02 March 06
Thanks.
Btw, my car is a 1999 C5 Targa (Supercharger ++).
Perhaps not the right forum thread, but while I am in here, does anyone know where to buy the workshop/service manuals? (1999 mod manual sold out in all the shops I visited).
Best regards
Even

Intermediate
Joined: May 2015
Posts: 37
Likes: 0
From: PALM BAY Florida
Many of you have asked me for help on solving electrical problems and I thought this would be VERY interesting!
My 98 coupe would get the infamous "REDUCED ENGINE POWER", "TRACTION CONTROL FAILURE" and a host of random failure codes. After many, many hours of troubleshooting, replacing the BCM and TAC module, I solved most of the driveability issues. Still getting the random DTC failure codes, I thought that I may be having ground issues. Back in June I cleaned ALL of the chassis grounds and the car virtually stopped throwing the "RANDOM" DTC failure codes. Just moving the wires in the chassis ground connector was enough to change the indications and make the issues stop happening.
I had a chance to speak with some GM C5 Trouble Desk Engineers when I went to Bowling Green KY in April and they pointed out that MANY of the C5 electrical issues can be directly linked to chassis ground problems. The engineer even went as far as to recommending that I chop off the factory under hood chassis ground connectors and combine all of the wires into a single ground lug. Not wanting to just LOP off the factory connector, I took a chance and disassembled one of the ground plug connectors and to my surprise it was indeed full of corroded connections.
I strongly recommend that any C5 owner that has had or who are having electrical issues, examine and clean the chassis ground connectors. This may save you from needlessly replacing expensive electronics modules. Each ground connector can be disassembled and cleaned in about 20 min.
Just cleaning the metal ground connection between the chassis and the plug is only a band aid solution. Now that I look back, when I cleaned my chassis grounds and initially solved my issues, I believe that when the connector is being removed to clean the connection between chassis and the connector, just the wires being moved inside the plug is what changed the indications and made everything work better.
Disassembly of the chassis ground plug and cleaning the contacts inside the connector is the correct method of solving the issue!
I took some pictures of the under hood chassis ground connector and the corrosion that was in it. I cleaned the two connections on the frame rails and the left one was significantly corroded! Taking it apart and cleaning it is a very straight forward procedure and I believe that if you follow this recommendation, you will be on the way to solving the many of the electrical issues.
Here are some detailed pictures of the ground connector and the corrosion that was found inside it!
Picture of under hood Chassis Ground connector G-101
Corrosion inside connector! (You ain't seen nothing yet!)
[IMG][/IMG]
Next three photos are of the corrosion found on the connector terminals!
[IMG][/IMG] [IMG][/IMG] [IMG][/IMG]
Self tapping ground screw and star washer. This is what you will need if the ground stud breaks off during removal!
[IMG][/IMG] [IMG][IMG]
Here are where the chassis ground points are on a C5:
PLEASE let me know if you have any questions. NOTE! All of the pictures that I have of C5 Grounds have been posted on or in this post.
Bill Curlee
updated 02 March 06
My 98 coupe would get the infamous "REDUCED ENGINE POWER", "TRACTION CONTROL FAILURE" and a host of random failure codes. After many, many hours of troubleshooting, replacing the BCM and TAC module, I solved most of the driveability issues. Still getting the random DTC failure codes, I thought that I may be having ground issues. Back in June I cleaned ALL of the chassis grounds and the car virtually stopped throwing the "RANDOM" DTC failure codes. Just moving the wires in the chassis ground connector was enough to change the indications and make the issues stop happening.
I had a chance to speak with some GM C5 Trouble Desk Engineers when I went to Bowling Green KY in April and they pointed out that MANY of the C5 electrical issues can be directly linked to chassis ground problems. The engineer even went as far as to recommending that I chop off the factory under hood chassis ground connectors and combine all of the wires into a single ground lug. Not wanting to just LOP off the factory connector, I took a chance and disassembled one of the ground plug connectors and to my surprise it was indeed full of corroded connections.
I strongly recommend that any C5 owner that has had or who are having electrical issues, examine and clean the chassis ground connectors. This may save you from needlessly replacing expensive electronics modules. Each ground connector can be disassembled and cleaned in about 20 min.
Just cleaning the metal ground connection between the chassis and the plug is only a band aid solution. Now that I look back, when I cleaned my chassis grounds and initially solved my issues, I believe that when the connector is being removed to clean the connection between chassis and the connector, just the wires being moved inside the plug is what changed the indications and made everything work better.
Disassembly of the chassis ground plug and cleaning the contacts inside the connector is the correct method of solving the issue!
I took some pictures of the under hood chassis ground connector and the corrosion that was in it. I cleaned the two connections on the frame rails and the left one was significantly corroded! Taking it apart and cleaning it is a very straight forward procedure and I believe that if you follow this recommendation, you will be on the way to solving the many of the electrical issues.
Here are some detailed pictures of the ground connector and the corrosion that was found inside it!
Picture of under hood Chassis Ground connector G-101
Corrosion inside connector! (You ain't seen nothing yet!)
[IMG]
[/IMG] Next three photos are of the corrosion found on the connector terminals!
[IMG]
[/IMG] [IMG][/IMG] [IMG][/IMG] Self tapping ground screw and star washer. This is what you will need if the ground stud breaks off during removal!
[IMG]
[/IMG] [IMG][IMG]Here are where the chassis ground points are on a C5:
PLEASE let me know if you have any questions. NOTE! All of the pictures that I have of C5 Grounds have been posted on or in this post.
Bill Curlee
updated 02 March 06

Melting Slicks


Joined: Jun 2002
Posts: 2,591
Likes: 144
From: Mobile al
I just put the engine back in my 2003 Z06, the engine had been out prior to me buying it.
I think I missed a ground on the back of the drivers side cylinder head, in the factory manuals I have it shows a ground there. It looks like it's around the plug for the oil pressure sensor.
Does this ground drop down out of the large harness that runs across the back of the engine?
There is a ground that drops out of the small harness that drops down the drivers side of the engine that goes to the oil temp sensor, is that it?

Advanced
Joined: Aug 2011
Posts: 97
Likes: 1
Bill I have a issue that developed recently. I purchased a 1999 FRC and drove it home 2100 miles. I had the passenger door wire harness problem making the loss of coms and fixed it thanks to this thread.
I let the battery go dead by leaving the lights on accidentally and needed a jump the next day. now all my interior lights light and dash light up when I open either door. Also light up when I turn the key to accessory position. However if I put the key to the run position all interior lights shut off even if I turn the headlights on. Yes the dimmer witch is turned all the way up and work two days ago... any help what it could be?
I let the battery go dead by leaving the lights on accidentally and needed a jump the next day. now all my interior lights light and dash light up when I open either door. Also light up when I turn the key to accessory position. However if I put the key to the run position all interior lights shut off even if I turn the headlights on. Yes the dimmer witch is turned all the way up and work two days ago... any help what it could be?

Thread Starter
Tech Contributor


Joined: Dec 1999
Posts: 32,910
Likes: 2,402
From: Anthony TX
CI 6,7,8,9,11 Vet
St. Jude Donor '08
Just for nothing other thn to eliminate it, turn the DIMMER to MID RANGE and see if that changes anything
Check all your DTCs using the DIC and if you have any,, (YOU WILL),, CLEAR ALL of them. See if any return and post that
Report back
BC
Check all your DTCs using the DIC and if you have any,, (YOU WILL),, CLEAR ALL of them. See if any return and post that
Report back
BC
Corvette Stories
The Best of Corvette for Corvette Enthusiasts

8 Coolest Corvette Pace Cars (and Replicas) of All Time
Verdad Gallardo
Top 10 Corvette Engines RANKED by Peak Torque (70+ Years of Muscle!)
Joe Kucinski
Corvette ZR1X Will Be Pacing the Indy 500, And Could Probably Race, Too!
Verdad Gallardo
Top 10 Corvettes Coming to Mecum Indy 2026!
Brett Foote
Top 10 C9 Corvette MUST-HAVES to Fix These C8 Generation Flaws!
Michael S. Palmer
10 Revolutionary 'Corvette Firsts' Most People Don't Know
Joe Kucinski
5 Reasons to Upgrade to an LS6-Powered Corvette; 5 Reasons to Stay LT2
Michael S. Palmer
2027 Corvette vs The World: Every C8 vs Its Closest Competitor
Joe Kucinski
10 Most Common Corvette Problems of the Last 20 Years!
Joe KucinskiInstructor

Joined: Dec 2003
Posts: 103
Likes: 0
From: Williamsville NY
Hey Bill: Thanks for all the information on electrical issues. In your experience what tips might you have for me. My hazard light switch has been replaced twice. I still have electrical issues that are killing my battery. I described those to you before and as I said then I hope they are gone. I gonna get a new battery and see what happens. If it is still killing the battery, I think I will just sell it(a 2000 coupe) and get something newer. This car was a year old when I bought it. It came from Louisiana, I wonder about floods and salt. Some problems I have had since day 1 like about one in 20 backups as I stop the ABS/Traction control light comes on. I just restart the vette and all is better till next time. Thanks again Bill, I will dump another $190 on a battery.
Racer
Joined: Aug 2010
Posts: 297
Likes: 9
From: Holiday Shores IL
My drain turned out to be a bad diode in the driver seat multifuction switch.
The diodes look like zeners but are just regular surface mount diodes.
Fixed it a few months ago and I can leave the car sit for more than a week with no problem. I haven't tried for longer time because it is my daily driver. The only time it sits for more than a weekend is if we go on vacation.
The diodes look like zeners but are just regular surface mount diodes.
Fixed it a few months ago and I can leave the car sit for more than a week with no problem. I haven't tried for longer time because it is my daily driver. The only time it sits for more than a weekend is if we go on vacation.
Melting Slicks


Joined: May 2000
Posts: 2,498
Likes: 4
From: Brentwood TN
Charlie

4th Gear
Joined: Apr 2017
Posts: 4
Likes: 0
Yes. I stripped all leads back, and joined them in a soldered connector to avoid oxidation going forward. I also cleaned the frame with sandpaper to produce a shiny, clean contact surface. After attaching the ring connector I coated the junction with silicone grease to further impede oxidation.
Charlie
Charlie
Thread Starter
Tech Contributor
Joined: Dec 1999
Posts: 32,910
Likes: 2,402
From: Anthony TX
CI 6,7,8,9,11 Vet
St. Jude Donor '08


Cruising
Joined: Jun 2017
Posts: 11
Likes: 0
From: ROCKY VIEW ALBERTA
My husband loves to wash under the hood. I assume then this would cause the corrosion on the grounds??? My car likes to drain batteries seems like we were putting a new one in every year. Would this be the cause do you think before I take it in somewhere to be looked at? What did you clean the connections?


Thread Starter
Tech Contributor
Joined: Dec 1999
Posts: 32,910
Likes: 2,402
From: Anthony TX
CI 6,7,8,9,11 Vet
St. Jude Donor '08
My husband loves to wash under the hood. I assume then this would cause the corrosion on the grounds??? My car likes to drain batteries seems like we were putting a new one in every year. Would this be the cause do you think before I take it in somewhere to be looked at? What did you clean the connections?

7th Gear
Joined: Dec 2014
Posts: 7
Likes: 0
From: Southside TN
For those of you who have C5's that have problems keeping the battery from going dead if you leave your car idle for a short period of time, here is a procedure that you can use to see if your car is drawing an excessive amount of battery current. The C5 corvette should be able to sit idle for weeks with out running down the battery far enough that it will not start.
If your car has a good battery and it depletes the battery in a few days or a week, use a DC Amp meter to measure the battery current draw when the car has entered the BCM sleep mode.
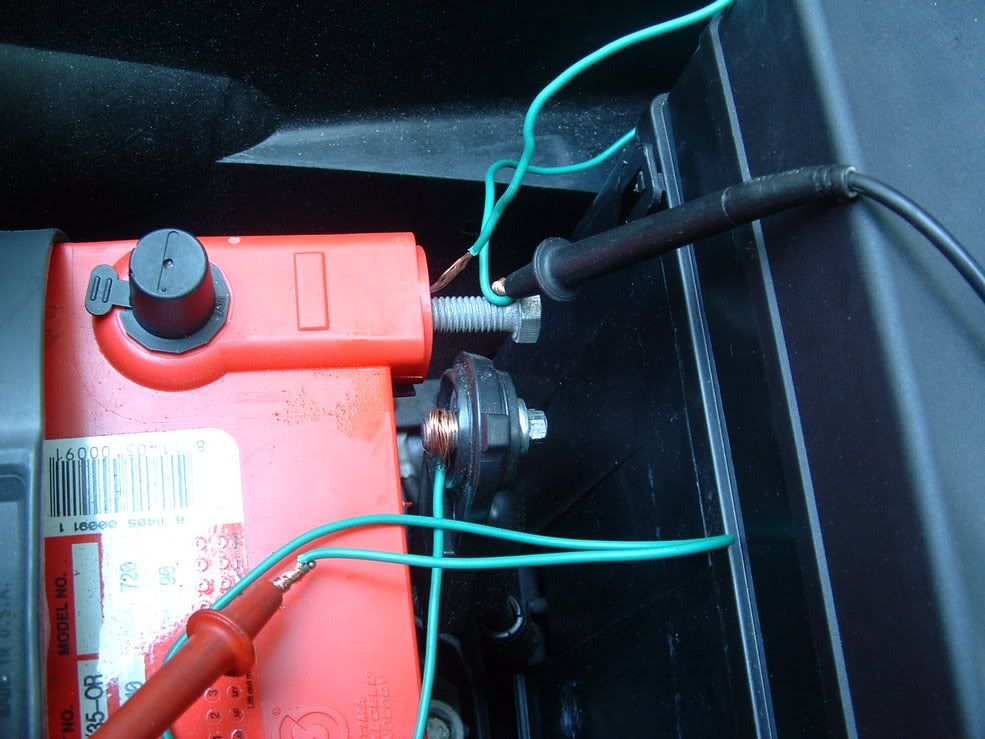
Once ALL of the cars loads are remove (ie doors shut, trunk shut, interior light off, radar detector and phone chargers removed etc, (make sure that you disconnect the under hood light), disconnect the battery NEGATIVE terminal. Connect a DC AMP METER capable of reading at least 10 amps in SERIES with the NEGATIVE battery terminal and the NEGATIVE battery cable. Once you connect the amp meter into the circuit, he car should power up and enter the "SLEEP MODE" with in a few minutes. It should not take longer than 10-15 minutes. If te car is in the RAP (retained acessory power) mode, it may take that entire 10-15 min to power down.
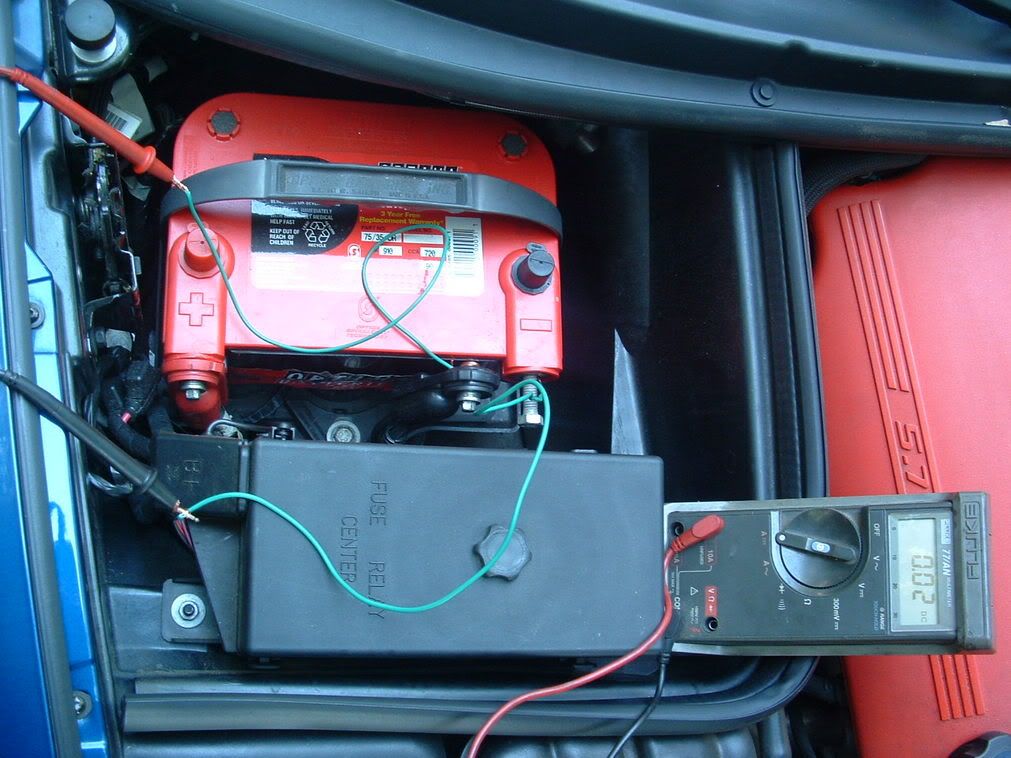
When you initially connect the AMP meter in the circuit, the current draw will be high. Some where around 8 amps. As the BCM determines that the car is secure, it will start dropping off loads and go into the SECURITY MODE and Sleep Mode. As it drops off loads you will see the battery current drop down from 8 amps to around 2-3 amps them in the milliamp range.
If there is a unwanted load, it could take up to 10-15 min for the current reading to settle out as low as it will go. The target reading will be 15-20 milliamperes. As you can see in the next photo, my 02 ZO6 draws .02 or 20 milliamperes.

With this small current draw and a properly charged battery in good condition, your C5 should be able to sit idle (without a battery tender or battery charger) for at least 3 weeks if not longer. My ZO6 has set idle for 30 days and started normally after that period.
C5's that drain batteries in days or a week have an excessive battery current draw issue. Here are a few places that have proven to be a cause of excessive battery current draw:
Drivers or Passengers seat control multifunction switch. The return spring in the switch gets weak or damaged and the seat sticks in a movement position. The motors are thermally protected by a "circuit breaker" in the passengers foot well and will continuously set and trip until the battery goes dead.
Drivers LUMBAR motor. Same as above!
Interior lights, dash lights, or other interior lights.
Head light motor control module. The module can short inside and draw current even though the lights are down and secure. If you feel the module and its HOT, its bad.
Alternator. The diodes can and do go bad. If hey go bad, the field windings will always be powered and draw current. If you suspect that the alternator is drawing current, remove the field terminal wire from the back of the alternator and insert the AMP Meter in SERIES with the circuit (between the red wire and alternator field terminal). The current draw should be ZERO. If you have current draw, one or more diodes are bad in the alternator. The last alternator that I checked this way was drawing 5 amps.
Bose Amplifier. Theres an amp under the dash on the drivers side dash. The relay for that amp sometimes sticks and the amp remains on even though the car is OFF.
Cell phones, radar detectors, wide band controllers ect... can get left plugged in.
NOTE! If you open the door, or trunk or even remove and then replace a fuse for troubleshooting, it will wake the car up and you will need to wait for it to enter the SLEEP mode again to read the current draw.
If you remove a BCM fuse, it will negate the test because the BCM is controlling the current draw.
Hope this helps figure out the reasons for premature battery failure.
Bill Curlee
If your car has a good battery and it depletes the battery in a few days or a week, use a DC Amp meter to measure the battery current draw when the car has entered the BCM sleep mode.
Once ALL of the cars loads are remove (ie doors shut, trunk shut, interior light off, radar detector and phone chargers removed etc, (make sure that you disconnect the under hood light), disconnect the battery NEGATIVE terminal. Connect a DC AMP METER capable of reading at least 10 amps in SERIES with the NEGATIVE battery terminal and the NEGATIVE battery cable. Once you connect the amp meter into the circuit, he car should power up and enter the "SLEEP MODE" with in a few minutes. It should not take longer than 10-15 minutes. If te car is in the RAP (retained acessory power) mode, it may take that entire 10-15 min to power down.
When you initially connect the AMP meter in the circuit, the current draw will be high. Some where around 8 amps. As the BCM determines that the car is secure, it will start dropping off loads and go into the SECURITY MODE and Sleep Mode. As it drops off loads you will see the battery current drop down from 8 amps to around 2-3 amps them in the milliamp range.
If there is a unwanted load, it could take up to 10-15 min for the current reading to settle out as low as it will go. The target reading will be 15-20 milliamperes. As you can see in the next photo, my 02 ZO6 draws .02 or 20 milliamperes.
With this small current draw and a properly charged battery in good condition, your C5 should be able to sit idle (without a battery tender or battery charger) for at least 3 weeks if not longer. My ZO6 has set idle for 30 days and started normally after that period.
C5's that drain batteries in days or a week have an excessive battery current draw issue. Here are a few places that have proven to be a cause of excessive battery current draw:
Drivers or Passengers seat control multifunction switch. The return spring in the switch gets weak or damaged and the seat sticks in a movement position. The motors are thermally protected by a "circuit breaker" in the passengers foot well and will continuously set and trip until the battery goes dead.
Drivers LUMBAR motor. Same as above!
Interior lights, dash lights, or other interior lights.
Head light motor control module. The module can short inside and draw current even though the lights are down and secure. If you feel the module and its HOT, its bad.
Alternator. The diodes can and do go bad. If hey go bad, the field windings will always be powered and draw current. If you suspect that the alternator is drawing current, remove the field terminal wire from the back of the alternator and insert the AMP Meter in SERIES with the circuit (between the red wire and alternator field terminal). The current draw should be ZERO. If you have current draw, one or more diodes are bad in the alternator. The last alternator that I checked this way was drawing 5 amps.
Bose Amplifier. Theres an amp under the dash on the drivers side dash. The relay for that amp sometimes sticks and the amp remains on even though the car is OFF.
Cell phones, radar detectors, wide band controllers ect... can get left plugged in.
NOTE! If you open the door, or trunk or even remove and then replace a fuse for troubleshooting, it will wake the car up and you will need to wait for it to enter the SLEEP mode again to read the current draw.
If you remove a BCM fuse, it will negate the test because the BCM is controlling the current draw.
Hope this helps figure out the reasons for premature battery failure.
Bill Curlee

Heel & Toe
Joined: Aug 2010
Posts: 20
Likes: 0
From: Melbourne FL
I've been having problems with electrical issues for a while now. I seem to have it isolated down to the wiring harnesses into the drivers door. At first, my window wouldn't go down or up, dug into the connectors between the pillar and door, jiggled things around a bit, and got it working. Cleaned connections, and everything worked fine. Months later, same thing, only now, the tire sensors would go offline, and the car would go into limp mode. Or traction control would go offline, or some other electrical issue would occur. Sometimes multiple issues simultaneously. Now,my headlights will suddenly go off and on as. I'm driving, or not come on when I switch them on. Also, a battery drain issue, which I've read about in this forum, and have checked the drain at .05, but mine seems to be in the door. The radio doesn't turn off, or the power antenna doesn't retract, or some other item which is supposed to turn off when the door is opened, doesn't sometimes. Jiggle wires, problems solved. My question for someone who might know, and Mr Curlee seems to be the resident expert, is, does all or many of the circuits in the C5 go thru the drivers door harness before proceeding to their ultimate destination? Also, since it looks like my only option is to pull the dash to get to the wiring, as there is no way to work on it with just the space between the door and body with the door open, can anyone tell me how long that operation might take? I need to repair my HUD at some point (it dropped) and need to pull the dash anyway, so I'm thinking I'll do all at once, unless someone knows of another option, or fix for this electrical issue if it's a common problem. I'll save the HUD for later.
Any advice or suggestions are greatly appreciated folks.
Any advice or suggestions are greatly appreciated folks.