


IMPORTANT ELECTRICAL INFORMATION (Long!)
Drifting


Joined: May 2000
Posts: 1,712
Likes: 1
From: Seekonk MA / RI border
my 2000 coupe acts funny occasionally.
How do I access the wire harness that is in the wires that go through the doors? I read in the thread that there's a bare wire in there that can cause problems but if I pop off the left side of the accordion (on driver's side) all I see is an orange wrap around what must be a bunch of wires. I don't see any connection.
(sometimes my driver's door controls won't work, radio goes dead, some gauges go dead, DIC gives me all kinds of warnings; Reduced Engine Power (of which there is NO power reduction), Service Vehicle Soon, etc., etc.)

Thread Starter
Tech Contributor


Joined: Dec 1999
Posts: 32,910
Likes: 2,402
From: Anthony TX
CI 6,7,8,9,11 Vet
St. Jude Donor '08
my 2000 coupe acts funny occasionally.
How do I access the wire harness that is in the wires that go through the doors? I read in the thread that there's a bare wire in there that can cause problems but if I pop off the left side of the accordion (on driver's side) all I see is an orange wrap around what must be a bunch of wires. I don't see any connection.
(sometimes my driver's door controls won't work, radio goes dead, some gauges go dead, DIC gives me all kinds of warnings; Reduced Engine Power (of which there is NO power reduction), Service Vehicle Soon, etc., etc.)
How do I access the wire harness that is in the wires that go through the doors? I read in the thread that there's a bare wire in there that can cause problems but if I pop off the left side of the accordion (on driver's side) all I see is an orange wrap around what must be a bunch of wires. I don't see any connection.
(sometimes my driver's door controls won't work, radio goes dead, some gauges go dead, DIC gives me all kinds of warnings; Reduced Engine Power (of which there is NO power reduction), Service Vehicle Soon, etc., etc.)
Drifting
Joined: May 2000
Posts: 1,712
Likes: 1
From: Seekonk MA / RI border
Thanks Bill. - of course I didn't stumble upon post #610 when I was searching through the thread - I pulled the door side off, reached inside the door and reached inside the accordion tube but didn't feel any connector. I'll pull the car side off next chance I get.
I'm wondering why they didn't just use regular insulated wire.
I'm wondering why they didn't just use regular insulated wire.
Drifting
Joined: May 2000
Posts: 1,712
Likes: 1
From: Seekonk MA / RI border
OK...so I made a chance to do the driver's side.
You don't tape that little individual wire do ya? I mean, the couplers don't pull very far from the door area. I can barely get my fingers to operate in those close quarters.

I DID separate the coupler but I just wrapped electrician's tape around the whole wire assembly and the upper most part of the couplers...then snapped it back together and stuck everything back into the car side cavity.
I don't know if that's the cure because the car stopped doing it's madness yesterday...but I just took it for a little joy ride and all was fine. <crossed fingers>
You don't tape that little individual wire do ya? I mean, the couplers don't pull very far from the door area. I can barely get my fingers to operate in those close quarters.
I DID separate the coupler but I just wrapped electrician's tape around the whole wire assembly and the upper most part of the couplers...then snapped it back together and stuck everything back into the car side cavity.
I don't know if that's the cure because the car stopped doing it's madness yesterday...but I just took it for a little joy ride and all was fine. <crossed fingers>
Thread Starter
Tech Contributor
Joined: Dec 1999
Posts: 32,910
Likes: 2,402
From: Anthony TX
CI 6,7,8,9,11 Vet
St. Jude Donor '08
I keep seeing people having charging system issues and instead of writing the same reply 5 times a week, I decided to get the info in this post.
Here is the charging system schematic:

When the charging voltages are LOW, carry out the following:
Disconnect the battery. Inspect the battery. Make SURE that it is not leaking acid around the battery terminals. Clean the battery terminals with a wire brush. Make sure that the threads in the battery terminals are not stripped.
The battery cables are connected to the cable terminal ends with a CRIMP. Pull the rubber terminal boots back and ins[ect that crimp connection. Make SURE that its not loose, corroded, burnt or damaged.
While the battery is disconnected, jack up the vehicle and inspect the Starter solenoid wiring. The alternator charges the battery THRU the connections on the starter solenoid.
Here is a picture of the starter solenoild wiring:

The large red wire on the left goes to the battey. The smaller orange wire on the same terminal goes to the "Batt TERMINAL" on the back of the alternator. Look at the condition of the wire terminals. This is an 04 Convertible with less than 40,000 miles on it and its not driven in the winter.
The purple wire is what energizes the solenoid. It comes from the Theft Deterrent Relay in the passengers foot well.
Remove the wires on the solenoid and clean the wire eyelets with a wire brush. Clean the lugs on the solenoid. Reinstall the wires and make sure that the connections are tight. If you have any anti corrosion spray, now is a good time to apply it to the solenoid terminals
While you under the car, theres a engine ground wire on the side of the block near the starter. Its easy to find. Just follow it down from the negative terminal on the battery. Make sure that engine ground connection is clean and tight.
Some troubleshooting with a meter:
ZERO the OHM Meter!
1- With the battery disconnected use the OHM Meter to read the positive battery cable terminal to alternator Batt terminal connection on the back of the alternator. THEORETICALLY,,,,it should be ZERO. If you have an ohm, thats not too bad. If you have high resistance start cleaning terminals
2- Measure the Negative battery cable terminal to chassis ground, Should have ZERO ohms.
3- Measure the Negative battery cable terminal to engine ground, Should have ZERO ohms.
4- Measure the resistance between the case of the alternator and the engine block. Should be ZERO ohms
Reconnect the battery terminals to the battery
Engine OFF.
1- Read the battery voltage directly at the POSITIVE & NEGATIVE battery terminals. Write down that reading. A good battery properly charged should read 12 VDC - 12.3 VDC
2- Read the battery voltage directly at the POSITIVE & on a ground area on the frame. Should be the same as the reading above in step 1.
3- Read the battery voltage directly at the POSITIVE & on a ground area on the ENGINE. Should be the same as the reading above in step 1
Engine running:
1- Read the battery voltage directly at the POSITIVE & NEGATIVE battery terminals. Write down that reading. A good battery properly working charging system should read 14 VDC - 14.5 VDC
2- Read the battery voltage directly at the POSITIVE & on a ground area on the frame. Should be the same as the reading above in step 1.
3- Read the battery voltage directly at the POSITIVE & on a ground area on the ENGINE. Should be the same as the reading above in step 1
4- Read the batt terminal on the back of the alternator to chassis ground. That should be the same voltage that you read on the positive battery theminal to chassis ground.
5- Read the positive battery terminal with the negative meter lead and read the field terminal with the positive meter lead. If the wires and connections between the battery and the alternator are properly connected, you should have ZERO VOLTS on the meter. If you read voltage, you have a bad connection between those two points and you need to clean and inspect the wires on the solenoid. That read will be your VOLTAGE DROP. You need to work to eliminate all voltage drops.
If you are having charging system low voltage issues you can try this test:
Connect one end of a 10 gage wire to the battery POSITIVE teminal and the other end to the back of the alternator to the BATT Terminal. I just use one wire of a set of jumper cables. Once that is connected, see if the DIC and the dash volt meter readings increase. If it does, the connection between the battery and alternator is bad.
Hope this helps
BC
Here is the charging system schematic:
When the charging voltages are LOW, carry out the following:
Disconnect the battery. Inspect the battery. Make SURE that it is not leaking acid around the battery terminals. Clean the battery terminals with a wire brush. Make sure that the threads in the battery terminals are not stripped.
The battery cables are connected to the cable terminal ends with a CRIMP. Pull the rubber terminal boots back and ins[ect that crimp connection. Make SURE that its not loose, corroded, burnt or damaged.
While the battery is disconnected, jack up the vehicle and inspect the Starter solenoid wiring. The alternator charges the battery THRU the connections on the starter solenoid.
Here is a picture of the starter solenoild wiring:
The large red wire on the left goes to the battey. The smaller orange wire on the same terminal goes to the "Batt TERMINAL" on the back of the alternator. Look at the condition of the wire terminals. This is an 04 Convertible with less than 40,000 miles on it and its not driven in the winter.
The purple wire is what energizes the solenoid. It comes from the Theft Deterrent Relay in the passengers foot well.
Remove the wires on the solenoid and clean the wire eyelets with a wire brush. Clean the lugs on the solenoid. Reinstall the wires and make sure that the connections are tight. If you have any anti corrosion spray, now is a good time to apply it to the solenoid terminals
While you under the car, theres a engine ground wire on the side of the block near the starter. Its easy to find. Just follow it down from the negative terminal on the battery. Make sure that engine ground connection is clean and tight.
Some troubleshooting with a meter:
ZERO the OHM Meter!
1- With the battery disconnected use the OHM Meter to read the positive battery cable terminal to alternator Batt terminal connection on the back of the alternator. THEORETICALLY,,,,it should be ZERO. If you have an ohm, thats not too bad. If you have high resistance start cleaning terminals
2- Measure the Negative battery cable terminal to chassis ground, Should have ZERO ohms.
3- Measure the Negative battery cable terminal to engine ground, Should have ZERO ohms.
4- Measure the resistance between the case of the alternator and the engine block. Should be ZERO ohms
Reconnect the battery terminals to the battery
Engine OFF.
1- Read the battery voltage directly at the POSITIVE & NEGATIVE battery terminals. Write down that reading. A good battery properly charged should read 12 VDC - 12.3 VDC
2- Read the battery voltage directly at the POSITIVE & on a ground area on the frame. Should be the same as the reading above in step 1.
3- Read the battery voltage directly at the POSITIVE & on a ground area on the ENGINE. Should be the same as the reading above in step 1
Engine running:
1- Read the battery voltage directly at the POSITIVE & NEGATIVE battery terminals. Write down that reading. A good battery properly working charging system should read 14 VDC - 14.5 VDC
2- Read the battery voltage directly at the POSITIVE & on a ground area on the frame. Should be the same as the reading above in step 1.
3- Read the battery voltage directly at the POSITIVE & on a ground area on the ENGINE. Should be the same as the reading above in step 1
4- Read the batt terminal on the back of the alternator to chassis ground. That should be the same voltage that you read on the positive battery theminal to chassis ground.
5- Read the positive battery terminal with the negative meter lead and read the field terminal with the positive meter lead. If the wires and connections between the battery and the alternator are properly connected, you should have ZERO VOLTS on the meter. If you read voltage, you have a bad connection between those two points and you need to clean and inspect the wires on the solenoid. That read will be your VOLTAGE DROP. You need to work to eliminate all voltage drops.
If you are having charging system low voltage issues you can try this test:
Connect one end of a 10 gage wire to the battery POSITIVE teminal and the other end to the back of the alternator to the BATT Terminal. I just use one wire of a set of jumper cables. Once that is connected, see if the DIC and the dash volt meter readings increase.
If it does, the connection between the battery and alternator is bad. Hope this helps
BC
Drifting
Joined: May 2000
Posts: 1,712
Likes: 1
From: Seekonk MA / RI border
Bill, you are the man.
I just want to say....that after taping up the bare wire area at the wire connection between the driver's door I have had no more instances of driver's door controls not working and the host of DIC error messages that accompanied the door/window situation. <Knock wood>
I just want to say....that after taping up the bare wire area at the wire connection between the driver's door I have had no more instances of driver's door controls not working and the host of DIC error messages that accompanied the door/window situation. <Knock wood>
Advanced


Joined: Oct 2008
Posts: 64
Likes: 0
From: Mount Juliet TN
I first want to thank Bill Curlee for all the help he gave me on here and in PM's. Now with that aside I want to tell my story of the infamous electrical issues. I have been chasing an electrical problem since Oct. 08, when I bought the car, a 99 Coupe. In talking with Bill about issues the C5's have, I continued to do everything in this post like cleaning grounds, sealing the haness between the door jams, repairing weather stripping that was allowing water to get in the floor board, even sealed the door hinge area. All of which eliminated the water problems I was having. I have bought new DCM's, new switches, and made a few repairs, one of which was a battery leak problem that roasted one of the wires under it in two. But I still couldn't get rid of the crazy warnings, radio quiting, AC Quiting, Memory seats not working, and windows not going down. I think I finally figured it out, or at least I haven't had the problems since I switched out the harness from the drivers side window switch to the door control module. My car did its crazy thing one day and I removed the door panel, again. (I have gotten really good at removing a door panel). I hit that harness just right that everything cleared up. Everything worked!! So I continued the leave the car on and push around a little and there was something faulty by the door control module in the harness. I unplugged the harness flipped it around and plugged the connector by the DCM up by the switch, and the one by the switch at the DCM. The problem moved to the switch now. So I got another short harness from another member on here, and I now have no more problems. I have pulled, pushed, slammed, twisted, and I can't get the problem to repeat itself. So maybe, just maybe, I have gotten rid of it for good!!! Just one more thing others may want to check out before buying stuff. I would have never found mine if I didn't hit it just right that day. And before I changed the harness I could take my finger and push on the harness, and duplicate the problem everytime. So there must be a break in the harness somewhere down by the connector.
Last edited by Rcurry23; Jul 9, 2009 at 02:38 PM.
Melting Slicks


Joined: May 2000
Posts: 2,498
Likes: 4
From: Brentwood TN
My horn works intermmitently and hasn't worked in several months. Pushing the horn button part of the steering does not make it blow, nor does it blow when I remotely lock the doors. When it is working, it blows from both trigger sources. I'm chasing grounds but now am thinking it may be in the steering column.
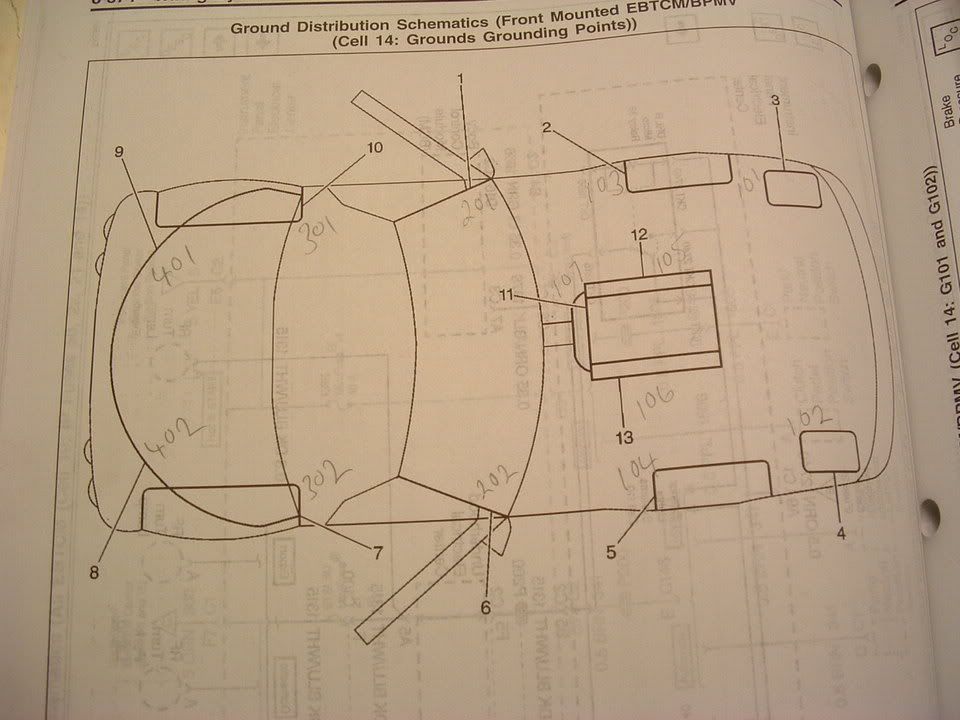
Question: Where is the ground that is connected with the horn? I cleaned the one on the frame next to the battery on the passenger side but have not cleaned any of the grounds in the passenger compartment. I also cleaned ground at the left front on the driver's side but not the one near the firewall on the driver's side because I can't find it. I KNOW there is a well drawn diagram in my Helm Manual somewhere but I cannot find it. Does anyone know waht page it is on? I saw the drawing way back up on this post and it is good but the one that I am looking for is an isometric of the frame with better reference points to ground locations.
Thanks.
Charlie
Corvette Stories
The Best of Corvette for Corvette Enthusiasts

Top 10 Most Expensive Corvettes Ever Sold on Bring A Trailer
Brett Foote
10 Things Every Corvette Owner Needs (2026 Edition)
Michael S. Palmer
8 Most "Only Corvette Owners Understand" Quirks and Problems
Pouria Savadkouei
10 Reasons the C6 Z06 is Still A Performance Benchmark After 20 Years
Joe Kucinski
How Much Horsepower Every Corvette Engine "LOST" in 1972
Joe Kucinski
Top 10 DOs and DON'Ts for Protecting Your Convertible Top!
Michael S. Palmer
Top 10 Most Explosive Corvettes Ever Made: Power-to-Weight Ratio Ranked!
Joe Kucinski
150 hp to 1,250 hp: Every Corvette Generation Compared by the Specs That Matter
Joe Kucinski
8 Coolest Corvette Pace Cars (and Replicas) of All Time
Verdad GallardoInstructor
Joined: Aug 2008
Posts: 121
Likes: 0
From: Murray River P.E.I.
Many of you have asked me for help on solving electrical problems and I thought this would be VERY interesting!
My 98 coupe would get the infamous "REDUCED ENGINE POWER", "TRACTION CONTROL FAILURE" and a host of random failure codes. After many, many hours of troubleshooting, replacing the BCM and TAC module, I solved most of the driveability issues. Still getting the random DTC failure codes, I thought that I may be having ground issues. Back in June I cleaned ALL of the chassis grounds and the car virtually stopped throwing the "RANDOM" DTC failure codes. Just moving the wires in the chassis ground connector was enough to change the indications and make the issues stop happening.
I had a chance to speak with some GM C5 Trouble Desk Engineers when I went to Bowling Green KY in April and they pointed out that MANY of the C5 electrical issues can be directly linked to chassis ground problems. The engineer even went as far as to recommending that I chop off the factory under hood chassis ground connectors and combine all of the wires into a single ground lug. Not wanting to just LOP off the factory connector, I took a chance and disassembled one of the ground plug connectors and to my surprise it was indeed full of corroded connections.
I strongly recommend that any C5 owner that has had or who are having electrical issues, examine and clean the chassis ground connectors. This may save you from needlessly replacing expensive electronics modules. Each ground connector can be disassembled and cleaned in about 20 min.
Just cleaning the metal ground connection between the chassis and the plug is only a band aid solution. Now that I look back, when I cleaned my chassis grounds and initially solved my issues, I believe that when the connector is being removed to clean the connection between chassis and the connector, just the wires being moved inside the plug is what changed the indications and made everything work better.
Disassembly of the chassis ground plug and cleaning the contacts inside the connector is the correct method of solving the issue!
I took some pictures of the under hood chassis ground connector and the corrosion that was in it. I cleaned the two connections on the frame rails and the left one was significantly corroded! Taking it apart and cleaning it is a very straight forward procedure and I believe that if you follow this recommendation, you will be on the way to solving the many of the electrical issues.
Here are some detailed pictures of the ground connector and the corrosion that was found inside it!
Picture of under hood Chassis Ground connector G-101
Corrosion inside connector! (You ain't seen nothing yet!)
[IMG] [/IMG]
Next three photos are of the corrosion found on the connector terminals!
[IMG] [/IMG] [IMG]
 [/IMG] [IMG]
 [/IMG]
Self tapping ground screw and star washer. This is what you will need if the ground stud breaks off during removal!
[IMG] [/IMG] [IMG][IMG]
Here are where the chassis ground points are on a C5:


PLEASE let me know if you have any questions.
Bill Curlee
updated 02 March 06
My 98 coupe would get the infamous "REDUCED ENGINE POWER", "TRACTION CONTROL FAILURE" and a host of random failure codes. After many, many hours of troubleshooting, replacing the BCM and TAC module, I solved most of the driveability issues. Still getting the random DTC failure codes, I thought that I may be having ground issues. Back in June I cleaned ALL of the chassis grounds and the car virtually stopped throwing the "RANDOM" DTC failure codes. Just moving the wires in the chassis ground connector was enough to change the indications and make the issues stop happening.
I had a chance to speak with some GM C5 Trouble Desk Engineers when I went to Bowling Green KY in April and they pointed out that MANY of the C5 electrical issues can be directly linked to chassis ground problems. The engineer even went as far as to recommending that I chop off the factory under hood chassis ground connectors and combine all of the wires into a single ground lug. Not wanting to just LOP off the factory connector, I took a chance and disassembled one of the ground plug connectors and to my surprise it was indeed full of corroded connections.
I strongly recommend that any C5 owner that has had or who are having electrical issues, examine and clean the chassis ground connectors. This may save you from needlessly replacing expensive electronics modules. Each ground connector can be disassembled and cleaned in about 20 min.
Just cleaning the metal ground connection between the chassis and the plug is only a band aid solution. Now that I look back, when I cleaned my chassis grounds and initially solved my issues, I believe that when the connector is being removed to clean the connection between chassis and the connector, just the wires being moved inside the plug is what changed the indications and made everything work better.
Disassembly of the chassis ground plug and cleaning the contacts inside the connector is the correct method of solving the issue!
I took some pictures of the under hood chassis ground connector and the corrosion that was in it. I cleaned the two connections on the frame rails and the left one was significantly corroded! Taking it apart and cleaning it is a very straight forward procedure and I believe that if you follow this recommendation, you will be on the way to solving the many of the electrical issues.
Here are some detailed pictures of the ground connector and the corrosion that was found inside it!
Picture of under hood Chassis Ground connector G-101
Corrosion inside connector! (You ain't seen nothing yet!)
[IMG]
[/IMG] Next three photos are of the corrosion found on the connector terminals!
[IMG]
[/IMG] [IMG][/IMG] [IMG][/IMG] Self tapping ground screw and star washer. This is what you will need if the ground stud breaks off during removal!
[IMG]
[/IMG] [IMG][IMG]Here are where the chassis ground points are on a C5:
PLEASE let me know if you have any questions.
Bill Curlee
updated 02 March 06

Heel & Toe
Joined: Aug 2005
Posts: 15
Likes: 0
From: Souderton PA
I would appreciate any guidance or advice concerning repairing the connection in the underhood fuse block for the fuel pump fuse in a 2002 convertible. Back in 2006 I was able to determine an intermittent problem where the car would start, but not run, was related to the fuel pump thanks to guidance from Bill C provided in this thread.
Specifically, I discovered the fuse for the fuel pump had a burned lug, although the fuse was not blown. I added a little dielectric grease and replaced the fuse with a new one. After almost three years of no problems the car is once again acting up. If I don't hear the fuel pump run when I turn the key on I know the car will not run. Wiggling the fuse will solve this problem every time.
This time the fuse does not show any evidence of damage and I have replaced it with a new one to no avail. I'm thinking the pin connector in the fuse block, or its connection needs attention.
Thanks in advance for any suggestions! gene
Racer
Joined: May 2008
Posts: 462
Likes: 0
I found this post because of the reduced engine power and the "no comm" while accessing the DIC. My garage isn't wide enough to open the doors all the way and it's dark out so I wasn't able to remove the boot around the door harness so I just started wiggling it. After a few seconds i heard some relays clicking and the interior lights popped on. So atleast tonight I found the problem, tomorrow will be fixing it. Thanks Bill and all the other people that posted to page 7, that's as far as I got, but will be reading the rest of this post.

Cruising
Joined: Jul 2009
Posts: 14
Likes: 1
Hey Bill, Great write up, I love all the detail.
I just bought a 2000 C5 convertible about two weeks ago. I’ve did all the things anyone new to a Vette would do. Yea I kicked it in the *** a few time to see what she's got. A couple a burn outs, and 110 MPH is nothing for this car, but that’s all the faster I care to go. I have all ready removed the entire dash to fix the HUD, replaced all the brakes, and I am still waiting for the new gears to arrive so I can rebuild the head lights motors. The reason I read your post, is because I am having some problems, that might be electrical. This past Sunday my wife and I took the car for a ride to Lake Tahoe. Its about a 2 � to 3 hours ride from where we are, and we went up CA-88. 88 goes up about 8,000 feet and has all the turns and dips you could imagine. it’s a great drive. On the tail end of our drive home I notice the SECURITY light on the dash came on. I don’t know why. 30 minutes after in came on I pulled into to a gas station to fuel up, and when I started the car the light was gone. I didn’t think to much about it.
The next day I was driving around in the neighborhood, you know just fart’in around, and the light came on again. I pulled over and shut the ignition off and restarted the car and the light stayed off. Long story short, the SECURITY light will pop on every once in a while. It doesn’t seem to matter if the car has been on for hours or a few minutes. I am new to the car so I don’t know if the SECURITY light is giving me a code, or if it is just acting funny.
Any input from you or anybody, would much be appreciated. Thanks Vic…
2000 C5 95k miles.
Last edited by Slickbravo; Jul 31, 2009 at 12:45 PM.
Thread Starter
Tech Contributor
Joined: Dec 1999
Posts: 32,910
Likes: 2,402
From: Anthony TX
CI 6,7,8,9,11 Vet
St. Jude Donor '08
Hey Bill, Great write up, I love all the detail.
I just bout a 2000 C5 convertible about two weeks ago. I�ve did all the things anyone new to a Vette would do. Yea I kick in in the *** a few time to se what she got. A couple a burn outs, and 110 MPH is nothing for this car, but that�s all the faster I care to go. I have all ready remover the entire dash to fix the HUD, replaced all the brakes, and I am still waiting for the new gears to arrive so I can rebuild the head lights motors. The reason I read your post, is because I am having some problems, that might be electrical. This past Sunday my wife and I took the car for a ride to Lake Tahoe. Its about a 2 � to 3 hours ride from where we are, and we went up CA-88. 88 goes up about 8,000 feet and has all the turns and dips you could imagine. it�s a great drive. On the tail end of our drive home I notice the SECURITY light on the dash came on. I don�t know why. 30 minutes after in came on I pulled into to a gas station to fuel up, and when I started the car the light was gone. I didn�t think to much about it.
The next day I was driving around in the neighborhood, you know just fart�in around, and the light came on again. I pulled over and shut the ignition off and restarted the car and the light stayed off. Long story short, the SECURITY light will pop on every once in a while. It doesn�t seem to matter if the car has been on for hours or a few minutes. I am new to the car so I don�t know if the SECURITY light is giving me a code, or if it is just acting funny.
Any input from you or anybody, would much be appreciated. Thanks Vic�
2000 C5 95k miles.
When the security light comes on, immediately read and post the DTCs with out turning the ignition off.
Heres how to do it:
READING YOUR Engine Diagnostic Codes (DTCs)
The Diagnostic Display Mode is entered with the following procedure:
1) Turn on the ignition but don't start the engine.
2) Press the RESET button to turn off any warning messages. (i.e. door open, trunk open etc�)
3) Press and hold OPTIONS
4) While holding OPTIONS, press FUEL four times within a 10-second period.
Initially, on-board diagnostics go into an Automatic Mode which shows diagnostic codes in a pre-set sequence: PCM - TCS - RTD - BCM - IPC - RADIO - HVAC - LDCM - RDCM - SCM - RFA. All codes will be displayed for each. ( i.e. PCM = 4 codes)
If none are present in a given module, you will see No More Codes on the display.
There are two kinds of diagnostic codes, Current and History designated with a letter suffix, C or ;H. A current code indicates a malfunction is present in the module displaying data. A history code indicates a problem existed sometime in the last 40 or 50 ignition cycles. When not accompanied by a current code of the same number, it's potential evidence of a previous problem, now resolved, that was not removed by clearing the codes.
More likely it's an indication of an intermittent malfunction.
Intermittent codes are the most challenging of the diagnostics. An intermittent code may have happened once, may have happened more than once but is inconsistent or may be happening on a regular basis but not at the time the codes are displayed. History codes can also be caused by a current malfunction in a system that is not operating at the time codes are displayed. An example is the rear window defogger which doesn't operate until the Body Control Module detects engine rpm. For history codes set by a module that does not operate with the key on and engine off, a special diagnostic tool called a Scan Tester is necessary to properly diagnose the malfunction.
Once the system has displayed all modules, it goes into the manual mode which allows selection of each module using combinations of Driver Information Center buttons. Manual mode can also be entered during the automatic sequence by pressing any button except E/M. Once the display shows Manual Diagnostics, select a module by pressing the OPTIONS button to go forward or the TRIP button to go back. Once a module is selected, a code is displayed, and if more than one are present;
press GAGES to go forward or FUEL to go back.
To exit the diagnostic mode at any time, press E/M. If you want to erase codes in a given module, press RESET
To reset the codes once in manual mode, press and hold RESET until it displays NO CODES Press OPTIONS to go to the next module. Repeat the steps until you have reset the codes in all the computer modules.
NOTE!! Only reset the codes IF you want to - it is NOT necessary to do this. Clearing a code does not repair a problem. You are simply erasing the evidence of it in the module's memory. If you clear the code/s, and extinguish the Check Engine Light, your emissions status ready will NOT allow you to pass an emissions test until you have completed the required driving cycles.
Once you have the codes, the next question is: What to do with the information?
First, consult the factory service manual. Any serious C5 Do-It-Yourself owner should invest in the Corvette Service Manual of the appropriate model year. The Service Manual is really a requirement if you want to understand and work on your C5.
Here is very good site of DTC definitions:
http://www.gearchatter.com
Make sure to include the H or C suffix!!
Post the DTCs that you find durring the event. If I were you I would clear all the history DTCs that are in there now.
BC
Cruising
Joined: Jul 2009
Posts: 14
Likes: 1
Bill thanks for taking the time to reply to my post. It really means a lot to me and it is so very helpful.
I had no idea that I could do all of that, very good to know. Your quote
“Any serious C5 Do-It-Yourself owner should invest in the Corvette Service Manual of the appropriate model year. The Service Manual is really a requirement if you want to understand and work on your C5.”
Now here’s my question. Witch manual should I get? Where do I get it? Am I looking for the old hard cover copy? I have seen some on the internet that say CD manual. Is that the best way to do it? Or do I go to the dealer and buy the one they have. Assuming they even have one to sell me. Please advise. Thanks Vic…
Last edited by Slickbravo; Jul 30, 2009 at 08:06 PM.
Thread Starter
Tech Contributor
Joined: Dec 1999
Posts: 32,910
Likes: 2,402
From: Anthony TX
CI 6,7,8,9,11 Vet
St. Jude Donor '08
STEALERSHIP????? You dont need NO STINKING Stealreship!!!
Call Gene Culley. He is one of our forum sponsors and has ALL the C5 repair manuals. There a THREE volume set but,,,there no longer hard back. There a nice bound book and there THICK!
Gene's web site is: www.gmpartshouse.com He has a very good price on the set. If I remember correctly, there around $130.
Heres his latest post. Im glad I looked at it:
http://forums.corvetteforum.com/c6-t...-specials.html
The service manuals are now:
Directly off the post::
||--Helms Corvette Service Manuals--||
'97'- '09 Corvette � 149.99 shipped
Please Call For Any Other Make/Model Vehicle
To order the service manuals:
Go to http://www.gmpartshouse.com/search.html
Starting in box #1 enter part number helmsmanuals and select Chevrolet make.
In step #2 of #4 you�ll find a comments section right under the verify order button. Enter the year make and model of the vehicle in the comments section.
If you�re interested in manuals for any other GM product email us. They�re mostly all the same price so we�ll just need to check availability for you.
Contains Factory Authorized Service information written by General Motors. It contains Diagnostic Information and Procedures, Schematics and Routing Diagrams, Component Locator, Repair Instructions, Description and Operation, Specifications, and Special Tools and equipment. Service information on HVAC, Body & Accessories, Restraints, Steering, Suspension, Driveline/Axle, Brakes, Engine and Transmission/Transaxle.
As for the CD. There are a number of members on the forum that have copies of this CD and will send it to you really reasonably. I got one and LOVED it! its real handy and worked well. My computer crashed and now I can NOT get it to reload! I really miss my CD service manual!
The CD's are inexpensive enough that I have both. I have manuals for my old 98, 02 and a 04. I got the 04 for reference. 04 C5 are diffeent enough that you cant use lower year manuals to effectively troubel shoot the electrical stuff and some systems like the fuel system. All different!
My 98 manual covers 97-98 & 99 for the most part. The 02 covers 2001-02 and 03 very well.
BC
Call Gene Culley. He is one of our forum sponsors and has ALL the C5 repair manuals. There a THREE volume set but,,,there no longer hard back. There a nice bound book and there THICK!
Gene's web site is: www.gmpartshouse.com He has a very good price on the set. If I remember correctly, there around $130.
Heres his latest post. Im glad I looked at it:
http://forums.corvetteforum.com/c6-t...-specials.html
The service manuals are now:
Directly off the post::
||--Helms Corvette Service Manuals--||
'97'- '09 Corvette � 149.99 shipped
Please Call For Any Other Make/Model Vehicle
To order the service manuals:
Go to http://www.gmpartshouse.com/search.html
Starting in box #1 enter part number helmsmanuals and select Chevrolet make.
In step #2 of #4 you�ll find a comments section right under the verify order button. Enter the year make and model of the vehicle in the comments section.
If you�re interested in manuals for any other GM product email us. They�re mostly all the same price so we�ll just need to check availability for you.
Contains Factory Authorized Service information written by General Motors. It contains Diagnostic Information and Procedures, Schematics and Routing Diagrams, Component Locator, Repair Instructions, Description and Operation, Specifications, and Special Tools and equipment. Service information on HVAC, Body & Accessories, Restraints, Steering, Suspension, Driveline/Axle, Brakes, Engine and Transmission/Transaxle.
As for the CD. There are a number of members on the forum that have copies of this CD and will send it to you really reasonably. I got one and LOVED it! its real handy and worked well. My computer crashed and now I can NOT get it to reload!
I really miss my CD service manual!The CD's are inexpensive enough that I have both. I have manuals for my old 98, 02 and a 04. I got the 04 for reference. 04 C5 are diffeent enough that you cant use lower year manuals to effectively troubel shoot the electrical stuff and some systems like the fuel system. All different!
My 98 manual covers 97-98 & 99 for the most part. The 02 covers 2001-02 and 03 very well.
BC

4th Gear
Joined: Jun 2009
Posts: 4
Likes: 0
From: Southlake TX
Bill, this is great information. Thanks!
Can you help me with a different problem that I'm having?
I'm getting the warning 'Service ABS, Service Active Handling, Service Traction System' every time I drive the car, but have not experienced problems. The dealership said that it's the C1241 steering gear coil failure. It will require gear replacement, which is extremely expensive.
Have you heard of this problem before? Do you know what's required to resolve the issue? Do you know anyone that can recommend a repair shop in the Dallas/Ft. Worth area?
Thanks.
Joe Broadway
Dallas, TX
Thread Starter
Tech Contributor
Joined: Dec 1999
Posts: 32,910
Likes: 2,402
From: Anthony TX
CI 6,7,8,9,11 Vet
St. Jude Donor '08
Bill, this is great information. Thanks!
Can you help me with a different problem that I'm having?
I'm getting the warning 'Service ABS, Service Active Handling, Service Traction System' every time I drive the car, but have not experienced problems. The dealership said that it's the C1241 steering gear coil failure. It will require gear replacement, which is extremely expensive.
Have you heard of this problem before? Do you know what's required to resolve the issue? Do you know anyone that can recommend a repair shop in the Dallas/Ft. Worth area?
Thanks.
Joe Broadway
Dallas, TX
Can you help me with a different problem that I'm having?
I'm getting the warning 'Service ABS, Service Active Handling, Service Traction System' every time I drive the car, but have not experienced problems. The dealership said that it's the C1241 steering gear coil failure. It will require gear replacement, which is extremely expensive.
Have you heard of this problem before? Do you know what's required to resolve the issue? Do you know anyone that can recommend a repair shop in the Dallas/Ft. Worth area?
Thanks.
Joe Broadway
Dallas, TX
Be ware of the STEALERSHIPS! They see you as a walking cash cow!!!

Do some checking on your own first. " DTC C1241 MAGNA STEER Circuit Malfunction "
Theres a connector on the steering rack on the area where the steering wheel shaft connects to the rack. Find the plug and examine it. Disconnect the plug and insure that the male and female pins are in good condition and clean.
Measure the coil resistance with an ohm meter. It should be 2 -3 ohms. If it reads that resistance, the coil in the rack isn't bad.
Give that connector a real close inspection.
BC
Heel & Toe
Joined: Jul 2008
Posts: 15
Likes: 0
From: York PA
I've scoured the CF and can't find an electrical issue quite the same as mine, but this seems to be the most appropriate place to post this.
I have an 01 Coupe that's having a starting issue. What's unique about this is that when the car won't start (not even turn over,) if I dis/reconnect the battery, it will start at anypoint within the 1st ~20 mninutes (i've timed it) afterwards. After ~20 mins, int. lights won't turn on, windows don't work, hatch release doesn't work (fob or button in car) and of course it won't start.
I've taken the advice of cleaning all grounds, had battery tested and it tested fine (not sure of the age of the batt), checked all fuses and played musical chairs w/ like relays.
Battery voltage dropped to the point of not being able to start the car (9.6v on DIC, about the same w/ multimter), but oddly came back to 12.2 v after a few hours... on it's own.
I've since charged the battery and drove the car for an hour or so. I noticed at times it seemed to hiccup at 0% throttle. DIC showed 13.8 V consistently. At the end of my run, idle seemed a bit low @ 500 rpm and seemed like it was about to stall when pulling into my garage (automatic trans)
Error codes are sporatic, if I clear them, I get a whole different set after running the car the next time. Only consistent one is the C1214 which I've read about on other posts and would like to think is unrelated to a time delayed (seemingly) electrical issue.
Anyone know if the C5 is equipped with any sorts of feature that would disable starting, windows, int lights after ~20 mins? Perhaps a safety or security feature of sorts?