


IMPORTANT ELECTRICAL INFORMATION (Long!)

Instructor


Joined: Dec 2012
Posts: 122
Likes: 2
From: Hampton Virginia
Fixed the door lock issue (Passenger Door would lock but not un lock) by replacing the middle relay on the circuit board. Took all of 45 minutes thanks to the information from the forum. Lastly is fixing the dim light on the HVAC controller. Will tackel that this weekend
Racer


Joined: Feb 2009
Posts: 427
Likes: 8
From: FRANCE
Hi, I think so...

(1) Fuse Block - Underhood C3
(2) A/C Compressor Clutch
(3) S106
(4) S107
(5) Electronic Brake Control Module (EBCM)
(6) Cooling Fan - Left
(7) C107
(8) Brake Fluid Pressure Sensor
(9) Brake Differential Switch
(10) Brake Fluid Level Switch
(11) Windshield Washer Fluid Pump
(12) Repeater Lamp - Left
(13) Windshield Washer Fluid Level Switch
(14) G103
(15) SP101
(16) G101
(17) Headlamp Door Assembly - Left
(18) Fog Lamp - LF
(19) Secondary Air Injection (AIR) Pump
(20) S108
(21) Cooling Fan - Right
(22) Ambient Air Temperature Sensor
(23) Fog Lamp - RF
(24) Horn Assembly
(25) C100
(26) C113
(27) Headlamp Door Control Module C2
(28) Headlamp Door Control Module C1
(29) Headlamp Door Assembly - Right
(30) G102
(31) SP100
(32) Secondary Air Injection (AIR) Solenoid
(33) A/C Refrigerant Pressure Sensor
(34) Repeater Lamp - Right
(35) G108
(36) C102
(37) UHEC C6
(38) C148
(39) C140
(40) C150
Drifting

Joined: Nov 2011
Posts: 1,401
Likes: 141
From: Summerville South Carolina
but are there any detailed ground access instructions in all this excellent information for us less than talented DIY'ers in here somewhere. I have cleaned all the visible grounds, but am not sure how to access some of the more hidden rears. I also cleaned the door harness plugs , and for that, I made sure to disconnect the battery
Perhaps a detail on what has to be removed to access unexposed plugs, and how to do it so as not to damage anything, would be useful to some of us motivated shade tree amateurs.
Could someone direct me to this detail?
Thanks to Bill and all for this great guide.
Perhaps a detail on what has to be removed to access unexposed plugs, and how to do it so as not to damage anything, would be useful to some of us motivated shade tree amateurs.
Could someone direct me to this detail?
Thanks to Bill and all for this great guide.
Melting Slicks

Joined: Apr 2002
Posts: 2,631
Likes: 2
From: Clever, MO aka SOMO
but are there any detailed ground access instructions in all this excellent information for us less than talented DIY'ers in here somewhere. I have cleaned all the visible grounds, but am not sure how to access some of the more hidden rears. I also cleaned the door harness plugs , and for that, I made sure to disconnect the battery
Perhaps a detail on what has to be removed to access unexposed plugs, and how to do it so as not to damage anything, would be useful to some of us motivated shade tree amateurs.
Could someone direct me to this detail?
Thanks to Bill and all for this great guide.
Perhaps a detail on what has to be removed to access unexposed plugs, and how to do it so as not to damage anything, would be useful to some of us motivated shade tree amateurs.
Could someone direct me to this detail?
Thanks to Bill and all for this great guide.


Drifting
Joined: Nov 2011
Posts: 1,401
Likes: 141
From: Summerville South Carolina
You need to grab a legal pad, like I did once, and read this thread from start to finish....making notes as you read about this car and it's gremlins. That, and along with the 3 vol GM manual set that you should already have, will help you answer many of your own questions about your C5. I've been doing this for many years and still don't have all the answers I sometimes need, but I definitely know and understand my car so much better. Bill Curlee and many others on all the Corvette online forums have amazing knowledge that they share to help others. I subscribe to this thread and read every word Bill types!
Sanctimonious, patronizing advice was not what I was seeking. I am not the only one looking for this specific information.
Melting Slicks
Joined: Apr 2002
Posts: 2,631
Likes: 2
From: Clever, MO aka SOMO


Burning Brakes

Joined: Feb 2012
Posts: 901
Likes: 2
From: Palm City Fl
Posted on here a while back about getting error codes for ABS/TC/AH, shortly after they come in I get reduced engine power and then my throttle sticks at about 3800 to 4000 rpm. I have just been sitting at a light and had the throttle jump and stick. I have checked the wiring harness, grounds ( I know it isn't a ground problem but did it anyway) and checked the ECM connector to be fully connected. Found they are bolted in so I figured they must be connected. I am at a loss as to what to do. I never drive my car anymore because even on short trips this will happen 2 or 3 times where before it was only once in a while. Should be easier to find with it happening all the time now though, for someone who knows where to look that is. PLEASE HELP... I miss my car. BTW this is on an 02Z If no one has any suggestions does anyone know of a reputable (really really good) corvette tuner in south to central Florida that could help????Thanks for whatever help you can give.
Last edited by Lt. Dan M.; Feb 27, 2013 at 11:44 AM.
Corvette Stories
The Best of Corvette for Corvette Enthusiasts

Corvette ZR1X Will Be Pacing the Indy 500, And Could Probably Race, Too!
Verdad Gallardo
Top 10 Corvettes Coming to Mecum Indy 2026!
Brett Foote
Top 10 C9 Corvette MUST-HAVES to Fix These C8 Generation Flaws!
Michael S. Palmer
10 Revolutionary 'Corvette Firsts' Most People Don't Know
Joe Kucinski
5 Reasons to Upgrade to an LS6-Powered Corvette; 5 Reasons to Stay LT2
Michael S. Palmer
2027 Corvette vs The World: Every C8 vs Its Closest Competitor
Joe Kucinski
10 Most Common Corvette Problems of the Last 20 Years!
Joe Kucinski
5 MOST and 5 LEAST Popular Corvette Model Years in History!
Joe Kucinski
2027 Corvette Buyer's Guide: Everything You Need to Know!
Joe Kucinski
Cruising
Joined: Feb 2013
Posts: 10
Likes: 0
It seems like this has been covered, but just wondering if anyone can tell me what the problem may be... And/Or what ground wires to inspect/clean for traction control/abs problems. I get the code c1228 currently along with another that has to deal with the right rear tire (Edit: Just looked it up it was C1235, its not on now, but im sure it will come on since im writing this right after i got home from the shop after they cleared the codes). Was told to replace the hub, took it to a shop they hooked up a new one, and its still pulling the same code... Any help would be appreciated
Last edited by Take5; Feb 28, 2013 at 06:14 PM.


Intermediate
Joined: Jan 2013
Posts: 40
Likes: 0
From: Indy
I suck at doing FANCY web stuff! I may try to make this into a TECH TIP. I would have posted more pictures but the forum would not let me!  I have more info and pictures if anyone need them! Just e-mail me
bill327@msn.com
My 98 electrical issues are 98% solved!!! The only thing that is still kicking my A$% is a Fuel Level Sender problem. After I drive it for a while it goes to empty and I get DIC codes P0461 & P1431
I suspect it is a fuel level sender issue BUT is it the left or the right sensor?? The left one is $400. and the right one is $300.

 My luck it will be BOTH that are bad!!
To figure it out without using a TECH II, I have to remove both senders and do a resistance check on a full sweep of the float assembly!
Anybody else had this issue??
Bill
I have more info and pictures if anyone need them! Just e-mail mebill327@msn.com
My 98 electrical issues are 98% solved!!! The only thing that is still kicking my A$% is a Fuel Level Sender problem. After I drive it for a while it goes to empty and I get DIC codes P0461 & P1431
I suspect it is a fuel level sender issue BUT is it the left or the right sensor?? The left one is $400. and the right one is $300.
My luck it will be BOTH that are bad!!To figure it out without using a TECH II, I have to remove both senders and do a resistance check on a full sweep of the float assembly!
Anybody else had this issue??
Bill
I saw a thread somewhere (I believe CF) that discussed the false empty fuel issue.
There were pictures showing slight burns or corrosion on what looked like a rheostat in the fuel level sending unit in the fuel tank.
The solution was replacing the unit. It was also suggested to replace the unit in both tanks, expecting a similar result.
Also, regarding the communication back and forth between us regarding my thread "something draining battery"....I saw a thread on Corvette Action Center-C5 tech-sticky thread "C5 column lock debunked" , "part 1" and "part 2".
A professional video about batteries states that the battery for a C5 should have a "RC 120" (reserve capacity) and a "500 CCA" (cold cranking amps) minimum rating.
My Delco "Professional" battery only has a rating of "RC 90". Apparently this has to do with supporting the computer while the car sets un-started for a while. He also says to remove the negative ONLY battery cable when a car sets for a month or more.
Thanks for your help!
Intermediate
Joined: Jan 2013
Posts: 40
Likes: 0
From: Indy
I suck at doing FANCY web stuff! I may try to make this into a TECH TIP. I would have posted more pictures but the forum would not let me! I have more info and pictures if anyone need them! Just e-mail me
bill327@msn.com
My 98 electrical issues are 98% solved!!! The only thing that is still kicking my A$% is a Fuel Level Sender problem. After I drive it for a while it goes to empty and I get DIC codes P0461 & P1431
I suspect it is a fuel level sender issue BUT is it the left or the right sensor?? The left one is $400. and the right one is $300. My luck it will be BOTH that are bad!!
To figure it out without using a TECH II, I have to remove both senders and do a resistance check on a full sweep of the float assembly!
Anybody else had this issue??
Bill
I have more info and pictures if anyone need them! Just e-mail mebill327@msn.com
My 98 electrical issues are 98% solved!!! The only thing that is still kicking my A$% is a Fuel Level Sender problem. After I drive it for a while it goes to empty and I get DIC codes P0461 & P1431
I suspect it is a fuel level sender issue BUT is it the left or the right sensor?? The left one is $400. and the right one is $300.
My luck it will be BOTH that are bad!!To figure it out without using a TECH II, I have to remove both senders and do a resistance check on a full sweep of the float assembly!
Anybody else had this issue??
Bill
I saw a thread somewhere (I believe CF) that discussed the false empty fuel issue.
There were pictures showing slight burns or corrosion on what looked like a rheostat in the fuel level sending unit in the fuel tank.
The solution was replacing the unit. It was also suggested to replace the unit in both tanks, expecting a similar result.
Also, regarding the communication back and forth between us regarding my thread "something draining battery"....I saw a thread on Corvette Action Center-C5 tech-sticky thread "C5 column lock debunked" , "part 1" and "part 2".
A professional video about batteries states that the battery for a C5 should have a "RC 120" (reserve capacity) and a "500 CCA" (cold cranking amps) minimum rating.
My Delco "Professional" battery only has a rating of "RC 90". Apparently this has to do with supporting the computer while the car sets un-started for a while. He also says to remove the negative ONLY battery cable when a car sets for a month or more.
Thanks for your help!

5th Gear
Joined: Mar 2013
Posts: 5
Likes: 0
From: Pryor Okla.
Hi Bill,
I have just purchased a 1997 corvette and I am having some issues with all types of trouble codes and lights on (traction control,security,and ABS). I seen your post about the grounding points and cleaned all that I could find (2 under battery box, the ones on top of frame rail behind headlights) and drove the car all day the next day and the lights stayed off. My fuel gauge even started working again! Got in it Friday to go to town and all lights back on and fuel gauge not working again. If you have any addictional photos or input on this, it would be GREATLY APPRECATED if you could e-mail them to me @ dennisl945@netzero.net
I have just purchased a 1997 corvette and I am having some issues with all types of trouble codes and lights on (traction control,security,and ABS). I seen your post about the grounding points and cleaned all that I could find (2 under battery box, the ones on top of frame rail behind headlights) and drove the car all day the next day and the lights stayed off. My fuel gauge even started working again! Got in it Friday to go to town and all lights back on and fuel gauge not working again. If you have any addictional photos or input on this, it would be GREATLY APPRECATED if you could e-mail them to me @ dennisl945@netzero.net

Thread Starter
Tech Contributor


Joined: Dec 1999
Posts: 32,910
Likes: 2,402
From: Anthony TX
CI 6,7,8,9,11 Vet
St. Jude Donor '08
Without DTCs,, your not going to get much help. Please read and post the DTCs you have right now.
CLEAR ALL OF THEM after you read and post them.
When the engibe dies,,,,, without changing anything,,, carefully and safely read the DTCs and post what is displayed.
READING YOUR Engine Diagnostic Trouble Codes (DTC)
This procedure should be carried out any time you experience a problem with your C5. Most inexpensive store bought aftermarket code readers will ONLY read power train DTC�s. Reading the DTC�s with the C5 built in code reader will allow you to read ALL the modules in the vehicle.
The Diagnostic Display Mode is entered with the following procedure:
1) Turn on the ignition but don't start the engine.
2) Press the RESET button to turn off any warning messages. (i.e. door open, trunk open ect)
3) Press and hold the OPTIONS button
4) While holding OPTIONS, press FUEL button four times within a 10 -second period.
Initially, the on-board diagnostics go into an Automatic Mode which will cycle through each module and shows diagnostic codes in a pre-set sequence: PCM - TCS - RTD - BCM - IPC - RADIO - HVAC - LDCM - RDCM - SCM - RFA. All codes will be displayed for each module. ( i.e. PCM = 4 codes) If none are present in a given module, you will see No More Codes on the display.
There are two types of diagnostic codes, Current and History designated with a letter suffix, �C� or �H�. A current code indicates a malfunction is present in the module displaying data. A history code indicates a problem existed sometime in the last 40 or 50 ignition cycles. When not accompanied by a current code of the same number, it's potential evidence of a previous problem, now resolved, that was not removed by clearing the codes. More likely it's an indication of an intermittent malfunction.
Intermittent codes are the most challenging of the diagnostics. An intermittent code may have happened once, may have happened more than once but is inconsistent or may be happening on a regular basis but not at the time the codes are displayed. History codes can also be caused by a current malfunction in a system that is not operating at the time codes are displayed. An example is the rear window defogger which doesn't operate until the Body Control Module detects engine rpm. For history codes set by a module that does not operate with the key on and engine off, a special diagnostic tool called a Scan Tester is necessary to properly diagnose the malfunction.
Once the system has displayed all modules, it goes into the manual mode which allows selection of each module using combinations of Driver Information Center buttons. Manual mode can also be entered during the automatic sequence by pressing any button except E/M. Once the display shows Manual Diagnostics, select a module by pressing the OPTIONS button to go forward or the TRIP button to go back. Once a module is selected, a code is displayed, and if more than one are present; press GAGES to go forward or FUEL to go back.
To exit the diagnostic mode at any time, press E/M. If you want to erase codes in a given module, press RESET To reset the codes once in manual mode, press and hold RESET until it displays NO CODES Press OPTIONS to go to the next module. Repeat the steps until you have reset the codes in all the computer modules.
NOTE!! Only reset the codes IF you want to - it is NOT necessary to do this. Clearing a code does not repair a problem. You are simply erasing the evidence of it in the module's memory. If you clear the code/s, and extinguish the Check Engine Light, your emissions status ready will NOT allow you to pass an emissions test until you have completed the required driving cycles. There are a few body module DTC�s that if set will prevent the module from operating properly. Once the DTC is cleared, the module will return to full function. This is not true for power train DTCs.
If you have never read and cleared your codes, there will probably be a lot of old history DTCs. It is recommended that you clear your codes and see if any come back during a driving cycle. Those are the ones that you need to concentrate on diagnosing.
Once you have the codes, the next question is: What to do with the information?
First, consult the factory service manual. Any serious C5 Do-It-Yourself owner should invest in the Corvette Service Manual of the appropriate model year. The Service Manual is really a requirement if you want to understand and work on your C5.
NOTE and a WARNING. You can read the DTCs while the engine is running. I pull mine up all the time while driving.
WARNING. Don�t become distracted while reading DTCs while your driving and cause an accident!!!!! Use common sense and drive safe.
These are some very good C5 Diagnostic Trouble Code (DTC) explanation web sites!!! They also explain how to read the DTCs
Here are some very good sites that explain what DTC mean:
http://www.gearchatter.com/viewtopic11755.php
http://www.obd-codes.com/trouble_cod...d-ii-codes.php
Make sure to include the H or C suffix when you post your DTCs!!
5th Gear
Joined: Mar 2013
Posts: 5
Likes: 0
From: Pryor Okla.
Thank you very much for your input on the dtc's. I have my vette on jack stands now doing complete service on all fluids (motor oil,rear axle,trans.) brake pads,turn rotors etc. I will keep you informed when i find anything. Thanks again for your time Bill.
Melting Slicks

Joined: Aug 2006
Posts: 3,123
Likes: 116
From: North Dallas Forty Orange County, Ca.
St. Jude Donor '08-'09-'10-'11-'12-'13, '15,'21
For those of you who have C5's that have problems keeping the battery from going dead if you leave your car idle for a short period of time, here is a procedure that you can use to see if your car is drawing an excessive amount of battery current. The C5 corvette should be able to sit idle for weeks with out running down the battery far enough that it will not start.
If your car has a good battery and it depletes the battery in a few days or a week, use a DC Amp meter to measure the battery current draw when the car has entered the BCM sleep mode.
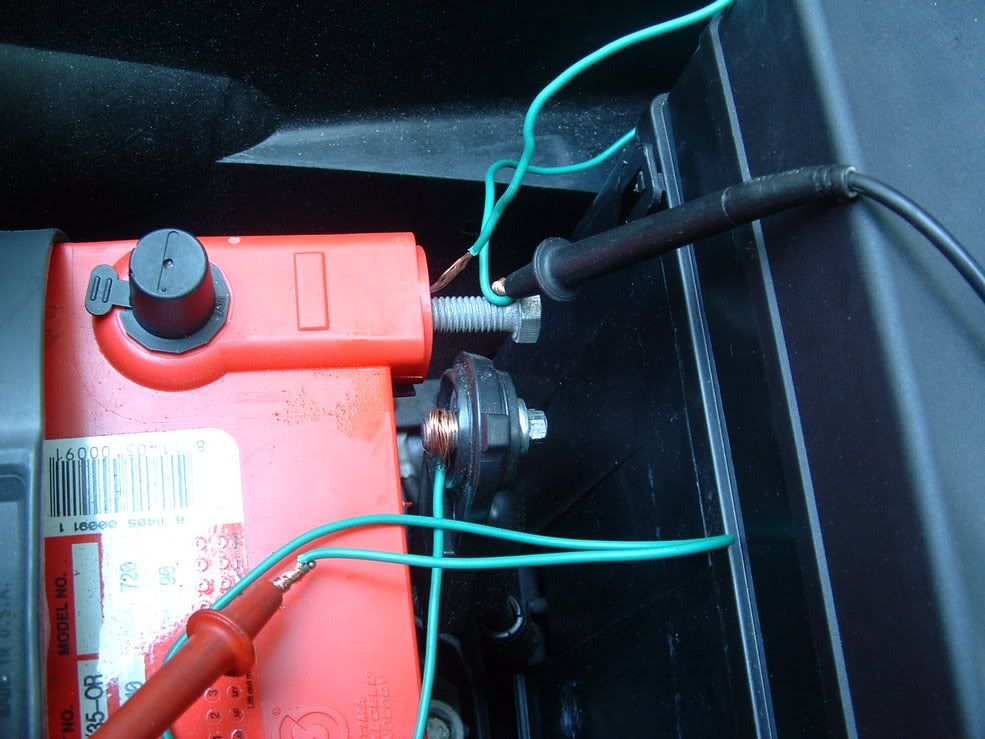
Once ALL of the cars loads are remove (ie doors shut, trunk shut, interior light off, radar detector and phone chargers removed etc, (make sure that you disconnect the under hood light), disconnect the battery NEGATIVE terminal. Connect a DC AMP METER capable of reading at least 10 amps in SERIES with the NEGATIVE battery terminal and the NEGATIVE battery cable. Once you connect the amp meter into the circuit, he car should power up and enter the "SLEEP MODE" with in a few minutes. It should not take longer than 10-15 minutes. If te car is in the RAP (retained acessory power) mode, it may take that entire 10-15 min to power down.
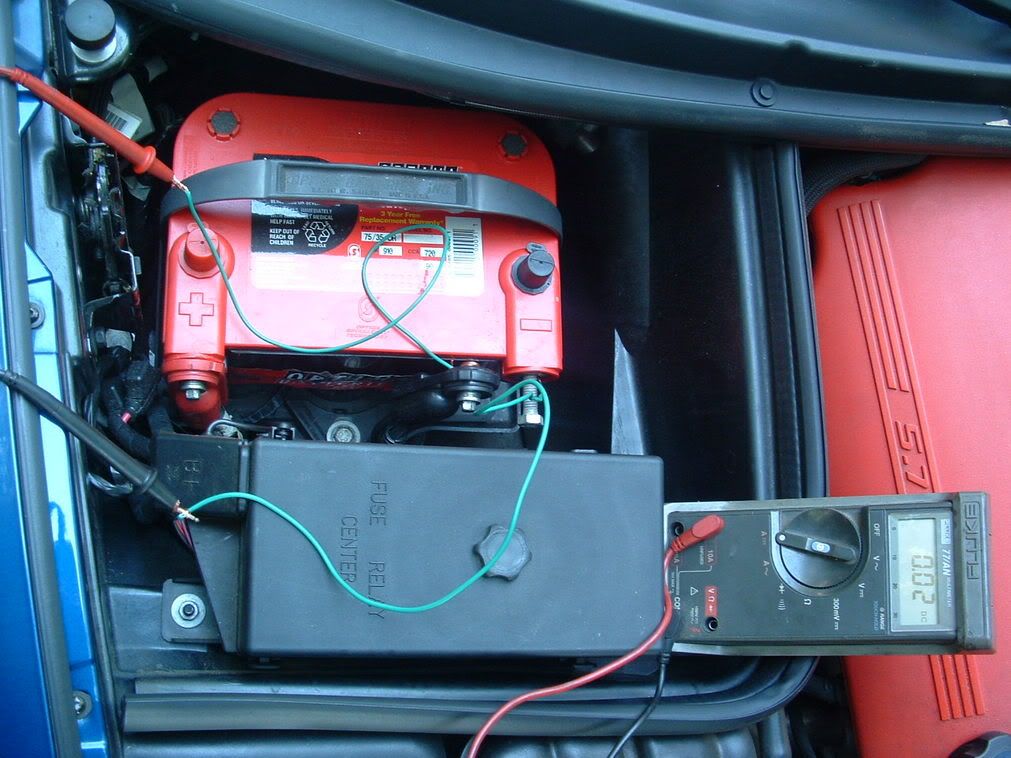
When you initially connect the AMP meter in the circuit, the current draw will be high. Some where around 8 amps. As the BCM determines that the car is secure, it will start dropping off loads and go into the SECURITY MODE and Sleep Mode. As it drops off loads you will see the battery current drop down from 8 amps to around 2-3 amps them in the milliamp range.
If there is a unwanted load, it could take up to 10-15 min for the current reading to settle out as low as it will go. The target reading will be 15-20 milliamperes. As you can see in the next photo, my 02 ZO6 draws .02 or 20 milliamperes.

With this small current draw and a properly charged battery in good condition, your C5 should be able to sit idle (without a battery tender or battery charger) for at least 3 weeks if not longer. My ZO6 has set idle for 30 days and started normally after that period.
C5's that drain batteries in days or a week have an excessive battery current draw issue. Here are a few places that have proven to be a cause of excessive battery current draw:
Drivers or Passengers seat control multifunction switch. The return spring in the switch gets weak or damaged and the seat sticks in a movement position. The motors are thermally protected by a "circuit breaker" in the passengers foot well and will continuously set and trip until the battery goes dead.
Drivers LUMBAR motor. Same as above!
Interior lights, dash lights, or other interior lights.
Head light motor control module. The module can short inside and draw current even though the lights are down and secure. If you feel the module and its HOT, its bad.
Alternator. The diodes can and do go bad. If hey go bad, the field windings will always be powered and draw current. If you suspect that the alternator is drawing current, remove the field terminal wire from the back of the alternator and insert the AMP Meter in SERIES with the circuit (between the red wire and alternator field terminal). The current draw should be ZERO. If you have current draw, one or more diodes are bad in the alternator. The last alternator that I checked this way was drawing 5 amps.
Bose Amplifier. Theres an amp under the dash on the drivers side dash. The relay for that amp sometimes sticks and the amp remains on even though the car is OFF.
Cell phones, radar detectors, wide band controllers ect... can get left plugged in.
NOTE! If you open the door, or trunk or even remove and then replace a fuse for troubleshooting, it will wake the car up and you will need to wait for it to enter the SLEEP mode again to read the current draw.
If you remove a BCM fuse, it will negate the test because the BCM is controlling the current draw.
Hope this helps figure out the reasons for premature battery failure.
Bill Curlee
If your car has a good battery and it depletes the battery in a few days or a week, use a DC Amp meter to measure the battery current draw when the car has entered the BCM sleep mode.
Once ALL of the cars loads are remove (ie doors shut, trunk shut, interior light off, radar detector and phone chargers removed etc, (make sure that you disconnect the under hood light), disconnect the battery NEGATIVE terminal. Connect a DC AMP METER capable of reading at least 10 amps in SERIES with the NEGATIVE battery terminal and the NEGATIVE battery cable. Once you connect the amp meter into the circuit, he car should power up and enter the "SLEEP MODE" with in a few minutes. It should not take longer than 10-15 minutes. If te car is in the RAP (retained acessory power) mode, it may take that entire 10-15 min to power down.
When you initially connect the AMP meter in the circuit, the current draw will be high. Some where around 8 amps. As the BCM determines that the car is secure, it will start dropping off loads and go into the SECURITY MODE and Sleep Mode. As it drops off loads you will see the battery current drop down from 8 amps to around 2-3 amps them in the milliamp range.
If there is a unwanted load, it could take up to 10-15 min for the current reading to settle out as low as it will go. The target reading will be 15-20 milliamperes. As you can see in the next photo, my 02 ZO6 draws .02 or 20 milliamperes.
With this small current draw and a properly charged battery in good condition, your C5 should be able to sit idle (without a battery tender or battery charger) for at least 3 weeks if not longer. My ZO6 has set idle for 30 days and started normally after that period.
C5's that drain batteries in days or a week have an excessive battery current draw issue. Here are a few places that have proven to be a cause of excessive battery current draw:
Drivers or Passengers seat control multifunction switch. The return spring in the switch gets weak or damaged and the seat sticks in a movement position. The motors are thermally protected by a "circuit breaker" in the passengers foot well and will continuously set and trip until the battery goes dead.
Drivers LUMBAR motor. Same as above!
Interior lights, dash lights, or other interior lights.
Head light motor control module. The module can short inside and draw current even though the lights are down and secure. If you feel the module and its HOT, its bad.
Alternator. The diodes can and do go bad. If hey go bad, the field windings will always be powered and draw current. If you suspect that the alternator is drawing current, remove the field terminal wire from the back of the alternator and insert the AMP Meter in SERIES with the circuit (between the red wire and alternator field terminal). The current draw should be ZERO. If you have current draw, one or more diodes are bad in the alternator. The last alternator that I checked this way was drawing 5 amps.
Bose Amplifier. Theres an amp under the dash on the drivers side dash. The relay for that amp sometimes sticks and the amp remains on even though the car is OFF.
Cell phones, radar detectors, wide band controllers ect... can get left plugged in.
NOTE! If you open the door, or trunk or even remove and then replace a fuse for troubleshooting, it will wake the car up and you will need to wait for it to enter the SLEEP mode again to read the current draw.
If you remove a BCM fuse, it will negate the test because the BCM is controlling the current draw.
Hope this helps figure out the reasons for premature battery failure.
Bill Curlee
My battery has been dying after 2-3 days so we placed an amp meter on the battery and there was a draw of 5 amps, even after 15 minutes this number did not change. We began to pull fuses, when we got to the BCM fuse (25 at the foot panel) that amps dropped to approximately 2.5 amps, pulling #27 and #29 got the amps downs to .298. Replaced all fuses and repeated the sequence above and the amps go down to .298 upon removal of the BCM fuse, with the other fuses now not resulting in any further drop.
If we pull all fuses in the floor panel and engine compartment fuse blocks we still can't get below this number, and now the key fob and tire sensor monitors are not working.
Suggestions??

Thread Starter
Tech Contributor
Joined: Dec 1999
Posts: 32,910
Likes: 2,402
From: Anthony TX
CI 6,7,8,9,11 Vet
St. Jude Donor '08
The BCM puts the car into sleep mode so you cant pull the BCM fuses and trouble shoot it correctly.
I agree,,, If you pull the BCM fuse and still have 300 milliamps,,,,,, something is not turning off. Disconnect the Passengers fuse box feed on the underhood fuse box B+ terminal and see if it goes away. If it does,, you can concentrate on those fuses and breakers.
Bill
I agree,,, If you pull the BCM fuse and still have 300 milliamps,,,,,, something is not turning off. Disconnect the Passengers fuse box feed on the underhood fuse box B+ terminal and see if it goes away. If it does,, you can concentrate on those fuses and breakers.
Bill
Hi Bill,
My battery has been dying after 2-3 days so we placed an amp meter on the battery and there was a draw of 5 amps, even after 15 minutes this number did not change. We began to pull fuses, when we got to the BCM fuse (25 at the foot panel) that amps dropped to approximately 2.5 amps, pulling #27 and #29 got the amps downs to .298. Replaced all fuses and repeated the sequence above and the amps go down to .298 upon removal of the BCM fuse, with the other fuses now not resulting in any further drop.
If we pull all fuses in the floor panel and engine compartment fuse blocks we still can't get below this number, and now the key fob and tire sensor monitors are not working.
Suggestions??