


IMPORTANT ELECTRICAL INFORMATION (Long!)
Le Mans Master


Joined: Mar 2007
Posts: 5,376
Likes: 11
From: Texas, Republic of Texas/ Founding Member NDCC
Hey Bill,
My 03 is giving me a little, no a big issue,,,it appears to be a ground according to the last Motorsport shop that looked at it.
It is fairly ok at idle and cruising but as soon as I put any load on it it feels like the old days when it would flood out and you let off and after awhile it clears up somewhat and you can cruise ok. The shop said the drivers side bank is going lean. They checked and replaced Plugs, Plug Wires, installed insulator boots around all plug wires so the don't melt on the headers, check the tune,did a leak down test, switched out coil packs, switched out injectors, checked engine grounds, and replaced fuel,,all to no avail,,it was getting very expensive so I pulled it from the shop so I could maybe do some looking on my own,,I read on here that the injector wiring where it runs to the back of the engine on drivers side had a bracket on the stock fuel rail where the electric lines would rub a whole in it and short out,,however i do not have those fuel rails any longer, mine has new fuel rails and there isn't anything to rub on, of course i guess that could still be the issue after all those wires are 10 years old and for 9 years probably were rubbing on that are of the fuel rail bracket.
As of 1-1-13, my engine is LS1 all forged pistons , rods, alum block, etc, I have an A&A Vortec V3 SI super charger with a 3.4 pulley, large cam 232/236/630 lift/112 lsa,10 ov lap, I also have the Kenny Bell Boost a Pump, and the A&A 800hp fuel system, the boost a pump is wired to put a continuous 17 volts out. At WOT the boost is at 10lbs.
We are doing a repair Get together Saturday morning at one of our club members house and would like to get some ideas where to go next,,two of our guys are electrical intelligent, but were wondering if you have ran across anything that may be simple to check without having to tear the car all apart. Oh one other note,,My small radiator hose that goes from the right side top radiator to the small inlet at the drivers side head was rubbing on the electric water pump and wore a whole in it leaking antifreeze down in front,,not sure if this had anything to do with it or not, but the motorsport place said they doubted it.
Thank you for taking the time to read.
Last edited by Dirty Harry; Aug 15, 2013 at 06:15 PM.

Thread Starter
Tech Contributor


Joined: Dec 1999
Posts: 32,910
Likes: 2,402
From: Anthony TX
CI 6,7,8,9,11 Vet
St. Jude Donor '08
Hey Bill,
My 03 is giving me a little, no a big issue,,,it appears to be a ground according to the last Motorsport shop that looked at it.
It is fairly ok at idle and cruising but as soon as I put any load on it it feels like the old days when it would flood out and you let off and after awhile it clears up somewhat and you can cruise ok. The shop said the drivers side bank is going lean. They checked and replaced Plugs, Plug Wires, installed insulator boots around all plug wires so the don't melt on the headers, check the tune,did a leak down test, switched out coil packs, switched out injectors, checked engine grounds, and replaced fuel,,all to no avail,,it was getting very expensive so I pulled it from the shop so I could maybe do some looking on my own,,I read on here that the injector wiring where it runs to the back of the engine on drivers side had a bracket on the stock fuel rail where the electric lines would rub a whole in it and short out,,however i do not have those fuel rails any longer, mine has new fuel rails and there isn't anything to rub on, of course i guess that could still be the issue after all those wires are 10 years old and for 9 years probably were rubbing on that are of the fuel rail bracket.
As of 1-1-13, my engine is LS1 all forged pistons , rods, alum block, etc, I have an A&A Vortec V3 SI super charger with a 3.4 pulley, large cam 232/236/630 lift/112 lsa,10 ov lap, I also have the Kenny Bell Boost a Pump, and the A&A 800hp fuel system, the boost a pump is wired to put a continuous 17 volts out. At WOT the boost is at 10lbs.
We are doing a repair Get together Saturday morning at one of our club members house and would like to get some ideas where to go next,,two of our guys are electrical intelligent, but were wondering if you have ran across anything that may be simple to check without having to tear the car all apart. Oh one other note,,My small radiator hose that goes from the right side top radiator to the small inlet at the drivers side head was rubbing on the electric water pump and wore a whole in it leaking antifreeze down in front,,not sure if this had anything to do with it or not, but the motorsport place said they doubted it.
Thank you for taking the time to read.
My 03 is giving me a little, no a big issue,,,it appears to be a ground according to the last Motorsport shop that looked at it.
It is fairly ok at idle and cruising but as soon as I put any load on it it feels like the old days when it would flood out and you let off and after awhile it clears up somewhat and you can cruise ok. The shop said the drivers side bank is going lean. They checked and replaced Plugs, Plug Wires, installed insulator boots around all plug wires so the don't melt on the headers, check the tune,did a leak down test, switched out coil packs, switched out injectors, checked engine grounds, and replaced fuel,,all to no avail,,it was getting very expensive so I pulled it from the shop so I could maybe do some looking on my own,,I read on here that the injector wiring where it runs to the back of the engine on drivers side had a bracket on the stock fuel rail where the electric lines would rub a whole in it and short out,,however i do not have those fuel rails any longer, mine has new fuel rails and there isn't anything to rub on, of course i guess that could still be the issue after all those wires are 10 years old and for 9 years probably were rubbing on that are of the fuel rail bracket.
As of 1-1-13, my engine is LS1 all forged pistons , rods, alum block, etc, I have an A&A Vortec V3 SI super charger with a 3.4 pulley, large cam 232/236/630 lift/112 lsa,10 ov lap, I also have the Kenny Bell Boost a Pump, and the A&A 800hp fuel system, the boost a pump is wired to put a continuous 17 volts out. At WOT the boost is at 10lbs.
We are doing a repair Get together Saturday morning at one of our club members house and would like to get some ideas where to go next,,two of our guys are electrical intelligent, but were wondering if you have ran across anything that may be simple to check without having to tear the car all apart. Oh one other note,,My small radiator hose that goes from the right side top radiator to the small inlet at the drivers side head was rubbing on the electric water pump and wore a whole in it leaking antifreeze down in front,,not sure if this had anything to do with it or not, but the motorsport place said they doubted it.
Thank you for taking the time to read.
 WOW!! I bet it was EXPENSIVE!
If I typed out all that I have to tell you, i would need bandages for the blisters
 So,,,,,,,,,,, that being said
CALL ME!
 PM Sent
 Bill
Le Mans Master
Joined: Mar 2007
Posts: 5,376
Likes: 11
From: Texas, Republic of Texas/ Founding Member NDCC
Yes it gets very expensive at $100 an hour and then they come back and say , "well we haven't found anything yet" this is after 10 hours
I just had to pull it out of the shop and try to locate the issue with the help of my car club buds tomorrow. Yes I do get detailed when I start typing  But I try to put it all out there
Call you in a bit, it is 9:15 am here, don't want to hit you up to early
Thread Starter
Tech Contributor
Joined: Dec 1999
Posts: 32,910
Likes: 2,402
From: Anthony TX
CI 6,7,8,9,11 Vet
St. Jude Donor '08
Lets put this dielectric grease thing to bed in this post for good. My 2 cents mind you..Dielectric Grease is an INSULATOR! IT DOES NOT conduct electricity!
SO,,,,, if you have a connection inside a connector that is compromised and you slather grease into the connector, you just made the issue WORSE!
On the other side of the coin; IF,, all of the electrical connections are 100% properly in contact, dielectric compounds should not have any effect on the proper electrical connections.
Yes it isolates the connection from oxidation and moisture. YES, it can isolate the connection from making an electrical connection!
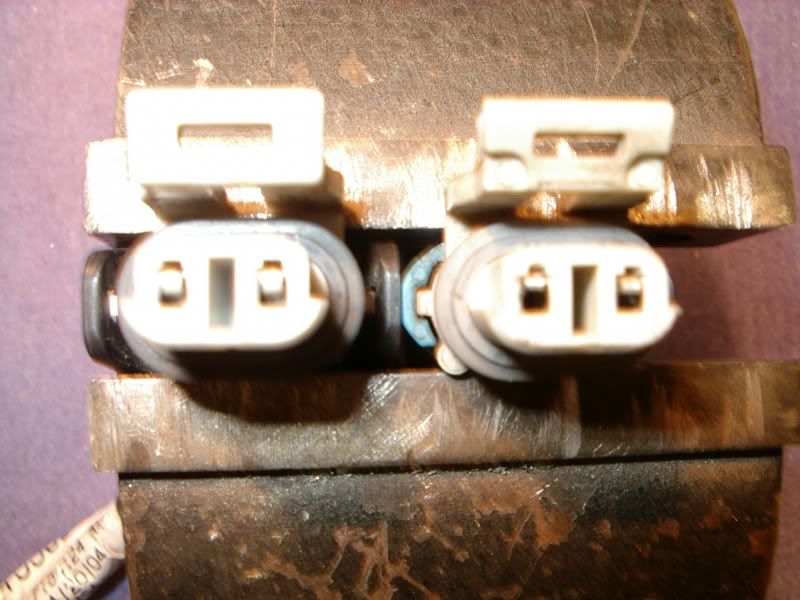
Here lies the issue. The female pins inside our weather tight and non weather tight connectors have a tendency to bend and spread. When they spread, they make a less than adequate connection which results in a high resistance or intermittent connection. Just because a connector is pristine clean, DOES NOT mean that it is making a good electrical connection. If the female pin/s are damaged, it is still bad.
Here is a prime example of brand new and bad spread contacts. The connector on the LEFT is brand new. The one on the RIGHT is old and has spread female contacts. This wheel speed connector had intermittent contacts from the connector on the right and any vibration would cause it to loose connection, It failed the pin pull test horribly! The female pin on the left of the OLD bad connector would allow the male pin to just fall out when it was inserted.

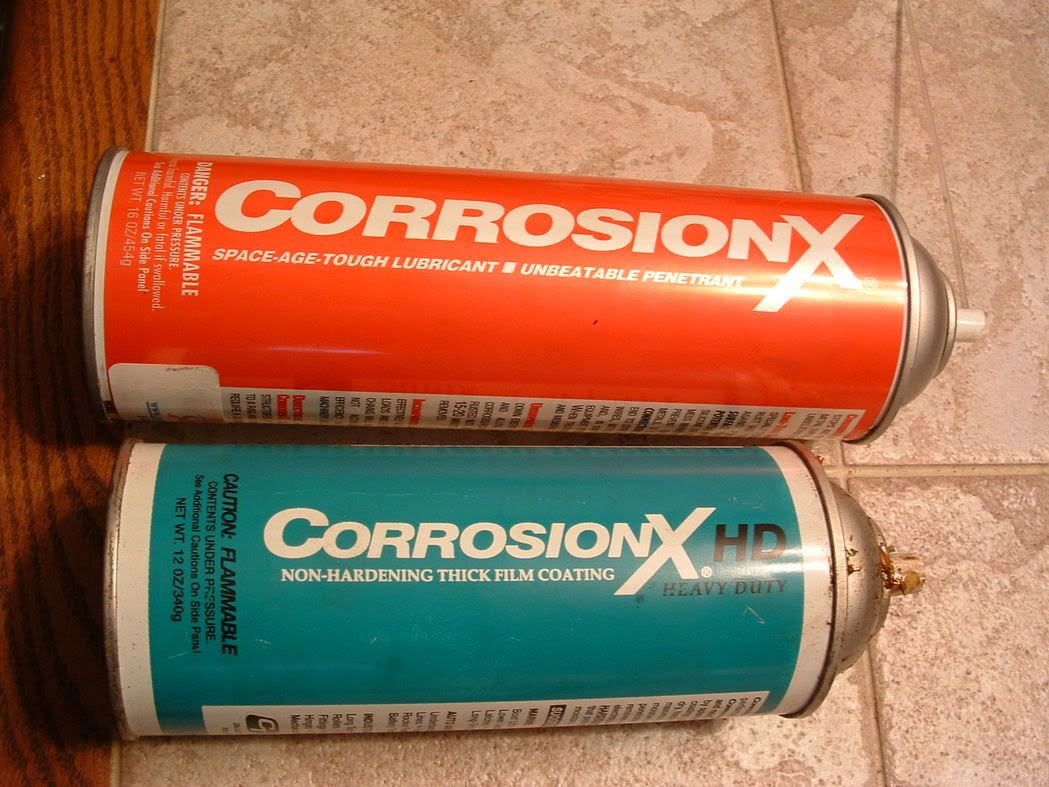
Thats where using dielectric grease can degrade the connection. Here is what I use on sound electrical connections:

Last edited by Bill Curlee; Aug 18, 2013 at 09:17 AM.
Le Mans Master
Joined: Mar 2007
Posts: 5,376
Likes: 11
From: Texas, Republic of Texas/ Founding Member NDCC
Lets put this dielectric grease thing to bed in this post for good. My 2 cents mind you..Dielectric Grease is an INSULATOR! IT DOES NOT conduct electricity!
SO,,,,, if you have a connection inside a connector that is compromised and you slather grease into the connector, you just made the issue WORSE!
On the other side of the coin; IF,, all of the electrical connections are 100% properly in contact, dielectric compounds should not have any effect on the proper electrical connections.
Yes it isolates the connection from oxidation and moisture. YES, it can isolate the connection from making an electrical connection!
Here lies the issue. The female pins inside our weather tight and non weather tight connectors have a tendency to bend and spread. When they spread, they make a less than adequate connection which results in a high resistance or intermittent connection. Just because a connector is pristine clean, DOES NOT mean that it is making a good electrical connection. If the female pin/s are damaged, it is still bad.
Here is a prime example of brand new and bad spread contacts. The connector on the LEFT is brand new. The one on the RIGHT is old and has spread female contacts. This wheel speed connector had intermittent contacts from the connector on the right and any vibration would cause it to loose connection, It failed the pin pull test horribly! The female pin on the left of the OLD bad connector would allow the male pin to just fall out when it was inserted.
Thats where using dielectric grease can degrade the connection. Here is what I use on sound electrical connections:
Instructor


Joined: Jun 2011
Posts: 201
Likes: 0
From: Virginia
Started having Charging Issues again last night. ABS and traction control engaged during some hard braking and cornering last night, at which point my voltage started to drop. DIC is showing code P1637 and voltage reading on the DIC is around 11.1-11.4. I recently cleaned the connections at the starter solenoid when I replaced the solenoid about a month ago, and rechecked them today to ensure they were tight which they were. When I bridged the connection between the battery and alternator with jumper cables, the DIC voltage reading went from 11.4 to 14.0. As soon as I removed the jumper cables, voltage dropped back down to 11.4. This leads me to believe the "big 3" upgrade from SacCity Corvette would cure my issue. Could I be correct in my assumption?
Corvette Stories
The Best of Corvette for Corvette Enthusiasts

Top 10 Most Expensive Corvettes Ever Sold on Bring A Trailer
Brett Foote
10 Things Every Corvette Owner Needs (2026 Edition)
Michael S. Palmer
8 Most "Only Corvette Owners Understand" Quirks and Problems
Pouria Savadkouei
10 Reasons the C6 Z06 is Still A Performance Benchmark After 20 Years
Joe Kucinski
How Much Horsepower Every Corvette Engine "LOST" in 1972
Joe Kucinski
Top 10 DOs and DON'Ts for Protecting Your Convertible Top!
Michael S. Palmer
Top 10 Most Explosive Corvettes Ever Made: Power-to-Weight Ratio Ranked!
Joe Kucinski
150 hp to 1,250 hp: Every Corvette Generation Compared by the Specs That Matter
Joe Kucinski
8 Coolest Corvette Pace Cars (and Replicas) of All Time
Verdad Gallardo
Thread Starter
Tech Contributor
Joined: Dec 1999
Posts: 32,910
Likes: 2,402
From: Anthony TX
CI 6,7,8,9,11 Vet
St. Jude Donor '08
Started having Charging Issues again last night. ABS and traction control engaged during some hard braking and cornering last night, at which point my voltage started to drop. DIC is showing code P1637 and voltage reading on the DIC is around 11.1-11.4. I recently cleaned the connections at the starter solenoid when I replaced the solenoid about a month ago, and rechecked them today to ensure they were tight which they were. When I bridged the connection between the battery and alternator with jumper cables, the DIC voltage reading went from 11.4 to 14.0. As soon as I removed the jumper cables, voltage dropped back down to 11.4. This leads me to believe the "big 3" upgrade from SacCity Corvette would cure my issue. Could I be correct in my assumption?
Your STOCK wiring will easily provide you all you need for normal everyday charging You DO NOT need any larger wires!
FIX WHATS WRONG! Something between the battery and alternator is LOOSE, CORRODED, BURNT, DAMAGED or DEFECTIVE.
That wire goes from the battery to the solenoid, thru a fusable link to the alternator. Recommend that you look and find the issue and fix it.
BC
Instructor
Joined: Jun 2011
Posts: 201
Likes: 0
From: Virginia
NO,,,,, NO & NO!!!!!!!!!!!!!!!
Your STOCK wiring will easily provide you all you need for normal everyday charging You DO NOT need any larger wires!
FIX WHATS WRONG! Something between the battery and alternator is LOOSE, CORRODED, BURNT, DAMAGED or DEFECTIVE.
That wire goes from the battery to the solenoid, thru a fusable link to the alternator. Recommend that you look and find the issue and fix it.
BC
Last edited by CeeRow; Aug 18, 2013 at 11:35 PM.
Thread Starter
Tech Contributor
Joined: Dec 1999
Posts: 32,910
Likes: 2,402
From: Anthony TX
CI 6,7,8,9,11 Vet
St. Jude Donor '08
Heres your charging schematic.. Pin D on the top connector and the BATT terminal on the back of the alternator should read full battery voltage with the engine OFF.
They have fuse links inside the wiring near the solenoid.

BC
They have fuse links inside the wiring near the solenoid.
BC

Thread Starter
Tech Contributor
Joined: Dec 1999
Posts: 32,910
Likes: 2,402
From: Anthony TX
CI 6,7,8,9,11 Vet
St. Jude Donor '08
Always conduct a pin pull test on female pins.
If you INSERT and REMOVE a spare new male pin (same size as the male pin in the connector) into the female pin, there should be a firm resistance going in and firm resistance pulling out.
If not, repair the female pin or replace the female connector.
I always connect and disconnect the connector a couple times and then recheck the female pins.
For those of you that get flustrated with the multipin non water tight ground connectors on the frame rail that corrode all the time; Just hack the connector off, combime the ground wires into one single eyelet and ground that to the ground stud!
 Problem SOLVED!
Thats what the a GM Engineer told me to do to those connectors way back when in 2001
Guess how the C6 2005-2013 frame ground are constructed????

ALL THE GROUND WIRES IN ONE EYELET!
They figured out EARLY in the C5 days that they made a mistake using a non water tight connections with pins inside!!
BC
Instructor
Joined: Jun 2011
Posts: 201
Likes: 0
From: Virginia
Thanks again Bill. Traced the problem to a loose connector. 14.1 volts on DIC right away after I fired her up. Now I'll be able to drive to Carlisle this weekend.

Burning Brakes

Joined: Feb 2012
Posts: 901
Likes: 2
From: Palm City Fl
I have not posted on here in a while. I have been fighting a problem with my throttle sticking at around 3800 rpm every time I drove the car (02 Z06). Also I have all the touble lighst for ABS, AH and TC, which are now locked in all the time. I got so fed up that I pretty much just quit driving it. I figured since I wasn't driving it I should put a battery tender on it. After about 3 weeks with it on the tender I took it for a drive. I had no thorttle issue at all, but still have the break trouble lights on with no codes. The battery was replaced in 05, but never gave me any troubles. I figured I might as well replace it before it did. Since I have replaced the battery I have put a few hundred miles on the car with no throuttle issues. It doesn't make much sense to me that it was the battery, but I have no other expliation for it. I can't help but think that somehow my break issue was also tied to the battery, but it has not cleared up. It used to come and go, just as the throttle sticking did. In fact, they would come in within seconds of each other. The break lights have been on solid for months now. I am wondering if the battery was shorting internally, draging the voltage down and messing up the modules? If so, I wonder if the voltage spiking had damaged the break module? I know there is a test using a jumper to verify the pump is working, that I have not done yet, but will do next. Anyway, just thought maybe this might help someone else. From now on when I start getting intermitent electronic problems, the battery is the first place I am going. I also had some issues with the wife's 99 coupe that went away after replacing the battery. Hope this is useful to someone. 
Thread Starter
Tech Contributor
Joined: Dec 1999
Posts: 32,910
Likes: 2,402
From: Anthony TX
CI 6,7,8,9,11 Vet
St. Jude Donor '08
TROUBLE LIGHTS FOR ABS?? Exactly what trouble lights???
Do you mean messages in the DIC? If so, what messages?
If you have messages and if you have any issues with the ABS AH or TC, you have DTCs
How and when are you checking your DTCs. You MUST check the EBTCM within the same ignition cycle that the issue happens in. In other words, when you have the issue, without turning OFF the ignition READ THE DTCs using the internal code reader.
READING YOUR Engine Diagnostic Codes (DTCs)
The Diagnostic Display Mode is entered with the following procedure:
1) Turn on the ignition but don't start the engine.
2) Press the RESET button to turn off any warning messages. (i.e. door open, trunk open etc�)
3) Press and hold OPTIONS
4) While holding OPTIONS, press FUEL four times within a 10-second period.
Initially, on-board diagnostics go into an Automatic Mode which shows diagnostic codes in a pre-set sequence: PCM - TCS - RTD - BCM - IPC - RADIO - HVAC - LDCM - RDCM - SCM - RFA. All codes will be displayed for each. ( i.e. PCM = 4 codes)
If none are present in a given module, you will see No More Codes on the display.
There are two kinds of diagnostic codes, Current and History designated with a letter suffix, C or ;H. A current code indicates a malfunction is present in the module displaying data. A history code indicates a problem existed sometime in the last 40 or 50 ignition cycles. When not accompanied by a current code of the same number, it's potential evidence of a previous problem, now resolved, that was not removed by clearing the codes.
More likely it's an indication of an intermittent malfunction.
Intermittent codes are the most challenging of the diagnostics. An intermittent code may have happened once, may have happened more than once but is inconsistent or may be happening on a regular basis but not at the time the codes are displayed. History codes can also be caused by a current malfunction in a system that is not operating at the time codes are displayed. An example is the rear window defogger which doesn't operate until the Body Control Module detects engine rpm. For history codes set by a module that does not operate with the key on and engine off, a special diagnostic tool called a Scan Tester is necessary to properly diagnose the malfunction.
Once the system has displayed all modules, it goes into the manual mode which allows selection of each module using combinations of Driver Information Center buttons. Manual mode can also be entered during the automatic sequence by pressing any button except E/M. Once the display shows Manual Diagnostics, select a module by pressing the OPTIONS button to go forward or the TRIP button to go back. Once a module is selected, a code is displayed, and if more than one are present;
press GAGES to go forward or FUEL to go back.
To exit the diagnostic mode at any time, press E/M. If you want to erase codes in a given module, press RESET
To reset the codes once in manual mode, press and hold RESET until it displays NO CODES Press OPTIONS to go to the next module. Repeat the steps until you have reset the codes in all the computer modules.
NOTE!! Only reset the codes IF you want to - it is NOT necessary to do this. Clearing a code does not repair a problem. You are simply erasing the evidence of it in the module's memory. If you clear the code/s, and extinguish the Check Engine Light, your emissions status ready will NOT allow you to pass an emissions test until you have completed the required driving cycles.
Once you have the codes, the next question is: What to do with the information?
First, consult the factory service manual. Any serious C5 Do-It-Yourself owner should invest in the Corvette Service Manual of the appropriate model year. The Service Manual is really a requirement if you want to understand and work on your C5.
Here is very good site of DTC definitions:
http://www.gearchatter.com
Make sure to include the H or C suffix!!
Thread Starter
Tech Contributor
Joined: Dec 1999
Posts: 32,910
Likes: 2,402
From: Anthony TX
CI 6,7,8,9,11 Vet
St. Jude Donor '08
STUCK THROTTLE????
GM goes thru great strides to insure that the throttle blade on the engine will NOT be able to STICK in one position and have the engine continue to run.
If the throttle position sensor and the accelerator position peddle position sensor disagree ANY, the PCM will go into reduced engine power mode and you will be lucky if you can limp along at 3 MPH.
If it is acting like cruise control, the accelerator peddle or the Accelerator position sensor is sticking and telling the throttle to open the throttle.
IF,,,,,,,,,,,,,,,,,,,, you have a vacuum leak, that could allow unmetered air around the throttle and the engine could rev up but I couldnt see it running correctly like that.
Bill
Burning Brakes
Joined: Feb 2012
Posts: 901
Likes: 2
From: Palm City Fl
Bill, thanks for your reply. The brake lights I speak of are the dash lights for TC &ABS. The messages come up every time the ignition is turned on, even without starting the car. The messages are: Service TC, Service ABS and Service AH. I have checked for DTCs and there are none. The problem used to come and go, but is constant now.
As far as the throttle issue, I would first get the Reduced Engine Power, then seconds latter the engine would rev to around 3800 RPM and be locked there. If you had the clutch in it was instantly at 3800, but if you we're driving it would slowly rev up till it got there. There was no throttle response at all. As soon as I cleared the codes the throttle went back to normal. As stated, since I replaced the battery I have had no further throttle issues.
As far as the throttle issue, I would first get the Reduced Engine Power, then seconds latter the engine would rev to around 3800 RPM and be locked there. If you had the clutch in it was instantly at 3800, but if you we're driving it would slowly rev up till it got there. There was no throttle response at all. As soon as I cleared the codes the throttle went back to normal. As stated, since I replaced the battery I have had no further throttle issues.