





Corvette V12?
Pro


Joined: Oct 2011
Posts: 554
Likes: 82
From: San Jose CA

Richard, great project, kudos and my hat is off to you. I am really interested in how the car drives and performs, I think you will have a real winner with silky smooth V12 power.
There was some mention of Jag V12s in this thread, if anyone is interested there is a very interesting project currently going on in the Jag world. In the mid 1960s Jaguar set out to build a 12 cylinder LeMans race car. By the time the first prototype was completed in 1966 it was obsolete due to rules changes and only that one car was built, the XJ13. In my opinion it one is of the most beautiful cars ever made but I will admit to some bias cuz I like Jags. The car was pretty much destroyed in a crash when a wheel failed at speed in the early '70s but it was later rebuilt with some minor changes.
Recently a fellow with a history of racing Jags, Neville Swales, set out to re-create the XJK13 in its original 1966 form. There are replica kits available and some of them are pretty nice, but nothing compared to Neville's undertaking. The best thing about the project is that he was actually able to acquire one of the original quad cam V12 engines developed for the project and it will go in his car, which will not be a showpiece when finished, he plans to vintage race it.
Neville has a great blog and is worth a visit:
http://www.xj13.eu/XJ13/#.VNo_Y_nF_pc
Here is a photo of the XJ13 in its post restoration form:
There was some mention of Jag V12s in this thread, if anyone is interested there is a very interesting project currently going on in the Jag world. In the mid 1960s Jaguar set out to build a 12 cylinder LeMans race car. By the time the first prototype was completed in 1966 it was obsolete due to rules changes and only that one car was built, the XJ13. In my opinion it one is of the most beautiful cars ever made but I will admit to some bias cuz I like Jags. The car was pretty much destroyed in a crash when a wheel failed at speed in the early '70s but it was later rebuilt with some minor changes.
Recently a fellow with a history of racing Jags, Neville Swales, set out to re-create the XJK13 in its original 1966 form. There are replica kits available and some of them are pretty nice, but nothing compared to Neville's undertaking. The best thing about the project is that he was actually able to acquire one of the original quad cam V12 engines developed for the project and it will go in his car, which will not be a showpiece when finished, he plans to vintage race it.
Neville has a great blog and is worth a visit:
http://www.xj13.eu/XJ13/#.VNo_Y_nF_pc
Here is a photo of the XJ13 in its post restoration form:
Thread Starter
Le Mans Master


Joined: May 2003
Posts: 8,881
Likes: 3,558
From: Fernandina Beach FL
2023 Restomod of the Year finalist
2020 C3 of the Year Winner - Modified
THANKS Guys!!!
Jim-
I'm hoping as well - it's silky smooth!!!
I saw this video on this engine used for a re-creation-
I finally had a good nights sleep after it started up....I was like dreaming about sensors and cranking pulse widths!!!
I'm on track for the Hot Rod Power Tour!!!!
Trying to knock out all the wiring- laid out a plan for the car and just started cutting-stripping-crimping-soldering-heat shrinking.....
Here's my ignition/start/ECU fuse /relay set-up.
Have the big current pullers shut down while cranking- AC/fans/lights
Also added a timer circuit- so after I shut down the car- Power Windows/lights/Misc- will work (adjustable) up to 15 minutes.
Yes- I will professionally label the relays/fuses!!! Also definitely going to run the LED fuses- when they blow they light up.
 ECU fuse panel by richardhayes454, on Flickr
 DSCN5030 by richardhayes454, on Flickr
 DSCN5029 by richardhayes454, on Flickr
Jim-
I'm hoping as well - it's silky smooth!!!
I saw this video on this engine used for a re-creation-
I finally had a good nights sleep after it started up....I was like dreaming about sensors and cranking pulse widths!!!
I'm on track for the Hot Rod Power Tour!!!!
Trying to knock out all the wiring- laid out a plan for the car and just started cutting-stripping-crimping-soldering-heat shrinking.....
Here's my ignition/start/ECU fuse /relay set-up.
Have the big current pullers shut down while cranking- AC/fans/lights
Also added a timer circuit- so after I shut down the car- Power Windows/lights/Misc- will work (adjustable) up to 15 minutes.
Yes- I will professionally label the relays/fuses!!! Also definitely going to run the LED fuses- when they blow they light up.
ECU fuse panel by richardhayes454, on FlickrDSCN5030 by richardhayes454, on FlickrDSCN5029 by richardhayes454, on Flickr
Pro
Joined: Oct 2011
Posts: 554
Likes: 82
From: San Jose CA
[quote=Richard454;1588948113]THANKS Guys!!!
Jim-
I'm hoping as well - it's silky smooth!!!
I saw this video on this engine used for a re-creation-
I finally had a good nights sleep after it started up....I was like dreaming about sensors and cranking pulse widths!!!
I'm on track for the Hot Rod Power Tour!!!!
Trying to knock out all the wiring- laid out a plan for the car and just started cutting-stripping-crimping-soldering-heat shrinking.....
Here's my ignition/start/ECU fuse /relay set-up.
Have the big current pullers shut down while cranking- AC/fans/lights
Also added a timer circuit- so after I shut down the car- Power Windows/lights/Misc- will work (adjustable) up to 15 minutes.
Yes- I will professionally label the relays/fuses!!! Also definitely going to run the LED fuses- when they blow they light up.
Here is another one, I'll bet your smile was just about as wide as Nevilles. >
Great work, Richard.
Jim-
I'm hoping as well - it's silky smooth!!!
I saw this video on this engine used for a re-creation-
I finally had a good nights sleep after it started up....I was like dreaming about sensors and cranking pulse widths!!!
I'm on track for the Hot Rod Power Tour!!!!
Trying to knock out all the wiring- laid out a plan for the car and just started cutting-stripping-crimping-soldering-heat shrinking.....
Here's my ignition/start/ECU fuse /relay set-up.
Have the big current pullers shut down while cranking- AC/fans/lights
Also added a timer circuit- so after I shut down the car- Power Windows/lights/Misc- will work (adjustable) up to 15 minutes.
Yes- I will professionally label the relays/fuses!!! Also definitely going to run the LED fuses- when they blow they light up.
Here is another one, I'll bet your smile was just about as wide as Nevilles. >
Great work, Richard.
Last edited by Jim__H; Feb 13, 2015 at 10:40 AM.
Thread Starter
Le Mans Master
Joined: May 2003
Posts: 8,881
Likes: 3,558
From: Fernandina Beach FL
2023 Restomod of the Year finalist
2020 C3 of the Year Winner - Modified
Again- thanks guys- sort helps keep me motivated!!!
Quick update- I'm still on track to do the Hot Rod Power Tour this June- have my hotels booked!!!
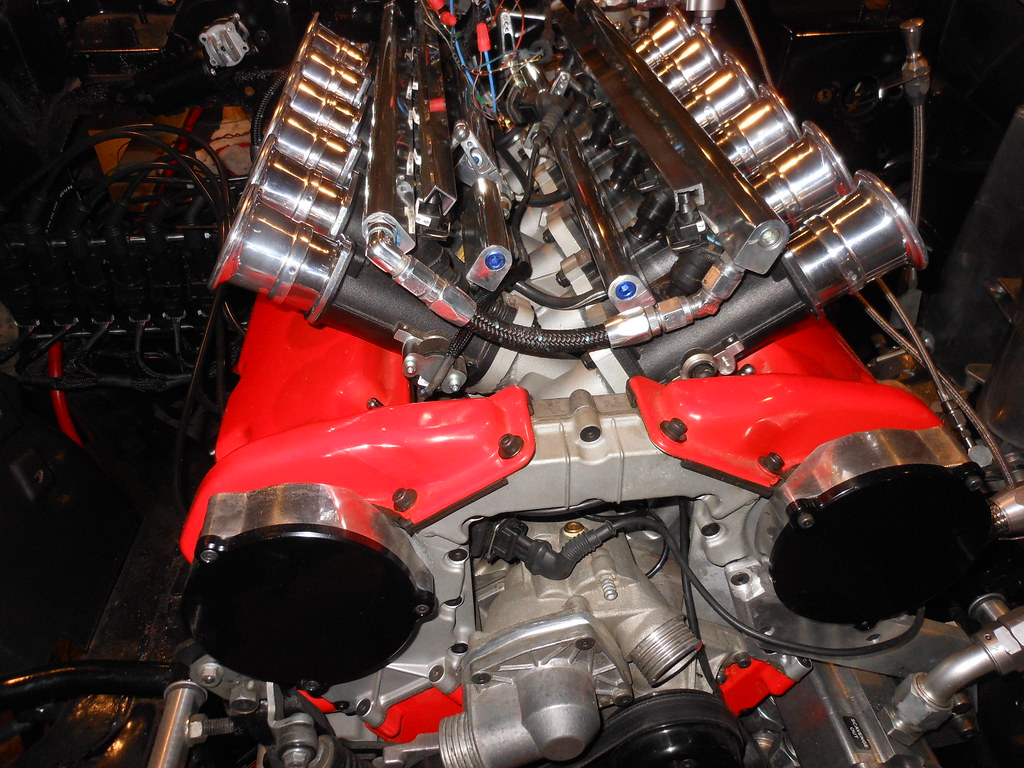
Here's the engine- starting to look like I want it to- clean- wires hidden- nice and shiny...need more aluminum polish!!
I used some aluminum u channels - hit it with the buffing wheel and neatened up the injector wiring- now it's all hidden- Going to make some endcaps for them, Couple more wires to relocate under the intakes- and get rid of the blue endcaps...
Got the coil packs all relocated- made the sparkplug wires...Next I'll make a cover to conceal the coils.
Bolt in the pedals- steering column- driveshaft and see if it can move under it's own power!!!
 DSCN5053 by richardhayes454, on Flickr
 DSCN5054 by richardhayes454, on Flickr
Just for reference- here was the engine to start with-
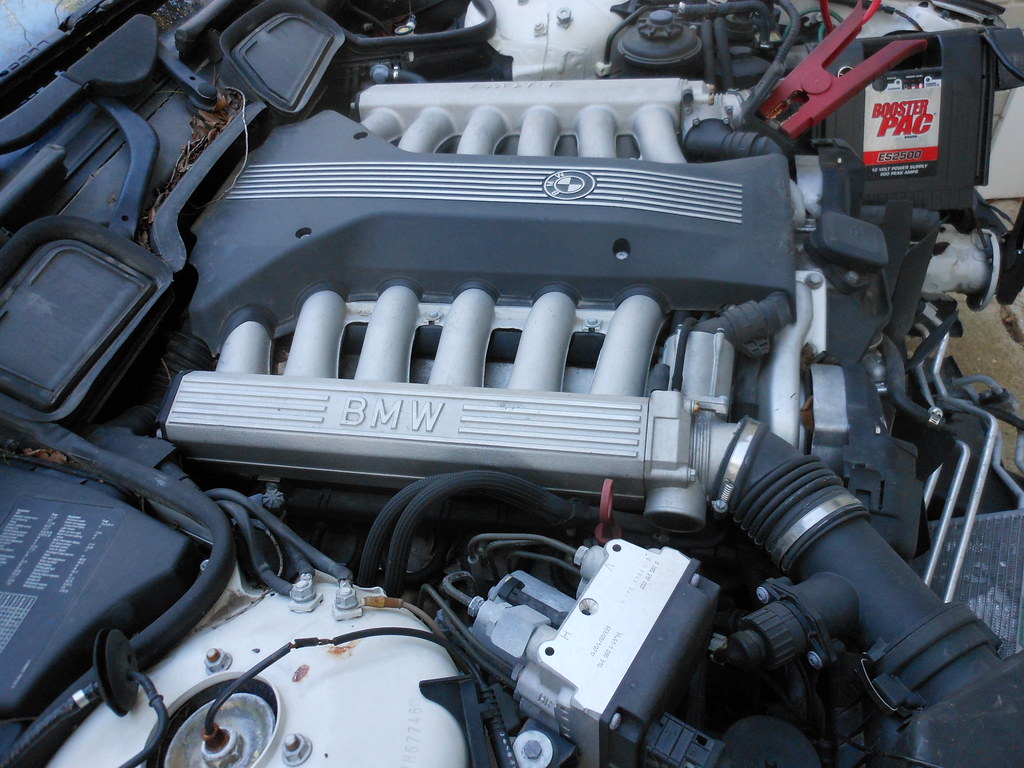 DSCN0661 by richardhayes454, on Flickr
The interior...it's wired and it works...just need some more electrical tape and solder!!!
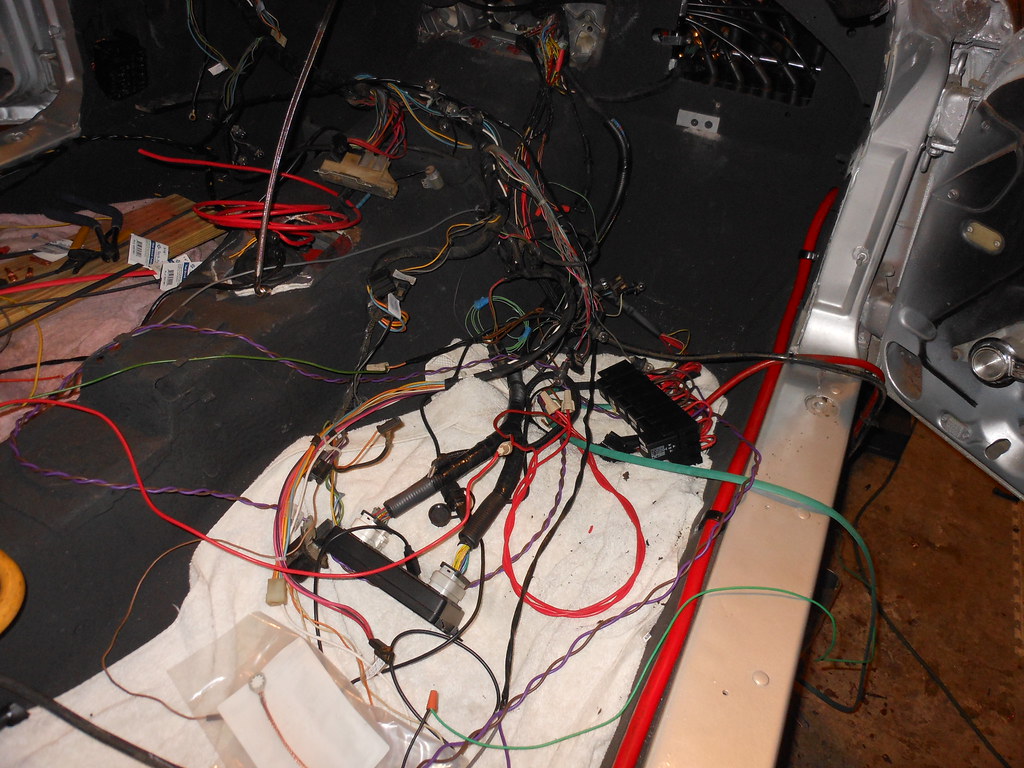 DSCN5052 by richardhayes454, on Flickr
Quick update- I'm still on track to do the Hot Rod Power Tour this June- have my hotels booked!!!
Here's the engine- starting to look like I want it to- clean- wires hidden- nice and shiny...need more aluminum polish!!
I used some aluminum u channels - hit it with the buffing wheel and neatened up the injector wiring- now it's all hidden- Going to make some endcaps for them, Couple more wires to relocate under the intakes- and get rid of the blue endcaps...
Got the coil packs all relocated- made the sparkplug wires...Next I'll make a cover to conceal the coils.
Bolt in the pedals- steering column- driveshaft and see if it can move under it's own power!!!
DSCN5053 by richardhayes454, on FlickrDSCN5054 by richardhayes454, on FlickrJust for reference- here was the engine to start with-
DSCN0661 by richardhayes454, on FlickrThe interior...it's wired and it works...just need some more electrical tape and solder!!!
DSCN5052 by richardhayes454, on Flickr

Melting Slicks


Joined: Apr 2002
Posts: 2,337
Likes: 14
From: Norfolk VA
My question is how did you get the car on those stacked blocks and how will you get it off. That corvette is definitely going to be a conversation topic for years to come. Great work.
Last edited by Oldguard 7; Dec 13, 2015 at 10:01 PM.
Thread Starter
Le Mans Master
Joined: May 2003
Posts: 8,881
Likes: 3,558
From: Fernandina Beach FL
2023 Restomod of the Year finalist
2020 C3 of the Year Winner - Modified
Thanks GUYS!!!!
Oldguard-the blocks slide together- as I have two heights- then put a carriage bolt through to keep them together.
UPDATE-
I have a cooling system now-
Made a aluminum tube to fit the top radiator hose to handle the steam post off the engine (LS engines have the same issue) Tapped and and used a -6 AN fitting.
 DSCN5129 by richardhayes454, on Flickr
Used weatherstripping to seal the radiator- off my BMW parts car!!!
 DSCN5098 by richardhayes454, on Flickr
Went w/ a Canton coolant tank- and added a -10AN hose to the back of the cylinder head coolant x-over pipe. Used -8AN hose to the radiator.
 DSCN5119 by richardhayes454, on Flickr
 DSCN5120 by richardhayes454, on Flickr
I have my electric parking brake working-
And since ditching the parking brake handle-I now have room for a REAL cupholder- as in electrically heated and cooled ( from a 2009-2013 Escalade)
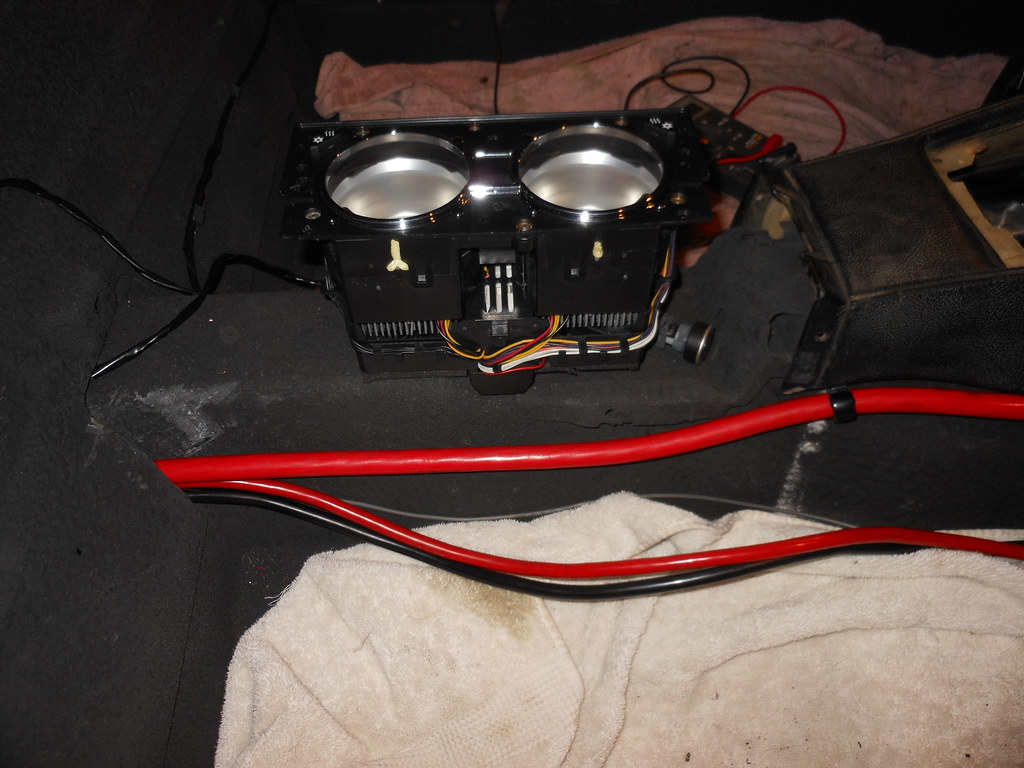 DSCN5117 by richardhayes454, on Flickr
I'm wiring the front of my car now-
Here's a nifty place for my headlight relays- next to the headlight motors-
 DSCN5113 by richardhayes454, on Flickr
I was able to tuck a pair of BMW horns next to the outside of the headlight frame- a pair on each side!!! It's loud w/ a snobby sound!!
 DSCN5124 by richardhayes454, on Flickr
Getting ready to wire the front lights- will have the turns flash from the side to the front - as I am using the same sequential modules used on the rear. Then have a separate circuit- LED strip lights and amber Halos for the parking-running clear lens.
 DSCN5125 by richardhayes454, on Flickr
Oldguard-the blocks slide together- as I have two heights- then put a carriage bolt through to keep them together.
UPDATE-
I have a cooling system now-
Made a aluminum tube to fit the top radiator hose to handle the steam post off the engine (LS engines have the same issue) Tapped and and used a -6 AN fitting.
DSCN5129 by richardhayes454, on FlickrUsed weatherstripping to seal the radiator- off my BMW parts car!!!
DSCN5098 by richardhayes454, on FlickrWent w/ a Canton coolant tank- and added a -10AN hose to the back of the cylinder head coolant x-over pipe. Used -8AN hose to the radiator.
DSCN5119 by richardhayes454, on FlickrDSCN5120 by richardhayes454, on FlickrI have my electric parking brake working-
And since ditching the parking brake handle-I now have room for a REAL cupholder- as in electrically heated and cooled ( from a 2009-2013 Escalade)
DSCN5117 by richardhayes454, on FlickrI'm wiring the front of my car now-
Here's a nifty place for my headlight relays- next to the headlight motors-
DSCN5113 by richardhayes454, on FlickrI was able to tuck a pair of BMW horns next to the outside of the headlight frame- a pair on each side!!! It's loud w/ a snobby sound!!
DSCN5124 by richardhayes454, on FlickrGetting ready to wire the front lights- will have the turns flash from the side to the front - as I am using the same sequential modules used on the rear. Then have a separate circuit- LED strip lights and amber Halos for the parking-running clear lens.
DSCN5125 by richardhayes454, on Flickr
Corvette Stories
The Best of Corvette for Corvette Enthusiasts

5 Best & 5 Worst Corvette Daily Drivers
Joe Kucinski
The Headlights of Every Corvette Generation Explained
Joe Kucinski
5 Best & 5 Most Overrated Corvette Track Packages of All Time!
Joe Kucinski
Every 2027 Corvette Engine Explained
Joe Kucinski
Designer Imagines A Corvette That Looks More Like a Corvette Than the Corvette
Verdad Gallardo
10 Ugly Corvettes That We Still Kinda Love
Joe Kucinski
Top 10 Most Expensive Corvettes Ever Sold on Bring A Trailer
Brett Foote
10 Things Every Corvette Owner Needs (2026 Edition)
Michael S. Palmer
8 Most "Only Corvette Owners Understand" Quirks and Problems
Pouria Savadkouei


Melting Slicks
Joined: Oct 2006
Posts: 2,193
Likes: 156
From: Navarre FL
Kinda makes me a little ashamed of my junk! Are you doing a write up on your lighting mods somewhere? I know guys are always talking about LED mods and would love to see your ideas (I know I would).
Thread Starter
Le Mans Master
Joined: May 2003
Posts: 8,881
Likes: 3,558
From: Fernandina Beach FL
2023 Restomod of the Year finalist
2020 C3 of the Year Winner - Modified
Thank you guys!!!!
I sort of missed my FIVE year anniversary of this thread a few days ago- it's taken way longer than I was ever thinking!!!
No really- there's a few times after you've messed w/ something that should be simple- and several hours later you still haven't got it to work or even fit-
And reading the kudos keeps me motivated!!! THANKS AGAIN!!!
Like how hard would it be to put a few headlights in?
Well the new bulb's (high beam) was to big to fit...so I had to cut it out- AND I didn't want to bugger it up-
Bulb-
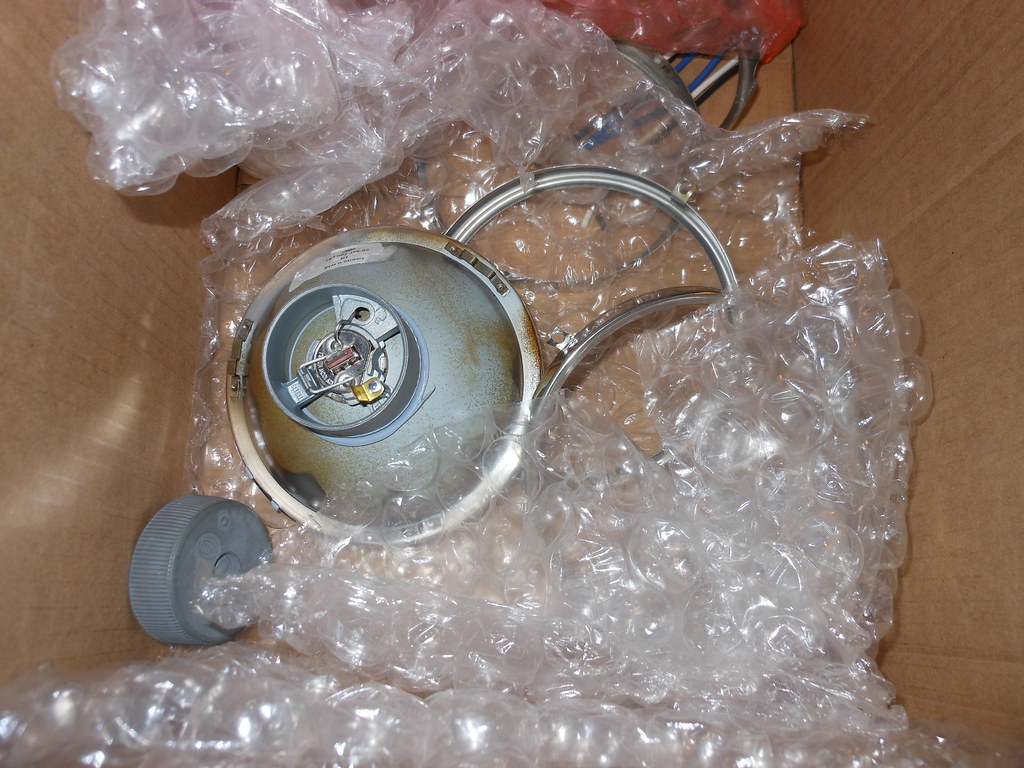 DSCN5145 by richardhayes454, on Flickr
Hole too small- so I vise-gripped a piece of metal behind to use as a pilot hole for the holesaw-
 DSCN5140 by richardhayes454, on Flickr
Metal removed- cut it pretty clean-
 DSCN5144 by richardhayes454, on Flickr
A few wires- upgraded the headlights to 12 gu- and ran 10gu to the terminal post-
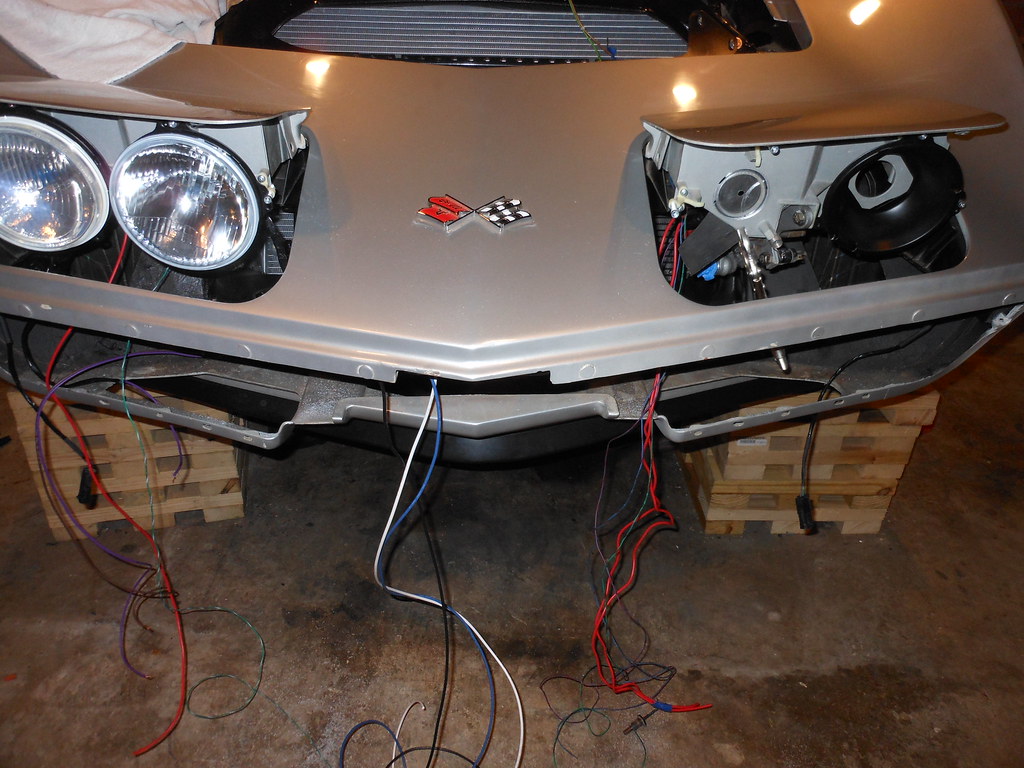 DSCN5143 by richardhayes454, on Flickr
finished - and tested. I use my jumpbox - has lots of juice and easy to connect- will wire tie & clamp to hide wires...
 DSCN5157 by richardhayes454, on Flickr
Fuse box- relay headlights
 DSCN5160 by richardhayes454, on Flickr
Headlight motors and horns-
 DSCN5161 by richardhayes454, on Flickr
Mounted-
 DSCN5162 by richardhayes454, on Flickr
Running the harness (trimmed back a bit from the original) for the headlights /turn signals/parking lights/horn- just wouldn't look good covered w/ split tubing or electrical tape
 DSCN5151 by richardhayes454, on Flickr
Had some AN12 ss hose laying around- heat shrinked the ends - and ran the wires through it-
 DSCN5153 by richardhayes454, on Flickr
Sort of looks like it's suppose to be there-
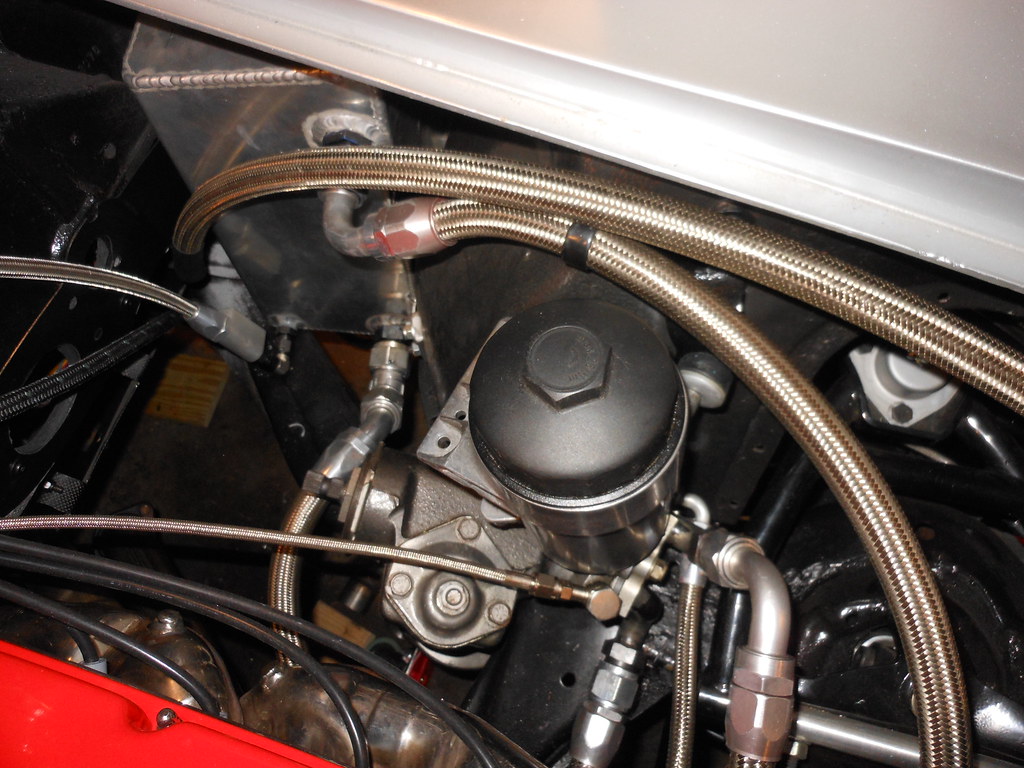 DSCN5154 by richardhayes454, on Flickr
Just connect- solder the wires- pull them back through- and I'm done w/ wiring under the hood!!!
 DSCN5155 by richardhayes454, on Flickr
I sort of missed my FIVE year anniversary of this thread a few days ago- it's taken way longer than I was ever thinking!!!
No really- there's a few times after you've messed w/ something that should be simple- and several hours later you still haven't got it to work or even fit-
And reading the kudos keeps me motivated!!! THANKS AGAIN!!!
Like how hard would it be to put a few headlights in?
Well the new bulb's (high beam) was to big to fit...so I had to cut it out- AND I didn't want to bugger it up-
Bulb-
DSCN5145 by richardhayes454, on FlickrHole too small- so I vise-gripped a piece of metal behind to use as a pilot hole for the holesaw-
DSCN5140 by richardhayes454, on FlickrMetal removed- cut it pretty clean-
DSCN5144 by richardhayes454, on FlickrA few wires- upgraded the headlights to 12 gu- and ran 10gu to the terminal post-
DSCN5143 by richardhayes454, on Flickrfinished - and tested. I use my jumpbox - has lots of juice and easy to connect- will wire tie & clamp to hide wires...
DSCN5157 by richardhayes454, on FlickrFuse box- relay headlights
DSCN5160 by richardhayes454, on FlickrHeadlight motors and horns-
DSCN5161 by richardhayes454, on FlickrMounted-
DSCN5162 by richardhayes454, on FlickrRunning the harness (trimmed back a bit from the original) for the headlights /turn signals/parking lights/horn- just wouldn't look good covered w/ split tubing or electrical tape
DSCN5151 by richardhayes454, on FlickrHad some AN12 ss hose laying around- heat shrinked the ends - and ran the wires through it-
DSCN5153 by richardhayes454, on FlickrSort of looks like it's suppose to be there-
DSCN5154 by richardhayes454, on FlickrJust connect- solder the wires- pull them back through- and I'm done w/ wiring under the hood!!!
DSCN5155 by richardhayes454, on Flickr
Last edited by Richard454; Apr 23, 2015 at 01:07 AM.

Thread Starter
Le Mans Master
Joined: May 2003
Posts: 8,881
Likes: 3,558
From: Fernandina Beach FL
2023 Restomod of the Year finalist
2020 C3 of the Year Winner - Modified
Thanks!!!
Was able to "hide" all the wires under the u channel over the fuel injectors- also made a mount for the air temp sensor (back left)....
 DSCN5168 by richardhayes454, on Flickr
Now that I have the engine looking pretty much like I envisioned it- I scored a small block hood on CL cheap- that I will eventually cut up and have a lexan window...Haven't quite figured how I wanna make it look
 DSCN5171 by richardhayes454, on Flickr
Got the Vintage Air condenser/Dryer/lines in- was sort of a pain-would have been a lot easier to drill holes for the lines BEFORE I put the radiator in. I used a Voltage regulator cover had laying around to conceal the relays for the Spal Fans (gray box)
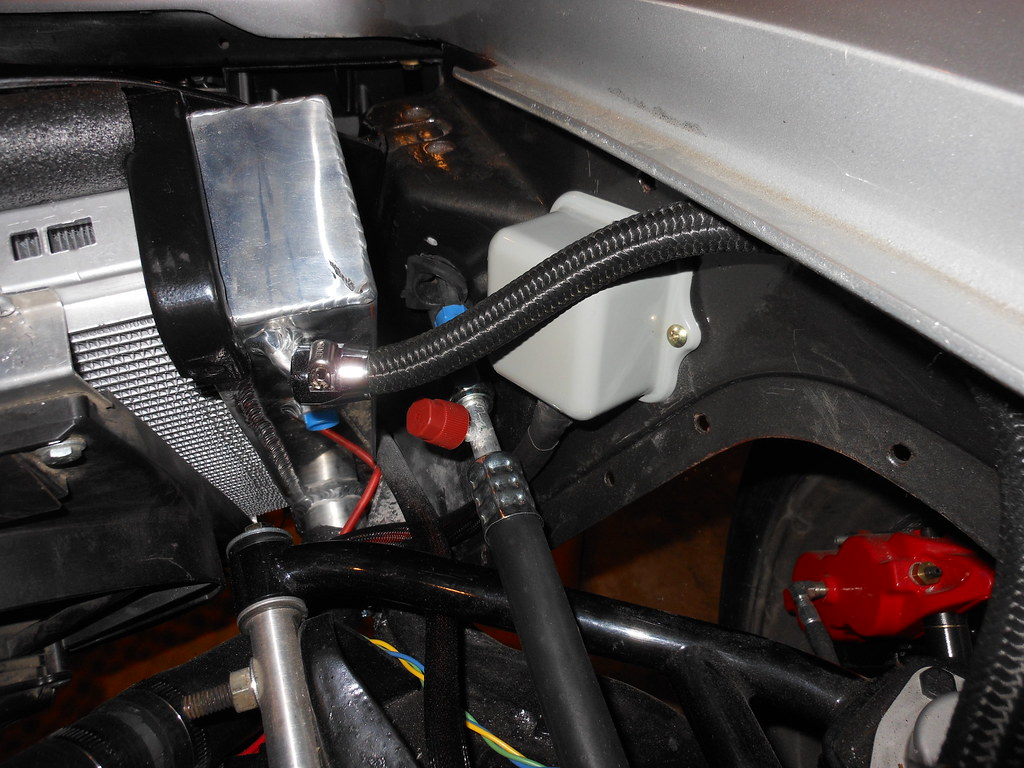 DSCN5180 by richardhayes454, on Flickr
Just about finished all the wiring- well except for the stuff I'll add as the interior goes in-heated seats/power windows/power door locks.
I have placed the ECU brain in the console - then I can have the USB port inside the console- and if I ever need to get to the ECU it'll be relatively easy.
Have the power terminal blocks inside the dash-sort of easy access- as the Vintage air will be wired there and the fuse block and what's left of the 'factory harness.'
Mounted the relay/fuses- to add my accessories I'll just clip the wire in the fuse panel. Only have 2 wires to connect to the factory harness!!! Ignition switch & tach- everything else has it's own relay/fuse bank. The wire nuts are for the O2 sensor- as I will shorten the harness when the exhaust is finalized.
Before-
 DSCN5172 by richardhayes454, on Flickr
After-
1/0 gu on left goes right to the alternator- one on the left goes directly to the starter.
 DSCN5177 by richardhayes454, on Flickr
Should all fit inside my console...
 DSCN5179 by richardhayes454, on Flickr
And here's one of my BEST mods-
If you have EVER had to jumpstart your vette- you know what a pain it is-
I pulled this cable/terminal off my BMW parts car. It give you a really easy accessible place to jump start - and the cable goes right to the starter where the power is needed.
Has a cover that covers the terminal when not in use.
 DSCN5181 by richardhayes454, on Flickr
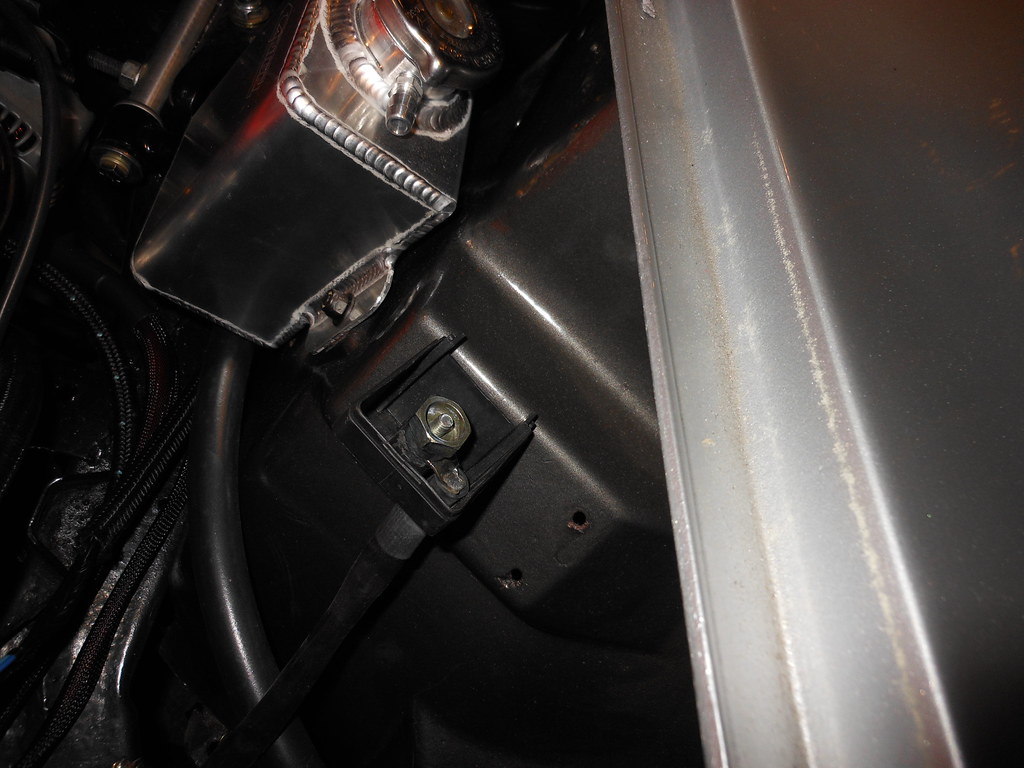 DSCN5182 by richardhayes454, on Flickr
Was able to "hide" all the wires under the u channel over the fuel injectors- also made a mount for the air temp sensor (back left)....
DSCN5168 by richardhayes454, on FlickrNow that I have the engine looking pretty much like I envisioned it- I scored a small block hood on CL cheap- that I will eventually cut up and have a lexan window...Haven't quite figured how I wanna make it look
DSCN5171 by richardhayes454, on FlickrGot the Vintage Air condenser/Dryer/lines in- was sort of a pain-would have been a lot easier to drill holes for the lines BEFORE I put the radiator in. I used a Voltage regulator cover had laying around to conceal the relays for the Spal Fans (gray box)
DSCN5180 by richardhayes454, on FlickrJust about finished all the wiring- well except for the stuff I'll add as the interior goes in-heated seats/power windows/power door locks.
I have placed the ECU brain in the console - then I can have the USB port inside the console- and if I ever need to get to the ECU it'll be relatively easy.
Have the power terminal blocks inside the dash-sort of easy access- as the Vintage air will be wired there and the fuse block and what's left of the 'factory harness.'
Mounted the relay/fuses- to add my accessories I'll just clip the wire in the fuse panel. Only have 2 wires to connect to the factory harness!!! Ignition switch & tach- everything else has it's own relay/fuse bank. The wire nuts are for the O2 sensor- as I will shorten the harness when the exhaust is finalized.
Before-
DSCN5172 by richardhayes454, on FlickrAfter-
1/0 gu on left goes right to the alternator- one on the left goes directly to the starter.
DSCN5177 by richardhayes454, on FlickrShould all fit inside my console...
DSCN5179 by richardhayes454, on FlickrAnd here's one of my BEST mods-
If you have EVER had to jumpstart your vette- you know what a pain it is-
I pulled this cable/terminal off my BMW parts car. It give you a really easy accessible place to jump start - and the cable goes right to the starter where the power is needed.
Has a cover that covers the terminal when not in use.
DSCN5181 by richardhayes454, on FlickrDSCN5182 by richardhayes454, on Flickr




Le Mans Master
Joined: Oct 2007
Posts: 7,462
Likes: 985
From: RI, Now Franklin/Nashville TN
This exactly my sentiments^^^^ about PhotoBucket....I will be transferring my remaining photos to my computer and then photobucket can rot in hell.....I would never use them again even if they go free again! Hilarious!
Last edited by jb78L-82; Aug 21, 2017 at 06:41 AM.

Melting Slicks
Joined: Aug 2012
Posts: 3,487
Likes: 83
From: Titusville Florida
I've not heard of this, guess I need to do some transferring myself!
Thread Starter
Le Mans Master
Joined: May 2003
Posts: 8,881
Likes: 3,558
From: Fernandina Beach FL
2023 Restomod of the Year finalist
2020 C3 of the Year Winner - Modified
Yep... a lot of digital waste now on DIY and build threads without pictures...
I'm slowly redoing the pics - and will update too..
Richard
Thanks- and I was lucky as my car (owned since 1980)was a southern no rust car...
I'm slowly redoing the pics - and will update too..
Richard
Thanks- and I was lucky as my car (owned since 1980)was a southern no rust car...
Drifting


Joined: Apr 2007
Posts: 1,970
Likes: 45
From: Cameron Park CA
A 1911 (handgun) forum I belong to is considering hosting photos for members for a small fee of $10.00 a year. It would be only for photos posted on that forum, not universal.
Perhaps Corvette Forum could do likewise.
Perhaps Corvette Forum could do likewise.