When you click on links to various merchants on this site and make a purchase, this can result in this site earning a commission. Affiliate programs and affiliations include, but are not limited to, the eBay Partner Network.
And before a small snowboarding break... let’s get a closer look at the drive shaft. The suspected source of the 60mph vibration.
Cleaning up the drive shaft was pretty straight forward. Interesting to note at this point how small the balancing weight is.
The caps are color-coded because the amount of grease on the non-greasable ones are set.
Overall tapping these out and the new ones back in was fairly easy.
I had to search around a bit to find the right place... and this looks to be it. Only two in country can balance drive shafts with U-joints. It turns out the owner was a former C3 owner.
Compared to above... check out the size of the balancing weights. This looks like quality work compared to what I presume was still an OEM job. They turned it around in less than 24 hours for $85. Hmmmm- I think it is a fair-ish price
Last edited by DorianC3; Feb 21, 2020 at 05:53 AM.
Wouldn’t you know... coming back from Austria on a 13 hour bus ride, it turns out that one of the passengers was diagnosed with COVID-19. So Uncle Sam put me on self-quarantine for two weeks
So, all work no play makes Jack...
Drive shaft installed. There is a lot less play in it now. Also, we know it is balanced and marked for future reference
All this dirt came out of the control arm pivot pocket.
These bits of rust were plugging the drain hole. I could not find anything structurally compromised. I think these are bits of shims !
Composite spring installed. The puzzling bit is that the spring is supposed to be for carriers with 9/16 cover bolts. Mine are at least 5/8 if not larger. The drive shaft U-joint is one of adapter types.
The booster is 0.5 inch short. The plan is to grind off the stud and weld on this bolt that I salvaged. It a very unusual fine thread. This will give my brake pedal full travel.
Removing I-joints from the half shaft. The old trick of bolting the spindle drive for support.
The U-joints look so far reasonable. This was the worst so far.
Often the same, the first half-shaft drives you nuts By the time you get to the last U-joint. Same for brake calipers. By the time you get to the last one, yer wondering why you were pulling out your hair.
Polished these as best I could then a light coat of grease. And the dirt caked on there was phenomenal.
I wish that I had taken more pics to document but I was in a rage for a while and entirely too focused on getting the job done. With a lick of paint, all that is required now is greasing. Note to self: do not blow off the caps when doing that.
Roll these on... as simple as that.
Easiest way I found of doing this was to slide on the dust boot with the piston before installing. I’ve done lip seals before. These O-rings are crazy easy. Just coat bite and O-rings with brake fluid before pressing in.
If you are going to do this, it is far easier with a socket. This one was left over from my Karmann Ghia project, it happened to be the perfect size. 36mm I think.
In order to make sure the O-rings between the caliper halves do not slide out of place, I slid the bolts through, threaded them 2/3 of the way and the calipers neatly dropped into place.
There, we can box these now... they are ready to go.
I have a rally race planned for March 22, so this fella really needs to be up and running by then.
The number of things remaining to do is shrinking. The wheel bearings and trailing arm bushings still need to be done.
The rear suspension needs to be reassembled.
The brakes have to go back on and be bled.
The rear geometry will also have to be done.
The modified travel for brake and clutch pedals go in.
If I have time I will replace the 160 thermostat with a 180; replace the alternator bracket and replace the 350’s rear main seal to get rid of that pesky oil leak.
There’s more to do, but at least I’ll be back on four patches of rubber.
So, when you get all this done, what are you going to do on Sunday?
Time to start working on this kit. They put a lot of emphasis on using anti-seize.
The spacers did not immediately fit. So I spent quite a bit of time sanding them and test fitting. Fortunately they are made out of aluminum.
There, that feels good !
These plates as well did not immediately fit and required some sanding. Again, fortunately aluminum.
Shims were provided but not enough to cover the play. I’ll need to install some washers.
The scary part is making triple sure that all the joints are in the right place. That’s why the struts are already in there to make sure the outer ones are correct.
I used Hammerite satin black. Seems to be good quality.
And this is 1969 quality
Mocking things up because once the spindles are pressed in, that’s it.
Stainless steel hardware. It’s the brakes after all and I don’t want to have to do this over anytime soon. As a friend of mine said... you’ll be too old then. Do it right now.
So far so good...
And here’s a problem, the shield will need to be ground out a bit. Glad I checked this.
First carefully clean and lightly grease. Then toss the trailing arm into the jig.
Still in the jig. Just a different view. Make sure the bushings are as level as possible.
Because the nuts will not reach the threads. I had to pound it a few times with a plastic hammer or with a wood 2x4. Wallop away to get the bushings started and to expose enough threads to get the nuts on. Then crank down evenly.
I thought I had a pic of the flaring mandrel. Just tighten away on the bolts. It will suddenly be much more difficult to tighten them, that is your cue to flare. Pound away with a BFH. This turned out to be an easy-ish job; for both sides !
Tapping in the bearing races. I hate this part. Always worried that I’ll screw it uo.
(...)
The next stp is putting together the bearings in the carrier plus the space and selected shin to check the end play between 1 and 8 thou. I got 2.5 and 5. thou. That’s as tight as I could make it.
Rats. I forgot to take a pic of the tool I used to press the bearings inn
Make sure these tabs are bent over.
Again, I forgot to take a detailed pic of the tool I’m using. It worked quite well.
Rebuild the trailing arms was not that big of a deal. (Assuming the wheels don’t fall off.) These are heavy pieces. What it would have cost me in shipping was more than the tools. Add over $300 a piece for the rebuild, it was a no-brainer.
At this point the brakes need to go back together; parking brakes as well. Everything needs to be greased. The booster need to be modified. The modified Z-bar needs to go in. Bleeding. Torque to spec. New dipstick tube... Easy. There’s light at the end of the tunnel.
New brake hoses. Really glad I replaced those. Nothing like fresh rubber for brakes.
Soooo - I was a bit skeptical about this fella but turned out super happy with it. I mean, really happy !!!! I think it took me 10 minutes tops to bleed all four calipers. I pumped it up to 14 PSI. That was perfectly enough.
One piece of advice I took from other who have used it before me, use a giant (vintage) C-clamp. It does indeed keep the air pressure better.
Just crack open the bleeds and you’re done in seconds on that caliper. No monkeying around opening and closing. It just presses the brake fluid out in one shot - smooth !
Sooo, I got the rest of my suspension in. Brakes are bled. Parking brake is still not adjusted.
The rear spring was far easier than I expected to install. In fact the kit left no instructions on how to install the spring... only how to remove the steel one.
I thought it looked a little high in the rear so I adjusted the nut all the way down.
My spring bolts are longer than stock, but is still seems to be sitting too high. Hopefully this will settle after some more driving. I am not sure I'd dare put in bolts any longer than these. I think the are 8-inch.
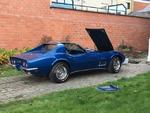
Gentlemen, I want to thank all of you for your excellent advice. The Corvette (I still have to find a name for it) is back on four patches of rubber. And while I have yet to get a four-wheel alignment done (something that was impossible with the old, perished rubber and seized struts) I already took it out for a test drive ...I can already say: the results are stunning. Granted, it is still a work in progress but the apprehension that came with casually driving this car is gone. I thought some of this was endemic to driving a vintage corvette: it's supposed to be scary. At this point, I haven't even begun to push it yet and I feel it can take more. It seems very predictable and I am very impressed. Thank you all !
The power brake conversion and clutch pedal seem to be operating perfectly now.
The rear of the driveline also feels smooth.
A couple of things left: the rear seems too high and... there is still a vibration. When I installed the drive shaft, I still noticed a lot of wiggle in the new yoke. The one that was in the car was quite battered. It stands to reason the the tail-housing bushing is shot. That vibration that starts up at 50 MPH really spoils the experience. I have ordered from Amazon what I think is the correct puller and installer + seal and new bushing. I reeeeally hope this solves my issue. It would make all the difference between a pleasant driving experience and With all the other sources of vibration seemingly addressed, it does feel like that bushing is the source.
Tomorrow, the alignment will be done. The shop is only a mile or two away. Until I replace this bushing I'll be staying under 50 MPH.
Last edited by DorianC3; Mar 16, 2020 at 09:54 AM.
Interesting. I did a Google search and it turns out that Muncies do not vibrate much (according to the source). It is almost never the input shaft.
However, "New extension housing bushings and driveshaft yokes usually have no more than .005-inch clearance. That's only .0025 on the surface. If the yoke, rear bushing, or pilot bushing are worn, you can get a vibration."
My pilot bushing is new and quite tight.
In the rear, I have WAY more than than .005 ! .005 should not be visible and almost barely audible.
I am guessing I have closer to .080-inch clearance... just eyeballing it.
This may be the silver bullet I am looking for.
Last edited by DorianC3; Mar 16, 2020 at 10:48 AM.
Another member on the forum just replaced his rear differential.
When he set the car down he was not happy with the ride height so he loosened everything back up, then loaded 350 lbs of weight in the interior, then torqued everything back up again.
Doing this brought the ride height to the perfect measurement.
Another member on the forum just replaced his rear differential.
When he set the car down he was not happy with the ride height so he loosened everything back up, then loaded 350 lbs of weight in the interior, then torqued everything back up again.
Doing this brought the ride height to the perfect measurement.
Designer Imagines A Corvette That Looks More Like a Corvette Than the Corvette
Slideshow: A Jaguar designer's personal project imagines what a modern front-engined Corvette might look like if Chevrolet revisited the golden age of the Stingray.






 it to the point I will not be able to reassemble


 By the time you get to the last U-joint. Same for brake calipers. By the time you get to the last one, yer wondering why you were pulling out your hair.







 ...I can already say: the results are stunning. Granted, it is still a work in progress but the apprehension that came with casually driving this car is gone. I thought some of this was endemic to driving a vintage corvette: it's supposed to be scary. At this point, I haven't even begun to push it yet and I feel it can take more. It seems very predictable and I am very impressed. Thank you all !
  With all the other sources of vibration seemingly addressed, it does feel like that bushing is the source.

 .005 should not be visible and almost barely audible.